 and
and 

How to set up a Node-RED server to receive NMEA remotely

GNSS RTK technology can be used in many applications, usually you would take some measurements and then you would export them to a computer to analyze the data. This is the most common case.
But for certain applications, you may need to send your GNSS RTK data to your computer/server in real time, so you can take actions immediately without waiting a few hours to process the data.
Popular applications that require real time position being sent to a server include: fleet management and logistics, ride-hailing and public transport, asset tracking, wildlife monitoring, …
In this tutorial, we will explain how to set up a server with Node-RED, which is a popular tool for visual programming, so you can start your own project, we will also cover how to configure your GNSS receiver and plugin to send the data to this server.
Required hardware
- Remote Linux server
Although we will use the above in our example, you can also run Node-RED locally on a Windows/Linux machine, on a RaspberryPi, Docker, Android, Cloud, … - Android smartphone
- RTK Portable Bluetooth Kit
- As an alternative, any other GNSS receiver with 4G NTRIP Master, WiFi NTRIP Master or Ethernet NTRIP Master plugins
Required software
- GNSS Master app for Android
Installation of Node-RED
Remote Linux server
In our case we are using AlmaLinux distribution.
Open a terminal to your server and run the following commands:
sudo dnf module reset -y nodejs
sudo dnf module enable -y nodejs:20
sudo dnf install -y nodejs npm gcc-c++ make
# then:
sudo npm i -g --unsafe-perm node-red
You can check if installation is successful by typing:/usr/local/bin/node-red --version
If everything is ok, you will see the version displayed on the terminal.
Other devices/OS
You can find instructions on the official Node-RED project page for different sytems.
Open TCP port on your server
This may not always necessary but you may need to open the TCP port to allow incoming connections.
We will use TCP port 2222 during all this example, you should type on your server terminal:iptables -A INPUT -p tcp --dport 2222 -j ACCEPT
Run Node-RED
Type this command: /usr/local/bin/node-red &
Go to your browser and type:
172.123.123.123:1880
Where 172.123.123.123 must be the IP address of your server.
If everything is ok, you should see something like this:

Prepare your first flow
In Node-RED, projects are called Flows.
We will prepare a new flow to listen to incoming TCP connections and to print whatever is received into a debug window.
Search on the left panel, the node called tcp in, drag and drop it to te flow canvas.
Search also the debug node and connect them together like this:
Double click on the tcp in node and set the TCP port where you want to listen to, in this example: 2222.
Set also to stream strings delimited by \r\n.
After doing this click the Deploy button on the top right of the screen.
This button will run the blocks after any modification.

Connect your GNSS receiver to Node-RED
RTK Portable Bluetooth Kit with Android device
- Connect your Portable Bluetooth Kit via BT to your Android device.
- Open GNSS Master app, connect to the BT module in GNSS Receiver Connection.
- Set Correction Input if needed
- On Receiver Data Output, select TCP Client and enter the IP address of your server into TCP Address and 2222 in TCP Port. Click Connect.
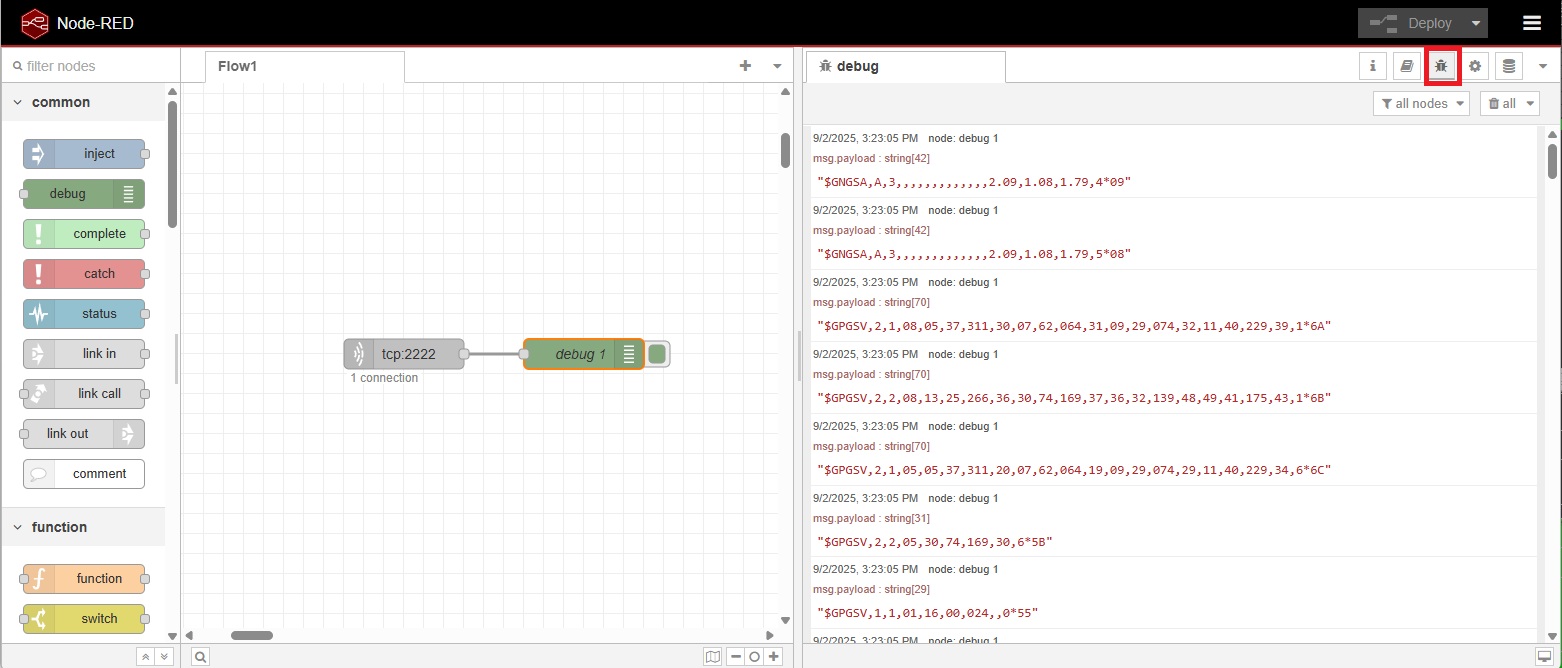
- That’s all, if you double click on the debug window in Node-RED you should see something like this, with all the data being received:
Other GNSS receivers with 4G, WiFi or Ethernet plugins
If you have a different GNSS receiver you can also achieve the same results, even without an Android device.
Make sure to output to the XBee plugin COM port the messages you want to send to your server, usually you want to send, at least, NMEA GGA.
Then, configure your 4G, WiFi or Ethernet NTRIP Master plugins with the TCP client functionality with the same parameters as we have done before, TCP server is your server IP address, TCP port is 2222.
As simple as that 🙂
Do something with the data
Ok, so far not very exciting right?
It is ok to see live NMEA streams on your server, but we want to see some of the capabilities of Node-RED.
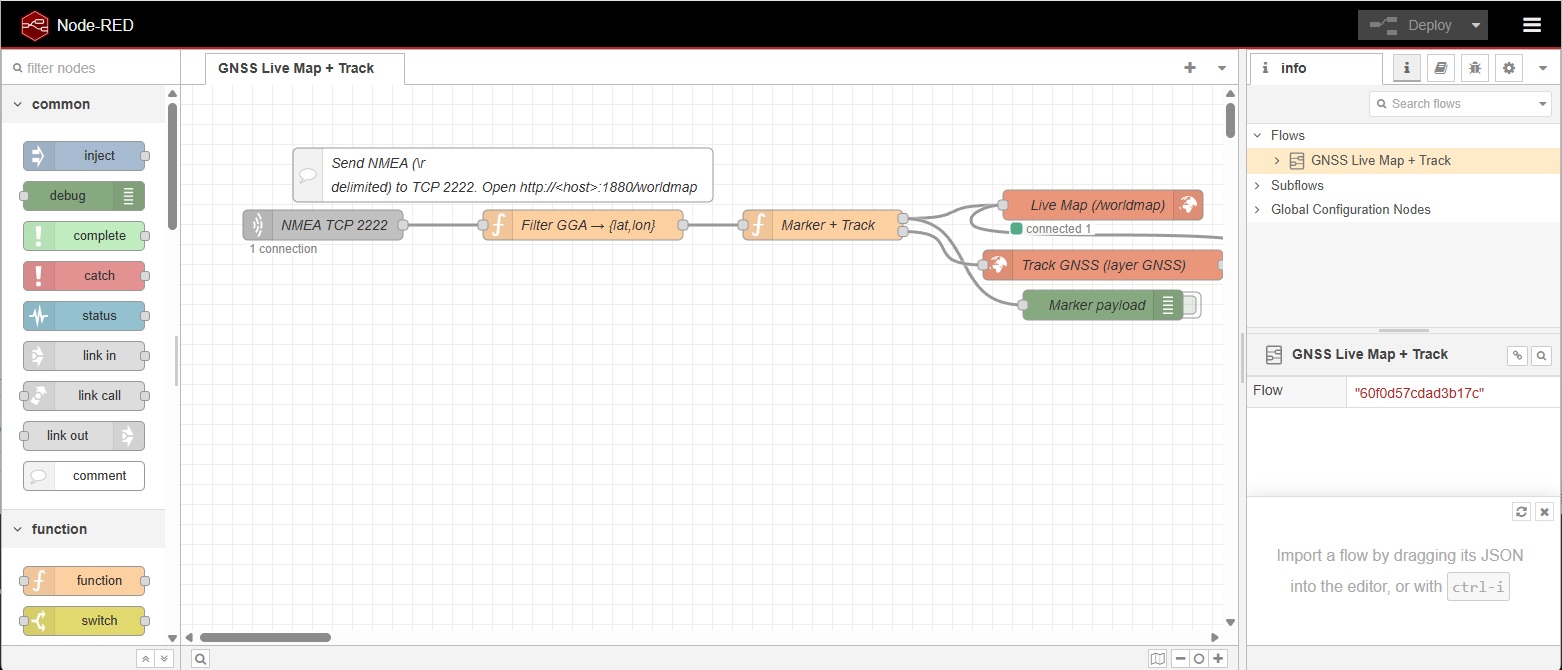
In the next example, we will show you how to parse the input stream to get the latitude and longitude and we will plot the live location in a map with a trace showing old locations.
First of all, delete your current flow.
Click on the top right menu > Manage palette > Install > search for node-red-contrib-web-worldmap and install it.
Go back to the menu > Import > Clipboard and paste the following code:
     [
  {
    "id": "tab1",
    "type": "tab",
    "label": "GNSS Live Map + Track",
    "disabled": false,
    "info": ""
  },
  {
    "id": "tcpInNmea2222",
    "type": "tcp in",
    "z": "tab1",
    "name": "NMEA TCP 2222",
    "server": "server",
    "host": "",
    "port": "2222",
    "datamode": "stream",
    "datatype": "utf8",
    "newline": "\\r\\n",
    "topic": "",
    "base64": false,
    "x": 150,
    "y": 140,
    "wires": [
      [
        "fnGGA"
      ]
    ]
  },
  {
    "id": "fnGGA",
    "type": "function",
    "z": "tab1",
    "name": "Filter GGA → {lat,lon}",
    "func": "// Allman style\nfunction nmeaToDecimal(raw, hemi)\n{\n    if (!raw || !hemi)\n    {\n        return null;\n    }\n    const isLat = (hemi === 'N' || hemi === 'S');\n    const degDigits = isLat ? 2 : 3;\n    const deg = parseInt(raw.slice(0, degDigits), 10);\n    const min = parseFloat(raw.slice(degDigits));\n    if (Number.isNaN(deg) || Number.isNaN(min))\n    {\n        return null;\n    }\n    let dec = deg + (min / 60.0);\n    if (hemi === 'S' || hemi === 'W')\n    {\n        dec = -dec;\n    }\n    return dec;\n}\n\nif (typeof msg.payload !== 'string')\n{\n    return null;\n}\n\nconst line = msg.payload.trim();\nif (!line.startsWith('$') || line.indexOf('GGA,') === -1)\n{\n    return null;\n}\n\nconst f = line.split(',');\nconst lat = nmeaToDecimal(f[2], f[3]);\nconst lon = nmeaToDecimal(f[4], f[5]);\nif (lat == null || lon == null)\n{\n    return null;\n}\n\nmsg.payload = { lat, lon };\nreturn msg;",
    "outputs": 1,
    "noerr": 0,
    "initialize": "",
    "finalize": "",
    "libs": [],
    "x": 410,
    "y": 140,
    "wires": [
      [
        "fnToWorldmap"
      ]
    ]
  },
  {
    "id": "fnToWorldmap",
    "type": "function",
    "z": "tab1",
    "name": "Marker + Track",
    "func": "// Input: msg.payload={lat,lon}\n// Output1 → worldmap marker\n// Output2 → worldmap-tracks polyline (then wired into worldmap)\n\nif (!msg.payload || msg.payload.lat == null || msg.payload.lon == null)\n{\n    return null;\n}\n\nconst lat = Number(msg.payload.lat);\nconst lon = Number(msg.payload.lon);\nconst name = \"GPS-1\"; // keep constant per device\nconst now = Date.now();\n\nconst base =\n{\n    name: name,\n    lat: lat,\n    lon: lon,\n    layer: \"GNSS\",\n    time: now, // helps pruning\n    icon: \"fa-location-arrow\",\n    popup: `Lat: ${lat.toFixed(6)}<br>Lon: ${lon.toFixed(6)}<br>UTC: ${new Date(now).toISOString()}`\n};\n\nreturn [ { payload: base }, { payload: base } ];",
    "outputs": 2,
    "noerr": 0,
    "initialize": "",
    "finalize": "",
    "libs": [],
    "x": 650,
    "y": 140,
    "wires": [
      [
        "worldmap",
        "dbgMarker"
      ],
      [
        "tracks"
      ]
    ]
  },
  {
    "id": "tracks",
    "type": "worldmap-tracks",
    "z": "tab1",
    "name": "Track GNSS (layer GNSS)",
    "depth": "1000",
    "layer": "GNSS",
    "doors": "",
    "x": 930,
    "y": 180,
    "wires": [
      [
        "worldmap"
      ]
    ]
  },
  {
    "id": "worldmap",
    "type": "worldmap",
    "z": "tab1",
    "name": "Live Map (/worldmap)",
    "lat": "0",
    "lon": "0",
    "zoom": "2",
    "layer": "OSM",
    "cluster": "",
    "maxage": "",
    "usermenu": "show",
    "layers": "show",
    "panit": "false",
    "panlock": "false",
    "zoomlock": "false",
    "hiderightclick": "false",
    "coords": "none",
    "showgrid": "false",
    "showruler": "false",
    "showlayer": "true",
    "showmenu": "true",
    "path": "/worldmap",
    "overlist": "DR,CO,RA,DN,HM",
    "maplist": "OSM,Esri Terrain,Esri Satellite",
    "mapname": "",
    "mapurl": "",
    "mapopt": "",
    "kmlurl": "",
    "devicelabel": "name",
    "layercontrol": "false",
    "x": 930,
    "y": 120,
    "wires": []
  },
  {
    "id": "dbgMarker",
    "type": "debug",
    "z": "tab1",
    "name": "Marker payload",
    "active": false,
    "tosidebar": true,
    "console": false,
    "tostatus": false,
    "complete": "payload",
    "statusVal": "",
    "statusType": "auto",
    "x": 930,
    "y": 220,
    "wires": []
  },
  {
    "id": "hint",
    "type": "comment",
    "z": "tab1",
    "name": "Send NMEA (\\r\\n delimited) to TCP 2222. Open http://<host>:1880/worldmap",
    "info": "",
    "x": 330,
    "y": 90,
    "wires": []
  }
]
You should see something like this:
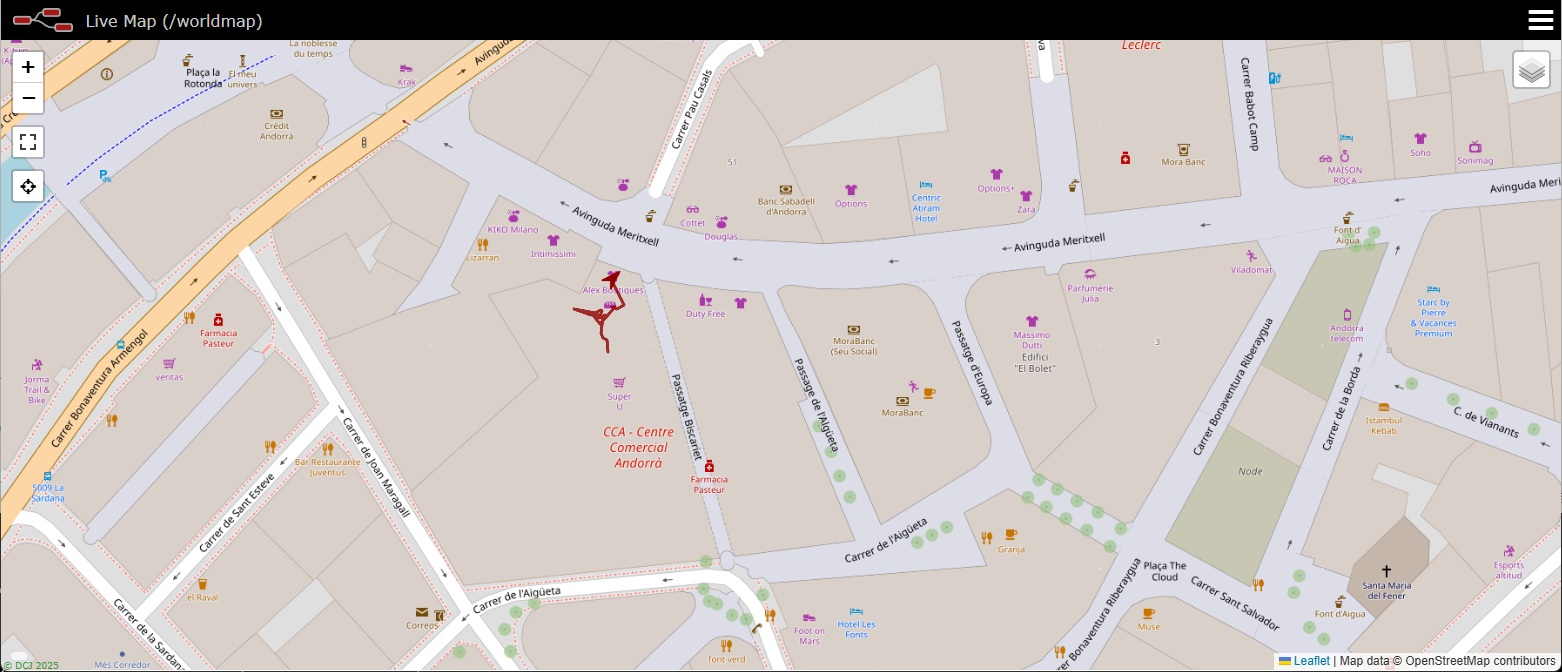
Double click the worldmap node.
On the Map list dropdown, select OpenStreetMap or another layer, click Done:

Press the Deploy button.
You can access from your browser to the live map here:
172.123.123.123:1880/worldmap/
where the IP address must be the same as your server’s one.
You will see a map with a marker showing your GNSS receiver location, updating in real time, you can zoom in/out at your pleasure.
We recommend you to take a look at each of the nodes on your flow to better understand what they do, modify them and see what changes.
You will find plenty of tutorials and AI tools will also help you if you want to do something a bit more advanced.
Have fun!
If you want to shutdown Node-RED, please do the following:iptables -A INPUT -p tcp --dport 2222 -j REJECT
type ps aux | grep node , find the node process if and kill the process by:kill NODE_PROCESS_ID

RTK Assistant
Find the best products for your application in just a few questions.

