Meet our team in San Diego, United States, from Tuesday 23 until Thursday 25 of April at XPONENTIAL, booth 4700

Update (02/05/2024): We have plenty of stock of all our products, find us also in and    Shop now

Meet our team in San Diego, United States, from Tuesday 23 until Thursday 25 of April at XPONENTIAL, booth 4700

How to use ArduSimple RTK receivers and get GPS data in ROS

In this tutorial we explain how to use ArduSimple RTK receivers to get precise positioning data in ROS. We will guide you through the steps to integrate ArduSimple RTK receiver into your ROS project, allowing you to harness the power of accurate GPS data.

Whether you’re a robotics enthusiast, researcher or developer, this tutorial will provide you with the steps to access positioning data in your ROS applications.

If you are new to ROS, we have prepared a short tutorial to help to get started with ROS to learn more about key terms of ROS, what platform and development environment it is better to choose etc.

Required hardware:

Required software:

  • Ubuntu 18 or 20 (in this tutorial we use Ubuntu 20) installed natively on a PC 
  • ROS (we use ROS Noetic).

How to use ArduSimple RTK receivers and get GPS data in ROS?

Firstly, connect and configure RTK Receiver in Ubuntu.

  1. Plug the RTK antenna to your receiver. Place the antenna in a location with good view of the sky, or near a window for testing the functionality.
  2. Connect your receiver to the PC via the USB port labeled with “POWER+GPS.”
  3. Your receiver should be automatically configured. To verify this, open Terminal and type the command:
				
					ls /dev/tty*
				
			
  • You will see the “/dev/ttyACM0” has been created automatically.
  1. To verify the stream from your RTK receiver, use the command:
				
					sudo cat /dev/ttyACM0
				
			
  • The GPS input stream shows similar to the below:
  • Press Ctrl+C to cancel seeing the stream.
  1. To prevent the RTK receiver from starting in a different “ttyACM*” each time when it is powered, create a udev rule (a dynamic link) that creates an entry with a specific name by adding the following file before connecting the RTK receiver.
				
					sudo nano /etc/udev/rules.d/50-ardusimple.rules
				
			
  1. Enter the following text to the rule:
				
					KERNEL=="ttyACM[0-9]*", ATTRS{idVendor}=="1546", ATTRS{idProduct}=="01a9", SYMLINK="tty_Ardusimple", GROUP="dialout", MODE="0666"
				
			
  1. Press Ctrl+X to exit the file and press Y to save modified buffer.
  2. Now whenever an RTK receiver is connected, it will be accessible from the “/dev/tty_Ardusimple” link. To check this, disconnect RTK receiver (unpower and power again) and enter the commands:
				
					sudo service udev reload
sudo service udev restart
sudo udevadm trigger
ls /dev/
				
			
  1. Now you can see that “tty_ArduSimple” has been created.
  1. In order to use the U-center program in Ubuntu, install Wine. It is a collection of Linux libraries that enable many Windows applications to run on Linux distributions (on Ubuntu among others).
    It does not make the U-center software fully compatible, but it can be used in case you want to check the status or configuration of your RTK receiver.
    To install Wine (the installation may last 2-3 minutes), use the command:
				
					sudo apt install wine64  //if Ubuntu is installed natively
sudo apt install wine32  //if you run Ubuntu on a virtual machine


  1. Once Wine is installed, it is possible to install U-Center in Ubuntu, as if it were Windows. Open Firefox Web Browser and download the U-Center program from the official website: https://www.u-blox.com/en/product/u-center.
  1. Once u-center is downloaded, go to the Download folder and extract the u-center on the Desktop.
  1. To start the installation of u-center software, type the command:
				
					cd ~/Desktop/
wine ./u-center_v22.07.exe


  1. Install u-center like you are in Windows by following the installation steps.
  2.  To create a COM1 port, open Terminal and enter the following command to make a link to RTK receiver in the folder “~/.wine/dosdevice”.
				
					ln -sf /dev/tty_Ardusimple ~/.wine/dosdevices/com1
				
			
  1. Close u-center if you have it opened. Open u-center.
  2. Connect to your RTK receiver in u-center by pressing Ctrl+1 .
  1. You will see green light in the left corner and the data from your RTK Receiver similar to below.

Secondly, run RTK Receiver in ROS.

  1. Make a folder with the workspaces. If you don’t have one, you can make it with the commands:
				
					mkdir -p ~/catkin_ws/src
cd ~/catkin_ws
catkin_make
source ~/catkin_ws/devel/setup.bash
				
			
  1. Download and install ROS packages inside src. In this tutorial we will download the packages from https://github.com/KumarRobotics/ublox that will publish the ROS information. This works with this 1.1.4 version.  You can use the latest releases but some steps may need to be modified. Enter commands:
				
					cd ~/catkin_ws/src
git clone https://github.com/KumarRobotics/ublox
cd ~/catkin_ws
rosdep install --from-paths src --ignore-src -r -y
				
			
  • You will see in the Terminal:
    #All required rosdeps installed successfully
  1. Compile the program to be able to execute it.  
				
					catkin_make
source ~/catkin_ws/devel/setup.bash
				
			
  • When the setup.bash is executed, we are selecting the workspace of work and updating the available programs in ROS.
  1. In order to have control of the messages to be published in ArduSimple you can modify the yaml (configuration file) that the node will use to execute the communication with ros.
    This node has several test configuration files, you can modify the values of this one by modifying the files located in the following directory:
				
					cd ~/catkin_ws/src/ublox/ublox_gps/config
				
			
  1. Since the u-blox model inside Ardusimple is the zed_f9p, we modify the file with the same name. To open the editor, we can use the following command:
				
					nano zed_f9p.yaml
				
			
  1. Change the address of device to “/dev/tty_Ardusimple” to make sure that it always goes to the RTK Receiver:

				
					device: /dev/tty_Ardusimple
frame_id: gps
uart1:
  baudrate: 9600  //Change the baudrate value to the value set in U-Center.
config_on_startup: false


  1. Close u-center because ROS and u-center do not run together.

  1. To execute the ROS Node, use the launcher located in the following folder:
				
					cd ~/catkin_ws/src/ublox/ublox_gps/launch
				
			
  • To check that it is listed, type the command:
				
					ls
				
			
  1. ROS launch files simplify the process of starting multiple nodes and configuring their parameters. A launch file is an XML file that describes the nodes to be executed, their parameters and the connections between them. By using launch files, you can start multiple nodes with a single command, making it easier to manage complex robotic systems. These files have “.launch” extension, there are other files that are configuration files that have “.yaml” extension.
    To launch the file:
				
					roslaunch <name_of_package> <launch_file>
				
			
  • The file that will launch our program is called “ublox_device.launch”.
    This file can be changed as needed.
    To launch the program, use the following command:
				
					roslaunch ublox_gps ublox_device.launch param_file_name:=zed_f9p
				
			
  1. Open new Terminal and enter the command:
				
					source ~/catkin_ws/devel/setup.bash
				
			
  1. ROS Nodes when running have unique names. To see the list of ROS Node names, use the command in the Terminal:
				
					rosnode list
				
			
  1. To obtain information about the ROS nodes, such as which topics they are subscribed to or publishing, you can use the following command:
				
					rosnode info <name_of_node>
				
			
  • For example, to obtain information about “info /ublox”, use the command:

				
					rosnode info /ublox
				
			
  1. To display a list of active ROS Topics which are currently available and are being published or subscribed to your ROS system, use the command.
				
					rostopic list
				
			
  • The output of ROS Topic list will typically show the names of the topics along with their message types. This command is useful for checking the available topics and verifying if the desired topics are being published or subscribed to in your ROS environment.

  1. To view information about who is posting and subscribed to this message, type of the message, use the command in the format:
				
					rostopic info <name_of_topic>
				
			
  • For example, to receive information about Message Type, Publishers and Subscribers of the topic “/rosout”, execute the command:
				
					rostopic info /rosout
				
			
  1. To receive information about Message Type, Publishers and Subscribers of the topic /ublox/fix, execute the command:
				
					rostopic info /ublox/fix
				
			
  1. To see the information that is being published,  use the command in the format:
				
					rostopic echo <name_of_topic>
				
			
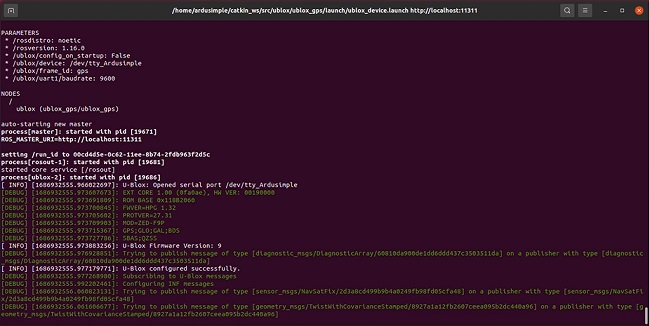
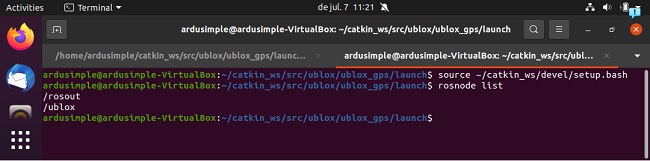
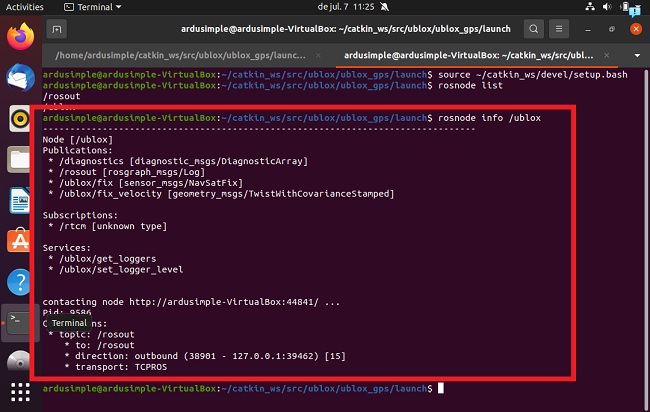
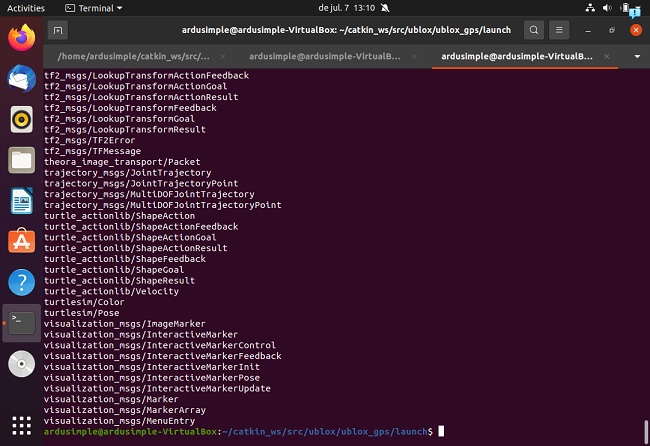
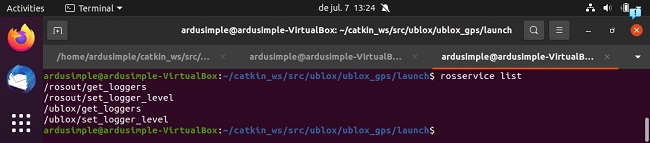
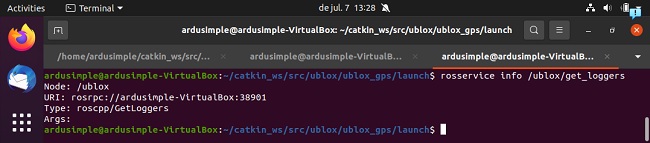
  • To test that it works we can subscribe to the different topics that the node creates.

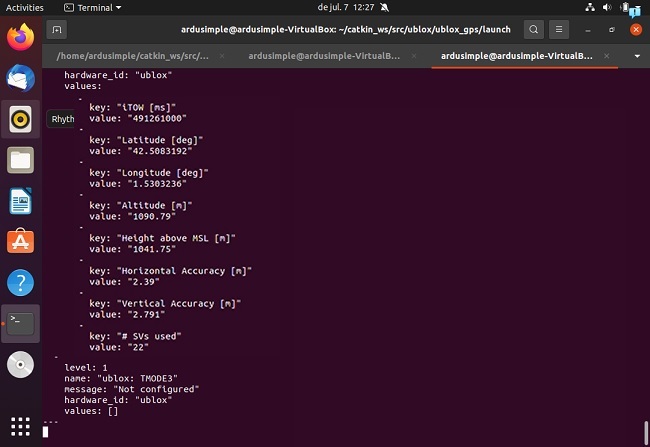
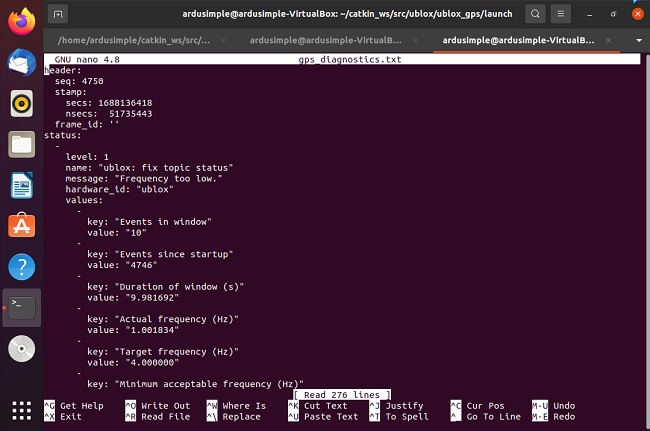
    The most important ones are “/gps/fix” (are the data in WGS64) and “/diagnostics” (gives us information of the GPS status). Other data can be published according to the configuration that has been set from RTK receiver.

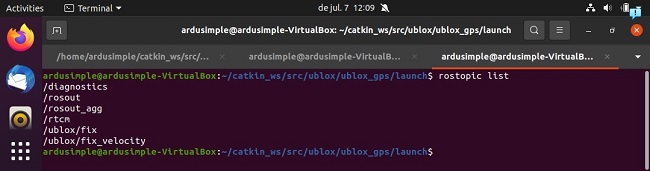
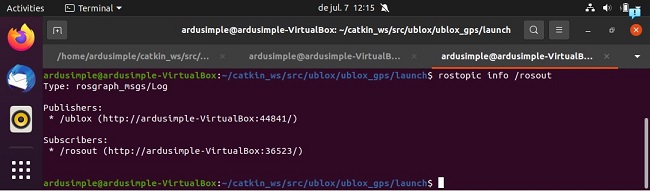
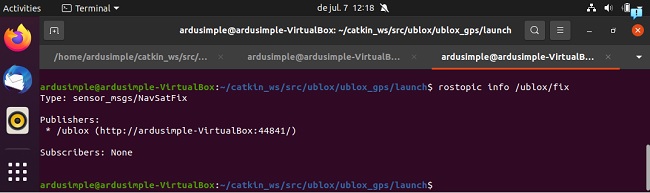
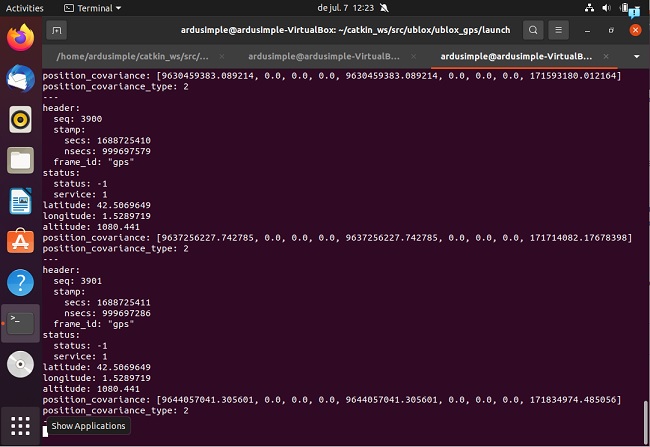
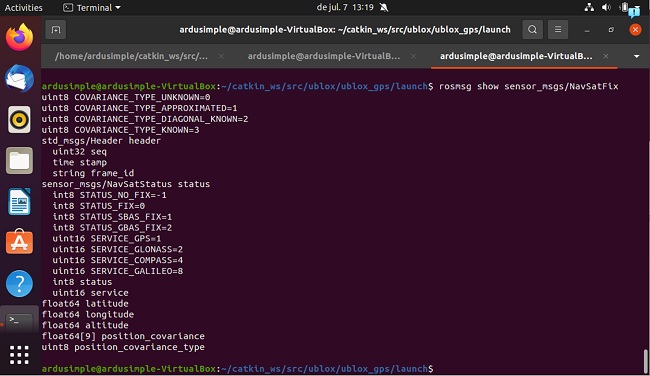
    For example, to observe and monitor the GPS fix data being published on “/ublox/fix” Topic (are the data in WGS64), such as latitude, longitude, altitude, and other relevant information, use following command to view the data:

				
					rostopic echo /ublox/fix
				
			
  • To stop viewing the topic, press Ctrl+C.

  1. To view the data being published on “/diagnostics” that gives the information of the GPS status like accuracy amung others, use the command:
				
					rostopic echo /diagnostics
				
			
  • To stop viewing the data, press Ctrl+C.

  1. If you want to record the information published on the Topic in the file, use the command:
  • to record GPS fix data being published on “/ublox/fix” Topic, such as latitude, longitude, altitude amung others:
				
					rostopic echo /ublox/fix > gps_fix_data.txt
				
			
  • to record data about the GPS status “/diagnostics”:
				
					rostopic echo /diagnostics > gps_diagnostics.txt
				
			
  • These commands create files gps_fix_data.txt and gps_diagnostics.txt, where the topic will be saved. To stop recording, press Ctrl+C.

  1. To see the information recorded in the files, execute:
				
					nano gps_fix_data.txt


					nano gps_diagnostics.txt
				
			
  1. ROS Messages are the data structures used for communication between ROS Nodes. They define the information exchanged on a topic. Messages are defined using the .msg file format.
    To see the list of the types of ROS Messages, use the command:
				
					rosmsg list
				
			
  1. To view the structure of the message, use the command in the format:

				
					rosmsg show <name_of_message>
				
			
  • For example, the “sensor_msgs/NavSatFix” is a message type in ROS that is used to represent GPS (Global Positioning System) fix data like thelatitude, longitude, altitude, and other parameters related to the GPS position.
    To see the structure of “sensor_msgs/NavSatFix” message, use the command:
				
					rosmsg show sensor_msgs/NavSatFix
				
			
  1. To view the list of active ROS Services which provide a way for Nodes to send requests and receive responses, use the command:
				
					rosservice list
				
			
  1. To call the service, use the command in the format:
				
					rosservice call <name_of_service> <type_srv> <request>
				
			
  • This service will respond with the result.

    For example, to obtain the current logger configuration of the u-blox Node, which can be helpful for debugging and monitoring purposes, use the command:

				
					rosservice info /ublox/get_loggers


If you want to do this tutorial, we have all the products in stock and ready to be shipped:

If you liked this content, you can follow us on Twitter, YouTube, Facebook or LinkedIn to stay updated of content like this.

Got any questions or requests?
Contact us! We'll answer <24 hours!

Icon
Contact ArduSimple
Close

Want to learn more about GPS/RTK?

1. Our engineering team will contact you to solve any questions
2. We will keep you updated about promotions and new product releases
3.You will only hear from us when we have important news, we won’t spam your email