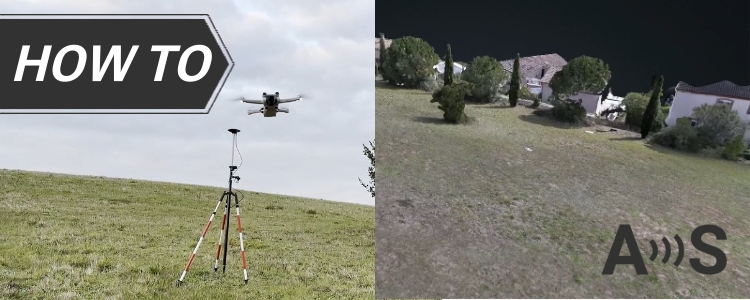
How to create accurate 3D photogrammetry maps using GCPs and a non-RTK drone?
This tutorial is designed for professionals and hobbyists who need accurate 3D terrain or site maps but does not own expensive drone with RTK module. This guide will show you how to achieve centimeter-accurate maps using a standard (non-RTK) drone, ground control points (GCPs) and photogrammetry software.
Unlike RTK-enabled drones, which embed georeferenced data with centimeter-level accuracy directly into each photo, non-RTK drones rely on standard GPS, which can introduce positional errors of several meters. To overcome this limitation, we use physical markers GCPs whose exact coordinates are measured with the RTK Smart Antenna. These serve as reference points in the photogrammetry workflow and with careful planning and processing, you can achieve survey-grade accuracy even using standard drone.
WebODM (it is an open-source photogrammetry tool with optional paid features like cloud service, technical support etc. If you’re a technical user and don’t mind some hands-on setup, you can install it for free from GitHub. In our tutorial we use paid cloud version of WebODM)
How to build accurate 3D maps with drone and ground control points?
Place GCPs and measure its precise coordinates using RTK Smart Antenna
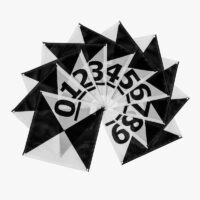
Place ground control points (GCPs) across your mapping area. To ensure your final 3D model will be accurate accurate, follow these rules:
Place GCPs near each corner of the surveying and at least one in the center.
Keep GCPs spaced 50–100 meters apart; add more along long edges if needed.
Ensure GCPs are clearly visible from the air and not obstructed by trees or other objects.
If the terrain is uneven, place GCPs at both high and low elevation points.
The RTK Smart Antenna is compatible with numerous mobile GIS apps. This tutorial uses the SW Maps app to demonstrate how to connect it to your Android or iOS device.
Install SW Maps app on your mobile device from the Google Play or Apple App store. Open the app and grant the required permissions (first time only).
Power on the RTK Smart Antenna by pressing the POWER button on the front panel.
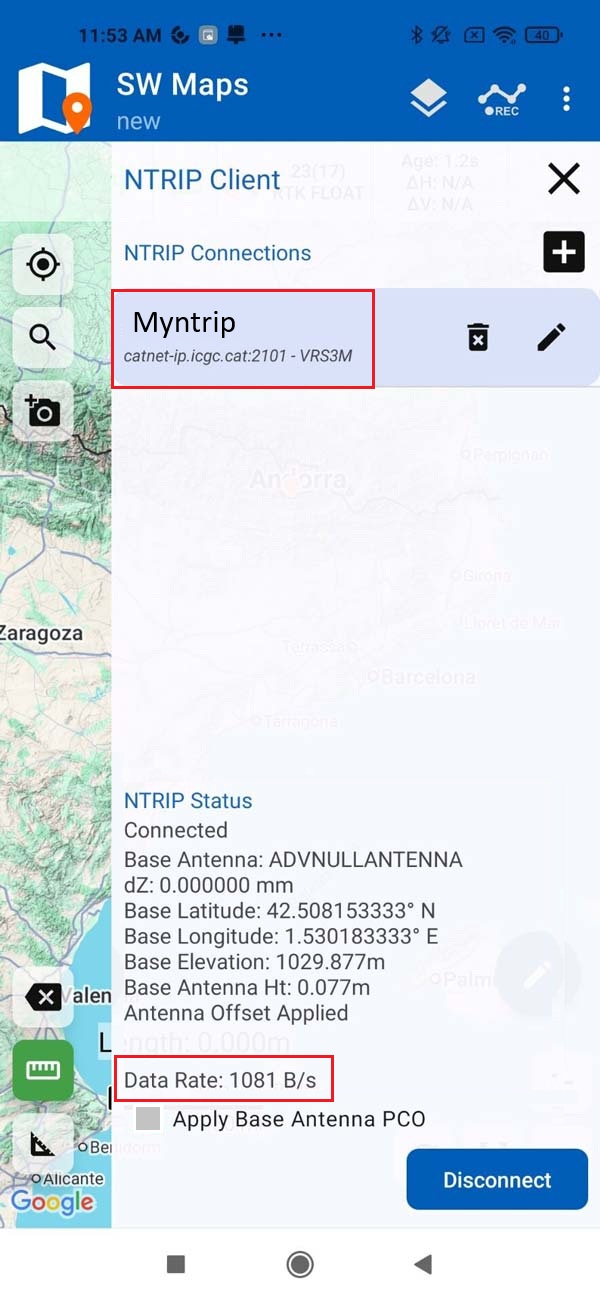
Connect to SW Maps via Bluetooth and to an NTRIP service by following the steps in the section of the RTK Smart Antenna User Guide. The NTRIP Status section will show a confirmation of a successful connection and active data streaming to your device.
Android
iOS
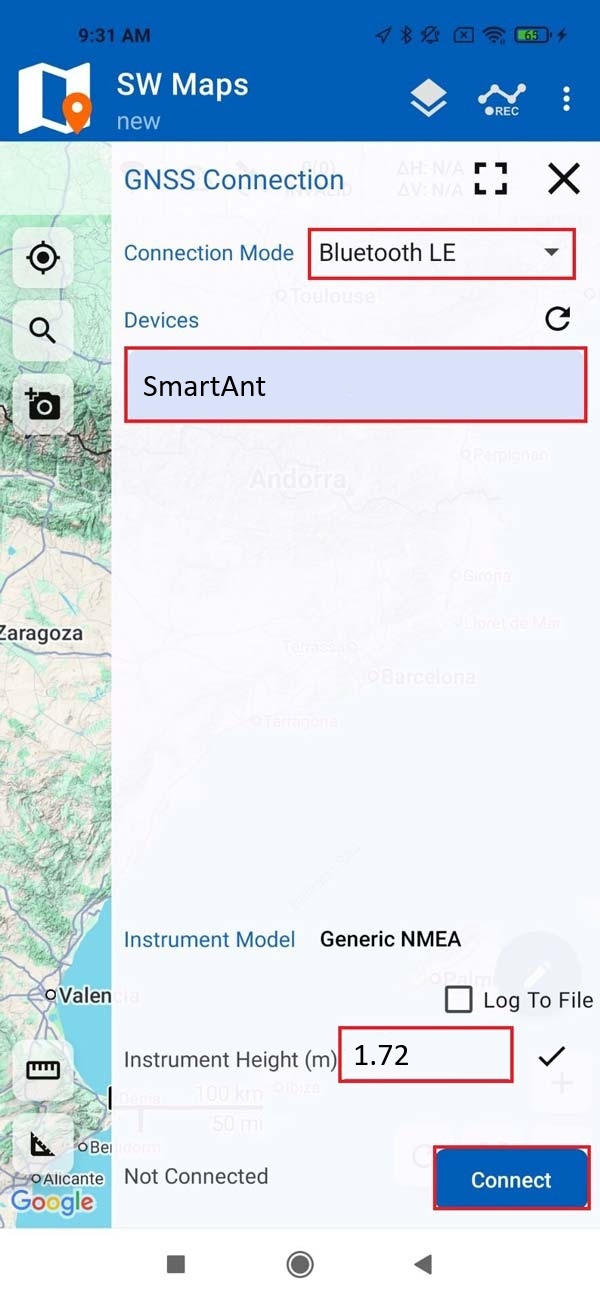
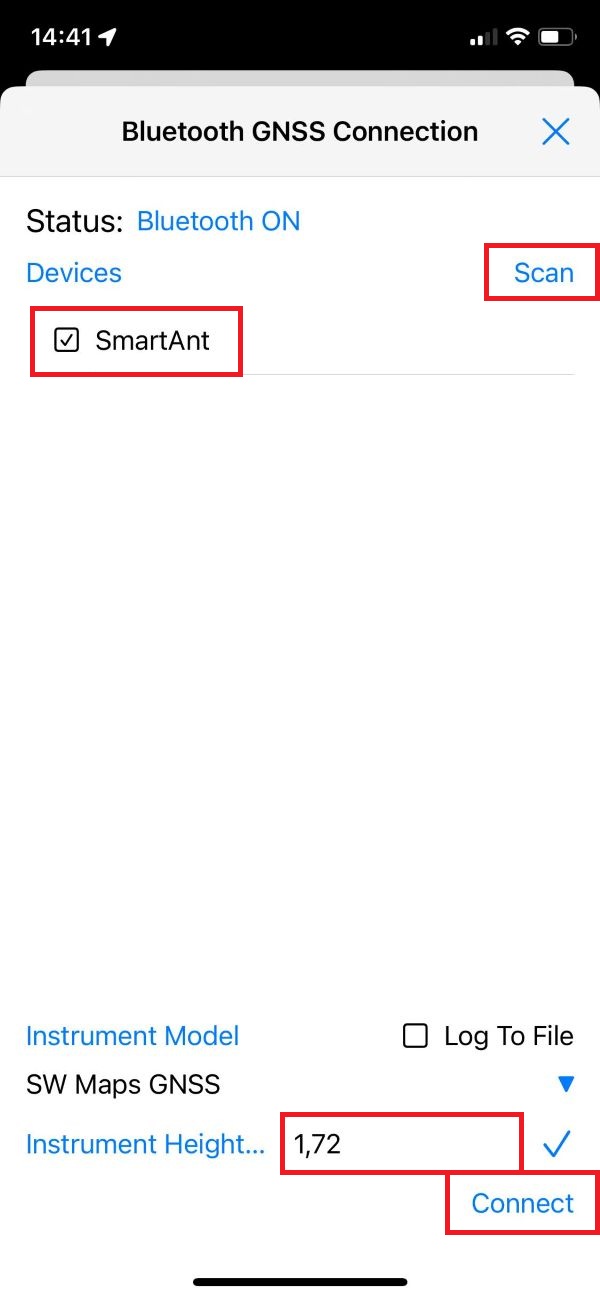
Make sure you set the Instrument Height to match the height of your survey pole, this is crucial for accurately measuring ground-level positions.
Android
iOS
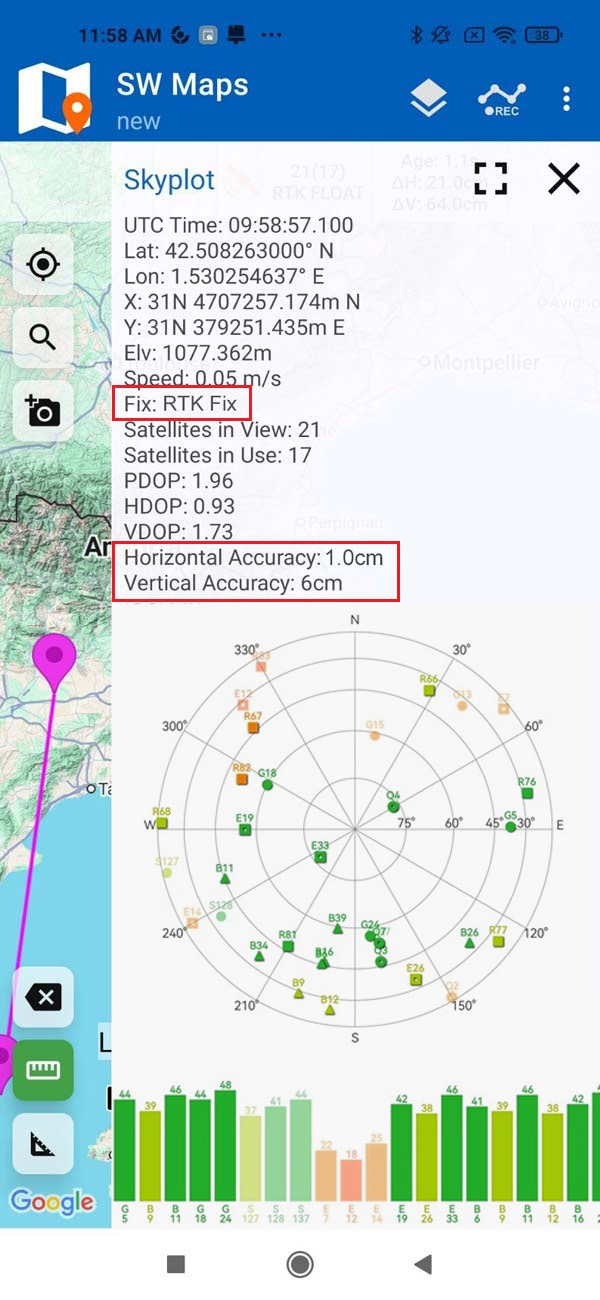
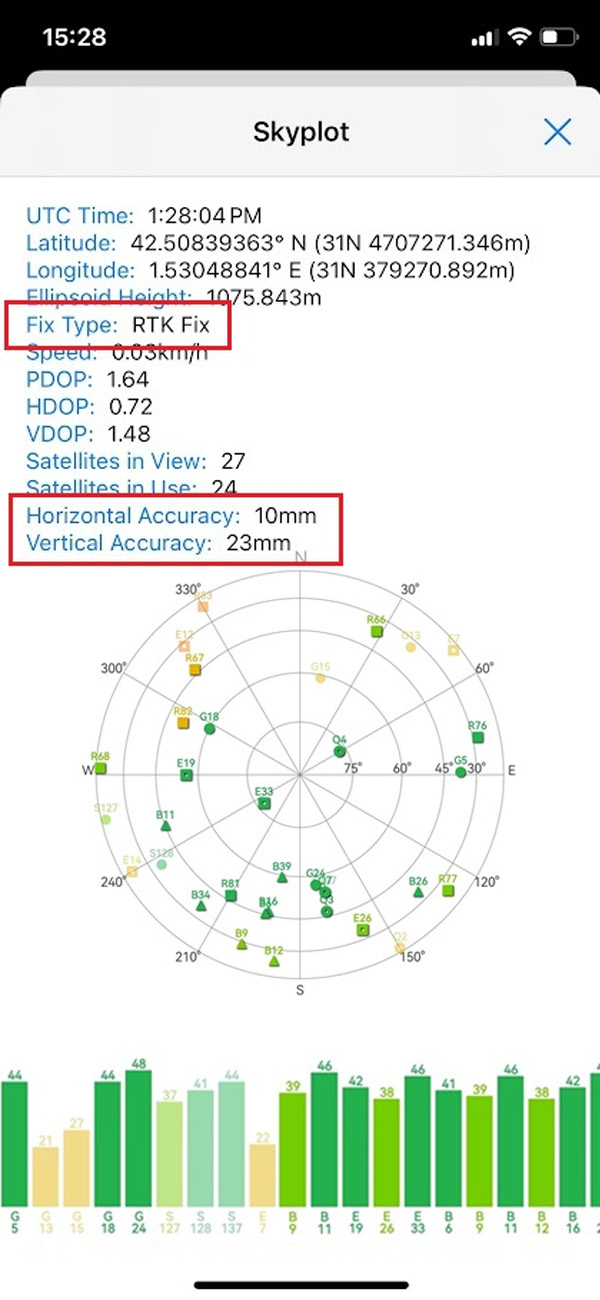
Before taking measurements in the field, make sure that the RTK Smart Antenna is connected to your smartphone and receiving corrections. In SW Maps, open Menu > Skyplot and check the Fix Type. For best accuracy, it should be RTK Fix.
Android
iOS
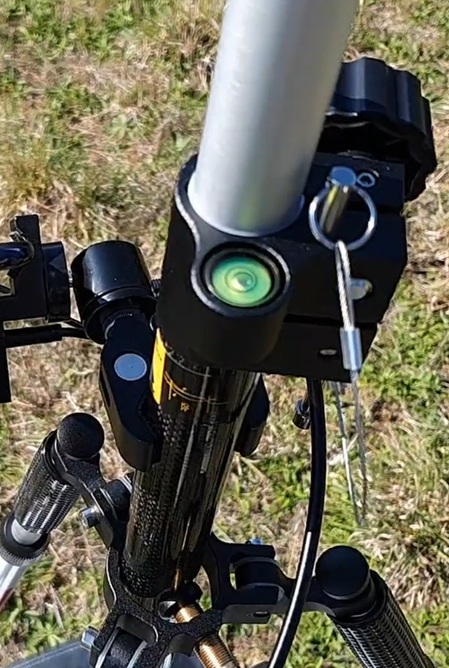
Place the RTK Smart Antenna on the first GCP, ensuring the bubble on the pole is centered within the circle. This confirms the pole is perfectly vertical for accurate positioning.
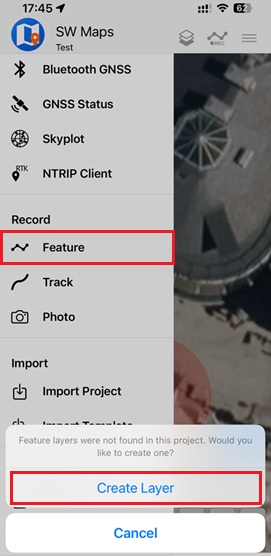
Tap on side menu, tap on Feature->Create Layer.
Enter the layer name, select Point as the geometry type, and choose a geometry symbol.
You can also set the layer color at this stage.
Select Satellite as the background map. Enable Tracks, and under Filter, choose Feature Layers.
Press Add Layer and tap GNSS Recorded Feature.
Set the layer name, choose POINT as the geometry type, and select a geometry symbol. Press Add.
The new layer will appear. Press Close.
Press Rec icon and tap Record Feature.
In the Remarks field, enter the name of the ground point — for example, GCP 1. We recommend checking the Averaging box to allow the kit to calculate an averaged position (make sure to keep the pole static during this process). Fix type should stay RTK Fix to get good accuracy of measuremtns. Then press ‘+’ to record the position. You’ll see a message saying “Point recorded!“.
Proceed to Ground Control Point #2 and take the measurement as explained in Step 15. Repeat this process for all your ground control points (in our tutorial, we used 6 GCPs). Once completed, you’ll see a map displaying all the recorded features.
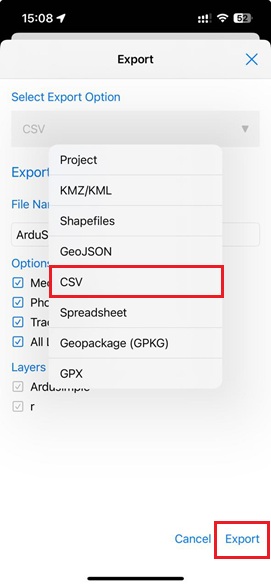
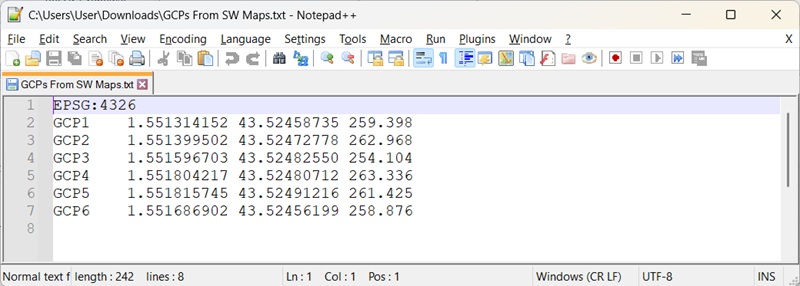
To export your project, tap on SW Maps main menu, press Export Project.
Choose CSV export format and press Export.
Capture drone images
Launch DroneLink app on your smartphone.
Turn on your drone and remote controller. Connect your smartphone to the controller.
Wait for DroneLink to detect the drone and confirm GPS lock
Tap “+” to create a new flight mission. Choose Mapping template.
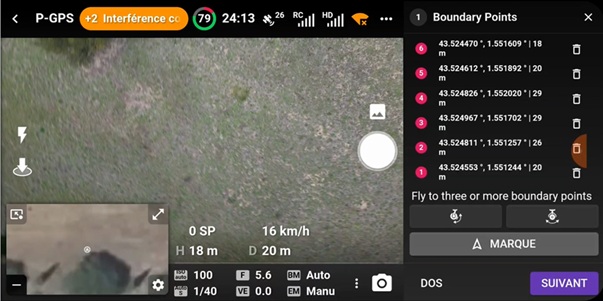
To define Boundary points, take off your drone and move the drone on top of 1st GCP. Be aware that the first point marks the altitude of the flight of you have paid version of Dronelink.
Tap Record to save the coordinates of 1 GCP.
Navigate your drone to the next GCP and save coordinates. Repeat this for all GCPs which you have and press Next.
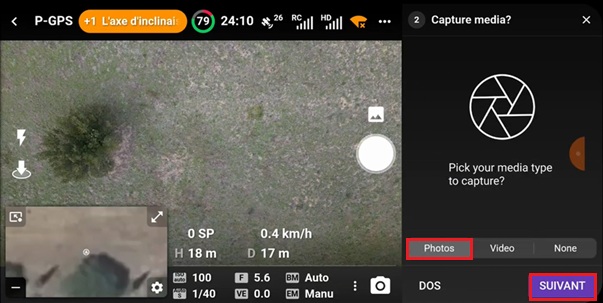
Pick Photos as a media type and press Next.
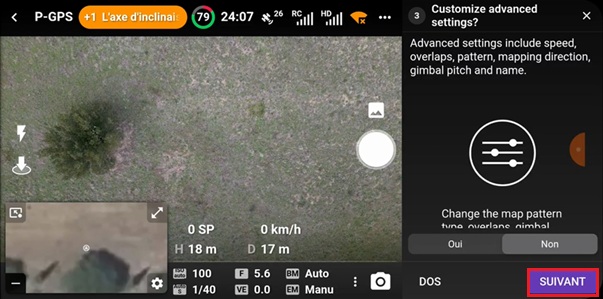
Do not customize advanced settings if you are not an advanced user and press Next.
Do not customize advanced settings if you are not an advanced user and press Next.
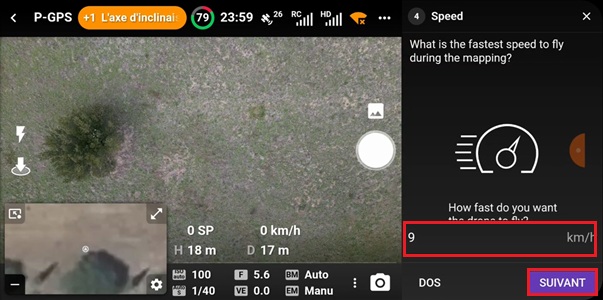
Set the speed of the flight and press Next.
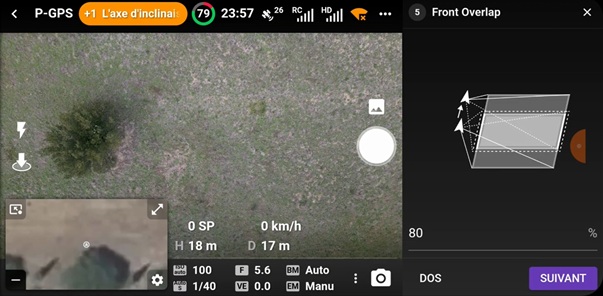
Set Front Overlap and press Next.
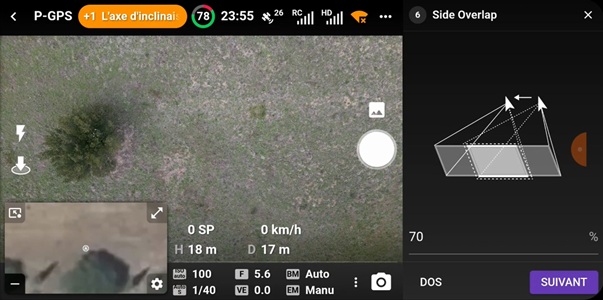
Set Side Overlap and press Next.
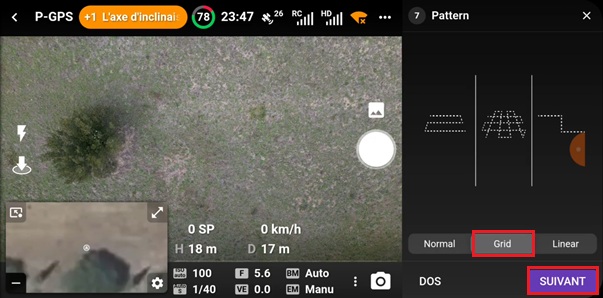
Choose Grid as a Pattern and press Next.
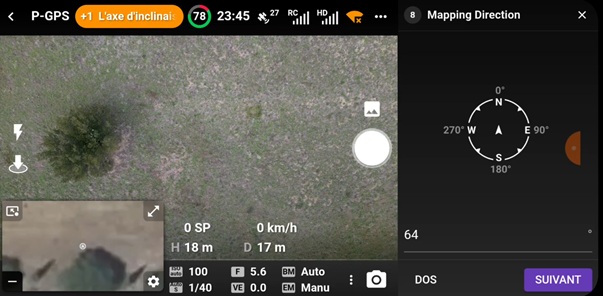
In the Mapping Direction settings, you can choose your preferred direction, but in our case, we used the default option. Press Next.
Set Gimbal Pitch of the drone camera in degrees and press Next.
Fill the name of the mission plan and press Next.
The summary of the mission will be shown. Press Continue.
The mission will be calculated. Press Play to lauch it.
Drone will navigate to the starting point and then will launch the mission. The drone will fly automatically—no manual control is needed during the flight. You can monitor the mission’s progress through the app’s flight dashboard.
Once the mission is completed, you will see notification in the app.
Now you have collected all the field measurements needed to create a 3D model.
Process images and build 3D model of terrain
When you are back to your office PC, transfer the CSV file exported from SW Maps in Step 16 to your PC. We’ll use this file—containing the GCP coordinates—later during the photo alignment process in WebODM to improve the accuracy of the 3D model.
If you’re using Android, connect your phone to the PC via USB, select File Transfer mode, and copy the exported file from the SW_Maps folder.
Alternatively, you can email the file to yourself or upload it to a cloud service (e.g., Google Drive, Dropbox) and download it on your PC.
Using the data from your CSV file from SW Maps, create a CSV file that includes the GCP name, northing, easting and elevation.
Save it on your PC as CSV file, we will use it later at step #48.
Download all photos taken by the drone. You can do this by connecting the drone directly to your computer or by removing the SD card from the drone and inserting it into your PC.
From all pictures taken, find the ones which have GCP visible and save them on the separate folder.
Open WebODM. Click Add a Project, give it a name, add a description if needed, and press Create.
Go to the GCP Interface, click Load existing control point file.
Choose the file which you have exported from SW Maps and press Open.
A preview of the Ground Control Point (GCP) file will appear, showing the precise coordinates of each point. Click Load to import the GCPs.
Press Map Provider and click Satellite to Satellite view to visualize the GCPs on the map.
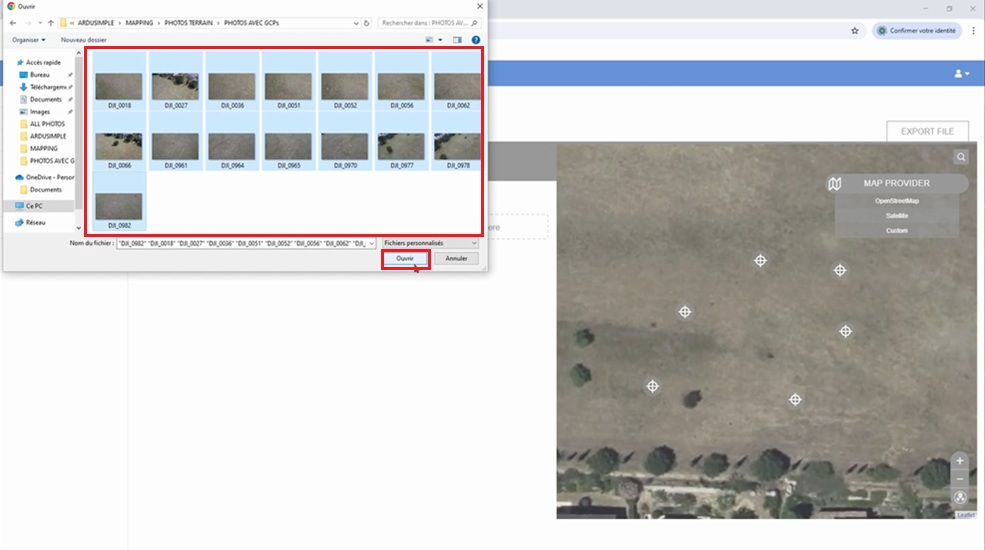
Press Choose images.
Go to the folder with GCP images whoch you haev prepared at step #38, select them all to import to WebODM and press Open.
Pictures with GCP will load. Now we will match each GCP coordinate with a drone image showing the corresponding target. Click on the first image.
Press delete preset coordinates in Ground Control points window and Map view window.
Click the “+” button, then click on the center of the control point in the image.
Next, match it with the corresponding point in the Satellite view by clicking on the same location. You can identify which GCP is which by checking the number labeled in the photo—it should match the name visible in the Satellite window.
Press Back and repeat steps 46–48 for each remaining GCP image to link every photo with its corresponding coordinate. One GCP can be linked to several images containing the same point. These steps are important, as the generated file associates each GCP with specific pixel values (X, Y, Z) within the image, which are used to improve georeferencing accuracy.
When all GCP images are linked to precise coordinates of GCP, press Export file and press Save. This Ground Control export file file helps align the map accurately for further post processing in WebODM.
Rename the file to GCP_file.txt and move it into the same folder where all your drone images are stored.
Now let’s import all the terrain photos. Go to the Dashboard and click Select GPS Images and Files.
Choose all the drone images along with the GCP_file.txt, then click Open. Wait a few seconds for the data to be plotted on the map.
Enable satellite view or google map view in Base maps.
Choose Processing Option according to your needs. We will use High resolution. It optimizes the settings to generate the highest quality orthophotos and 3D models. Use this if you want the best visual detail, but note it requires more processing time and memory. Press Validate.
Press Start processing. The processing might take several minutes.
By pressing Display of traces you can check the progress. In our case it took 22 minutes to process.
Once finished, the preview of photogrammetry map will appear. Press Show map to view your 2D model.
Now you can see your photogrammetry model of terrain in 2D overlayed on Google Maps.
Click the 3D button in the bottom-right corner to switch to the 3D view.
Your 3D model will now be displayed for interactive exploration.
Related products
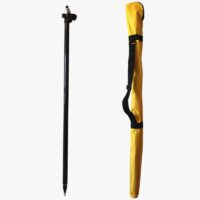
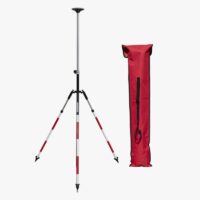
If you want to follow this tutorial, we have all the products in stock and ready to be shipped:


 and
and  How to get a quotation