User Guide: CANBus GNSS Master
Overview and installation
The CANBus GNSS Master is an accessory that allows to connect your simpleRTK2B, simpleRTK3B or simpleRTK4 board to a CAN Bus network and read/write messages.
With the current firmware you can use this plugin to transmit classic messages or you can also use it with NMEA2000 protocol.
The module has the following connections:
- XBee socket. This module is compatible with all our products with XBee sockets (simpleRTK2B, simpleRTK3B, simpleRTK4, …).
- microUSB connector. We use it to update its parameters or to load new firmware. Notice that this connection does not power the CANBus GNSS Master, you always need to plug it into a powered XBee socket.
- DB9 connector. You need to plug a cable to it. Connect the other end to your CANBus network.
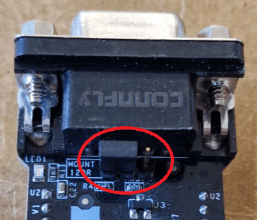
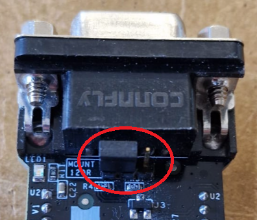
- Terminal resistor jumper. Make sure to set the terminal resistor jumper like this if your CANbus network has already a terminal resistor (if not leave it in the default position):

- BOOT button. Use it to load firmware (see instructions below).
- LEDs. Blue LED shows if the CANBus GNSS Master board is powered on.
To install this device, simply plug it into a GNSS receiver with XBee socket and power the receiver.
In normal operation there is no need to use the microUSB connector on it (we use it only to configure it).
Make sure your GNSS receiver is configured to send data in NMEA format at the proper UART port at 115200bps.
Parameters
To configure your CANBus GNSS Master, you should set its parameters:
- Plug the CANBus GNSS Master board into your GNSS receiver XBee socket, power your GNSS receiver.
- Connect the microUSB cable to your CANBus GNSS Master and your PC, a flash drive will appear
- Fill the form below with your desired output
- Press the Generate parameter file
- Drag and drop the generated file on your CANBus GNSS Master flash drive.
Make sure the name is can_settings.toml - Wait 10 seconds and restart your CANBus GNSS Master device by pressing the XBEE RESET button on your receiver(not the BOOT button on your CANBus GNSS Master). If you have a simpleRTK2B Lite, unplug the USB cable and replug it.
You can also read previous generated files by pressing the Read parameter file button.
Make sure the following NMEA messages are enabled: GGA , RMC , VTG , ROT , HDT .
For NMEA2000, use 10Hz frequency.
If some messages are not available on your receiver the related CAN messages won't be sent.
| Enabled | ID (hex) | ID (dec) | Msg Name | Parameter(s) | Bytes | Scaling | Range | Units |
|---|---|---|---|---|---|---|---|---|
| 0x31 | 49 | FIXSAT | FixType Satellites | 1 1 | 1 1 | [0|256] [0|256] | - # | |
| 0x32 | 50 | LAT | Latitude | 8 | 1e-7 | [-90|90] | deg | |
| 0x33 | 51 | LON | Longitude | 8 | 1e-7 | [-180|180] | deg | |
| 0x34 | 52 | SOGALT | Ground_speed Altitude | 4 4 | 0.001 1e-6 | [-1M|1M] [-1M|10M] | m/s m | |
| 0x35 | 53 | TIME | Year Month Day Hour Minute Second | 2 1 1 1 1 1 | 1 1 1 1 1 1 | [0|2200] [0|12] [0|40] [0|30] [0|70] [0|70] | year month day hour min sec | |
| 0x36 | 54 | ACC2D | Accuracy2D | 8 | 0.001 | [0|100k] | m | |
*Only for Unicore UM981 receivers with INSPVAXA enabled at 1Hz | 0x701 0x702 0x703 0x704 0x705 0x706 0x707 0x708 0x709 0x70A 0x70B 0x70C 0x70D 0x70E 0x70F 0x710 0x711 0x712 0x713 0x714 0x715 0x716 0x717 0x718 | 1793 1794 1795 1796 1797 1798 1799 1800 1801 1802 1803 1804 1805 1806 1807 1808 1809 1810 1811 1812 1813 1814 1815 1816 | INS_STAT POS_TYPE LATITUDE LONGITUDE HEIGHT UNDULATION NORTH_VELOCITY EAST_VELOCITY UP_VELOCITY ROLL PITCH AZIMUTH LAT_STD_DEV LONG_STD_DEV HEIGHT_STD_DEV NORTH_VEL_STD_DEV EAST_VEL_STD_DEV UP_VEL_STD_DEV ROLL_STD_DEV PITCH_STD_DEV AZIMUTH_STD_DEV EXT_SOL_STAT TIME_SINCE_UPDATE CRC | INS Status Position type Latitude Longitude Height Undulation North Velocity East Velocity Up Velocity Roll Pitch Azimuth Lat Std Dev Long Std Dev Height Std Dev North Vel Std Dev East Vel Std Dev Up Vel Std Dev Roll Std Dev Pitch Std Dev Azimuth Std Dev Extended solution status Time Since Update CRC | 4 4 8 8 8 4 8 8 8 8 8 8 4 4 4 4 4 4 4 4 4 4 2 4 | 1 1 1 1 1 1 1 1 1 1 1 1 1 1 1 1 1 1 1 1 1 1 1 1 | [] [] [-90|90] [-180|180] [-1M|10M] [-100|100] [-1M|1M] [-1M|1M] [-1M|1M] [-180|180] [-90|90] [0|360] [0|1M] [0|1M] [0|1M] [0|1M] [0|1M] [0|1M] [0|360] [0|360] [0|360] [0|360] [0|65535] [] | - - deg deg m m m/s m/s m/s deg deg deg m m m m/s m/s m/s deg deg deg - s - |
| Enabled | PGN | PGN Name | PGN Frequency | Fields |
|---|---|---|---|---|
| 127250 | Vessel Heading | 10 Hz | SID Heading Reading Deviation Variation Reference | |
| 127251 | Rate of Turn | 10 Hz | SID Rate | |
| 128275 *Only for u-blox receivers with odometer enabled at 1Hz (UBX-NAV-ODO) | Distance log | 1 Hz | Date Time Log Trip Log | |
| 129025 | Position, Rapid Update | 10 Hz | Latitude Longitude | |
| 129026 | COG & SOG, Rapid Update | 4 Hz | SID COG Reference Course Over Ground Speed Over Ground | |
| 129029 | GNSS Position Data | 1 Hz | SID Date Time Latitude Longitude Altitude Type of System Method Integrity Number of SVs HDOP PDOP Geoidal Separation | |
| 129033 | Time & Date | 1 Hz | Date Time Local offset |
Firmware update
To update your CANBus GNSS Master firmware you will need the following:
- CANBus GNSS Master and microUSB cable
- USB-C Carrier Board for XBee Plugins
- Latest CANBus GNSS Master firmware (zipped), you can find it below.
Once unzipped, it contains a firmware.hex file and a main.mpy file. - STM32 Cube Programmer, you can download for free here (Windows Version)
Please follow these steps:
- Plug your CANBus GNSS Master to the USB-C Carrier Board for XBee Plugins
- Make sure all cables are unplugged
- Press and keep pressed the CANBus GNSS Master button
- Connect the USB cable to the CANBus GNSS Master and to your computer
- Connect the USB cable to the USB-C Carrier Board for XBee Plugins and to your computer
- You can now release the CANBus GNSS Master button
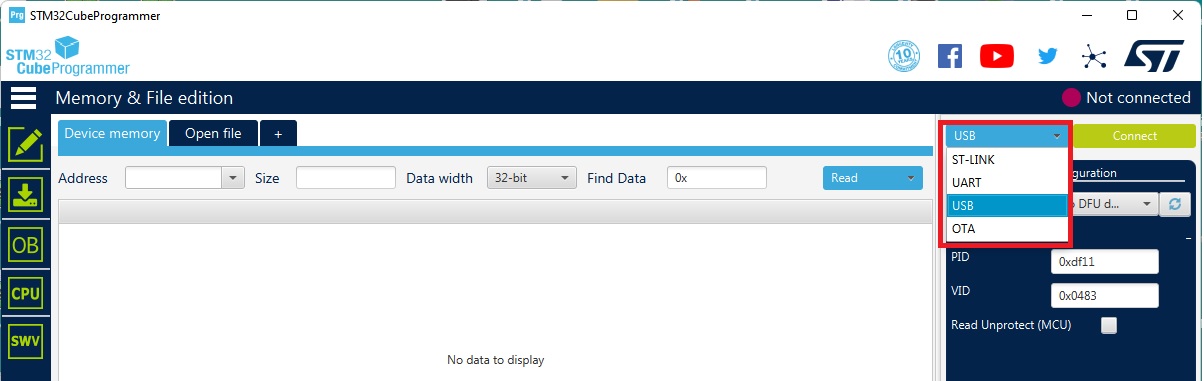
- Open STM32 Cube Programmer
- Select USB from the dropdown menu
- Click the refresh icon and wait until the port updates and shows a number
- Click the CONNECT button
- Go to Erasing & Programming and click on Full chip erase
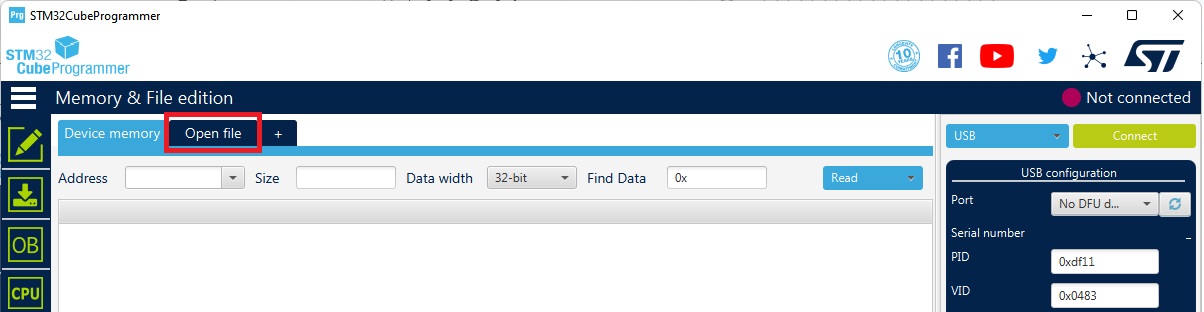
- Go to Memory & File Editing, click the Open File tab
- Browse and select your firmware .hex file
- Click the Download button and wait until it completes
- Power off/on both the CANBus GNSS Master and the USB-C Carrier Board for XBee Plugins
- When the flash drive appears again, delete main.py file (if exists) and drag and drop main.mpy.
If your computer changed the name of the main.mpy file to main-Copy.mpy, main(1).mpy or similar, please rename the file again as main.mpy - Wait 10 seconds and reset power on your device
- Congratulations, you completed the firmware update 🙂
Latest firmware and changelog
*** CANBus GNSS Master Changelog *** 2026-05-05 - FW V1.1.1 * Fix: ISO address claim message + PGN129026 2026-05-04 - FW V1.1.0 * NMEA2000: new PGN128275 (odometer, u-blox receivers only) * NMEA2000: new PGN129033 message * Classic CAN: new messages for INSPVAXA content (Unicore UM981 only) 2026-03-26 - FW V1.0.0 * First release