
 and
and 

How to build your own self-hosted NTRIP RTK caster on a Synology NAS

Table of contents
This guide shows how to build a fully open-source NTRIP caster on a Synology NAS fed by the ArduSimple RTK Base Station (Septentrio mosaic-X5), to broadcast RTK corrections to rovers over an internet connection. The NAS configuration used only exposes the RTK correction stream to the open internet.
We will configure the RTK Base Station, run BKG NTRIP Caster in a Docker container on the NAS, add a DDNS hostname to the server and forward a port for rovers to connect through it.
Elements of self-hosted NTRIP Caster
We are going to build a self-hosted caster where the base receiver will push its RTK correction stream to as an NTRIP server upload. The RTKLIB built-in str2str caster can only forward a stream pulled by itself, so we can’t use a push in this case. An actual caster listening to the source upload is needed.
- RTK Base Station (fixed reference, RTCMv3, NTRIP Server upload).
- Router LAN.
- Synology NAS.
- BKG open source NTRIP Caster (inside a Docker container).
- Internet DDNS and port.
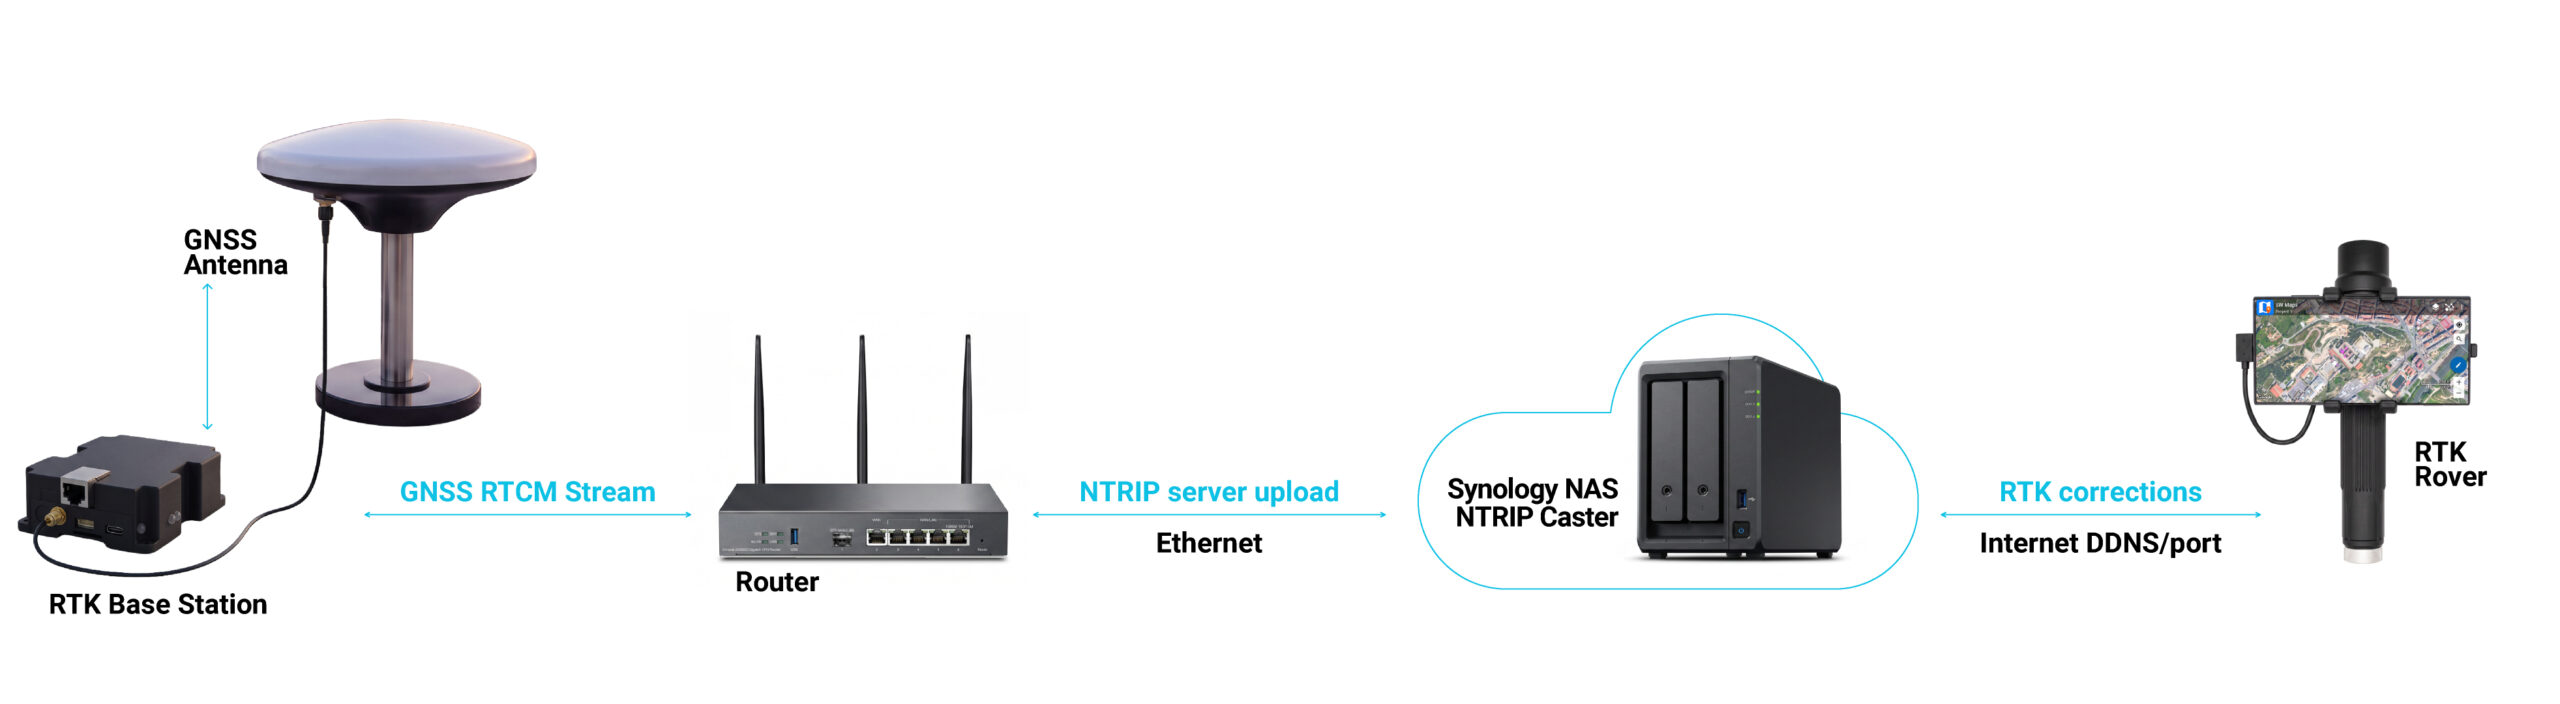
Required hardware
- RTK Base Station
- simpleRTK2B – Basic Starter Kit (optional as a rover for testing)
- Calibrated Survey Tripleband GNSS Antenna
- Synology NAS that supports Container Manager (x86-64 models)
- Router with port forwarding functionality
- PC or laptop
Required software
- BKG’s Open Source NTRIP Caster Running Under Docker
- u-center for u-blox M8, M9, F9, and legacy GNSS products (optional for rover testing)
- git
Before start
This tutorial depends on your internet connection having a public IP that accepts inbound connections. Compare your router WAN IP with the address shown by What is my IP website. If they are the same you may continue with the tutorial, but if they are different then your internet connection (ISP service) is behind a CGNAT (Carrier-Grade NAT) and the port forwarding method used in the tutorial would not work.
If this is your case, consider using a a VPN or relay/tunnel before proceeding with the rest of this tutorial.
- NAS LAN IP 192.168.1.3
- Receiver IP 192.168.1.50
- Port 2101
- Mountpoint andorra
- DDNS host "yourname".synology.me
How to build your self-hosted NTRIP Caster on a Synology NAS
Configure the RTK Base Station
The ArduSimple RTK Base Station (Septentrio mosaic-X5) comes pre-configured as a base, includes an Ethernet plugin and can be set up using a built-in web interface. You can find all information about how to configure it in the RTK Base Station User Guide.
- Screw the GNSS antenna to the Base Station SMA connector and place it outdoors with a non-obstructed sky view. Alternatively, you could place the antenna beside a window for testing purposes.
- Connect the Base Station using the provided USB to USB-C cable to a PC and type http://192.168.3.1 in a web browser. The Septentrio Configuration page should appear showing the receiver current status.
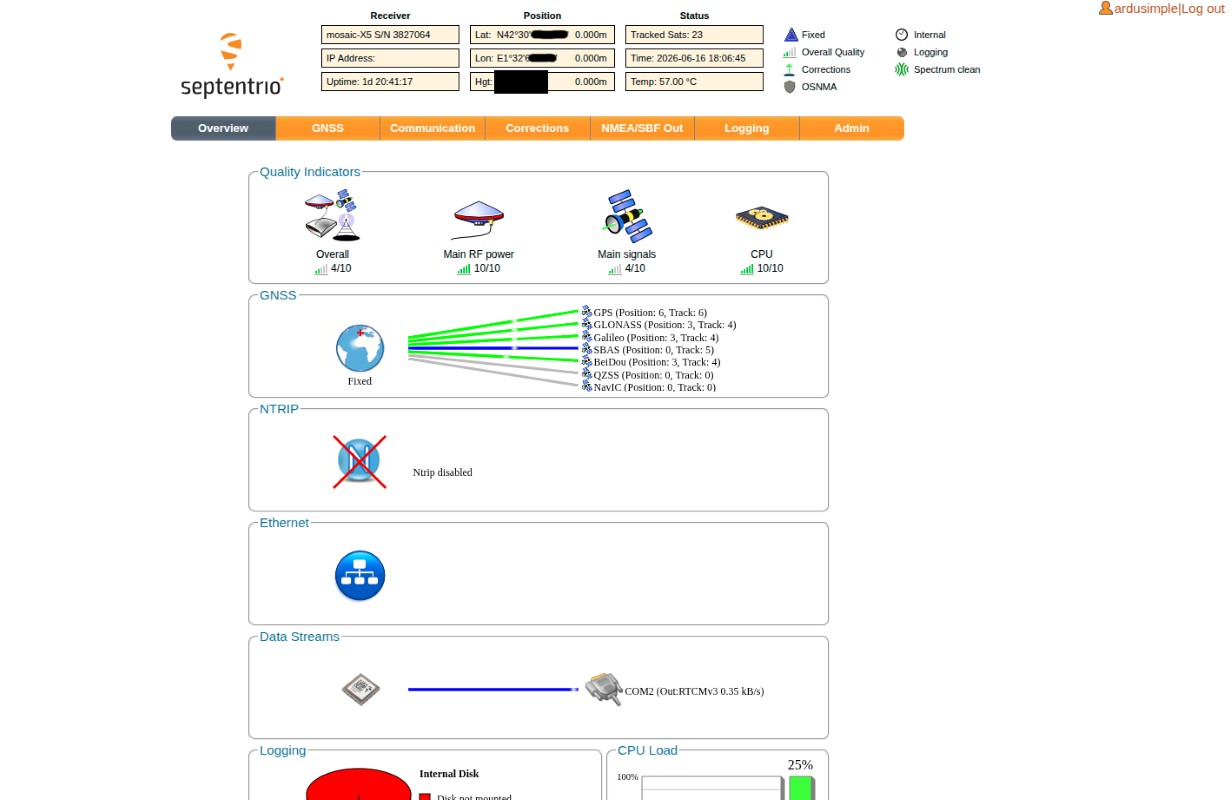
- After a few minutes the receiver computed position becomes stable. Go to GNSS -> Position Mode and set Mode to Static and Reference position to Geodetic1.
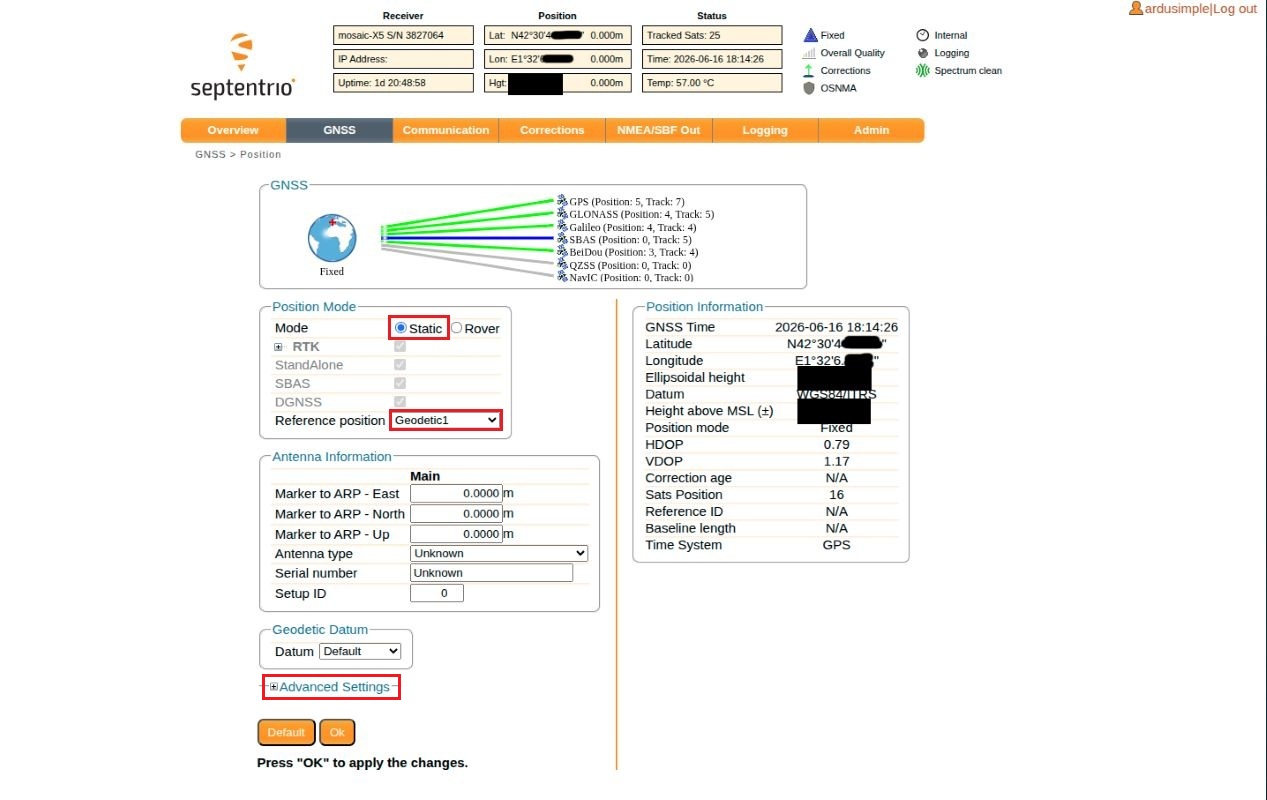
- Open Advanced Settings and under Geodetic1 press Use Current button. This copies the receiver converged position into the Geodetic1 reference slot, turning a computed position into a fixed coordinate the base will reuse on every boot.
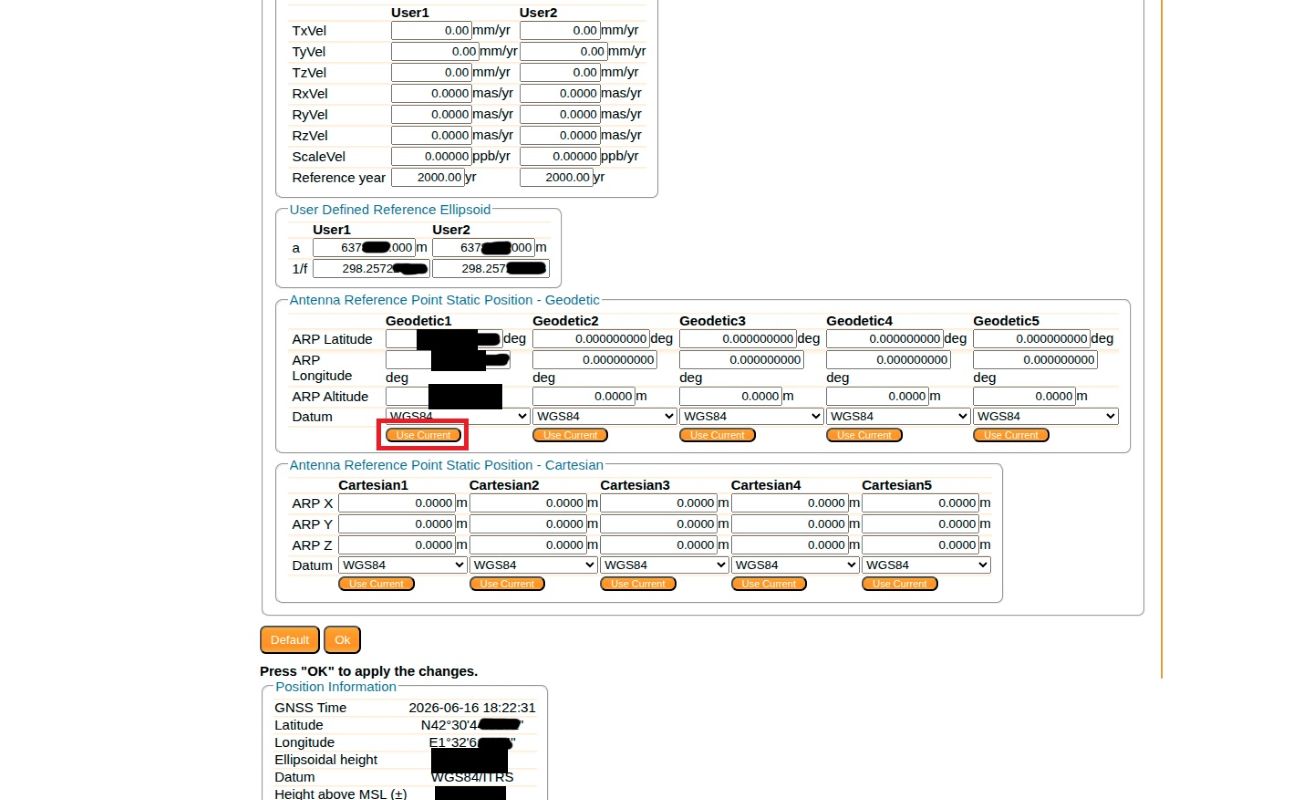
For a permanent base with absolute centimeter-level accuracy please follow the tutorial on How to determine the exact position of your base station with simpleRTK3B Pro.
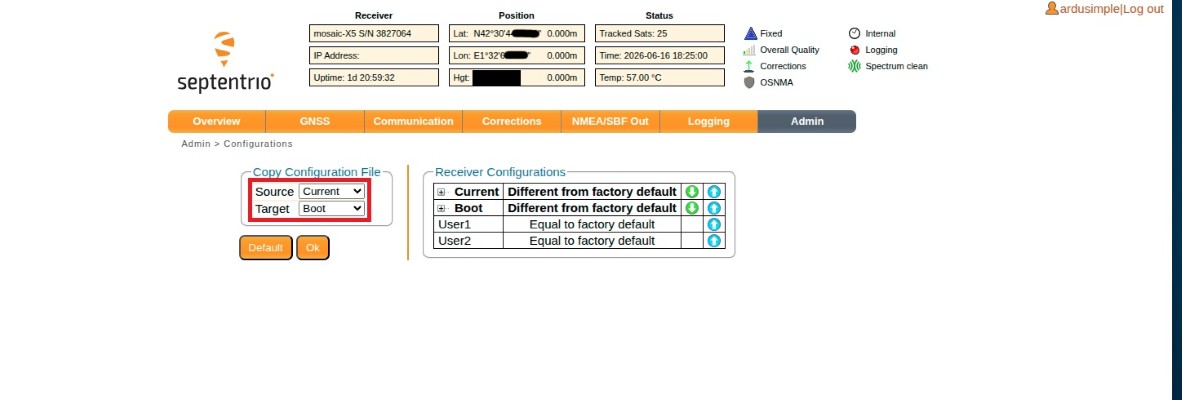
- To save the new Geodetic position as the default one used on every new boot of the receiver go to Admin -> Configurations. Set Source to Current and Target to Boot, and press OK.
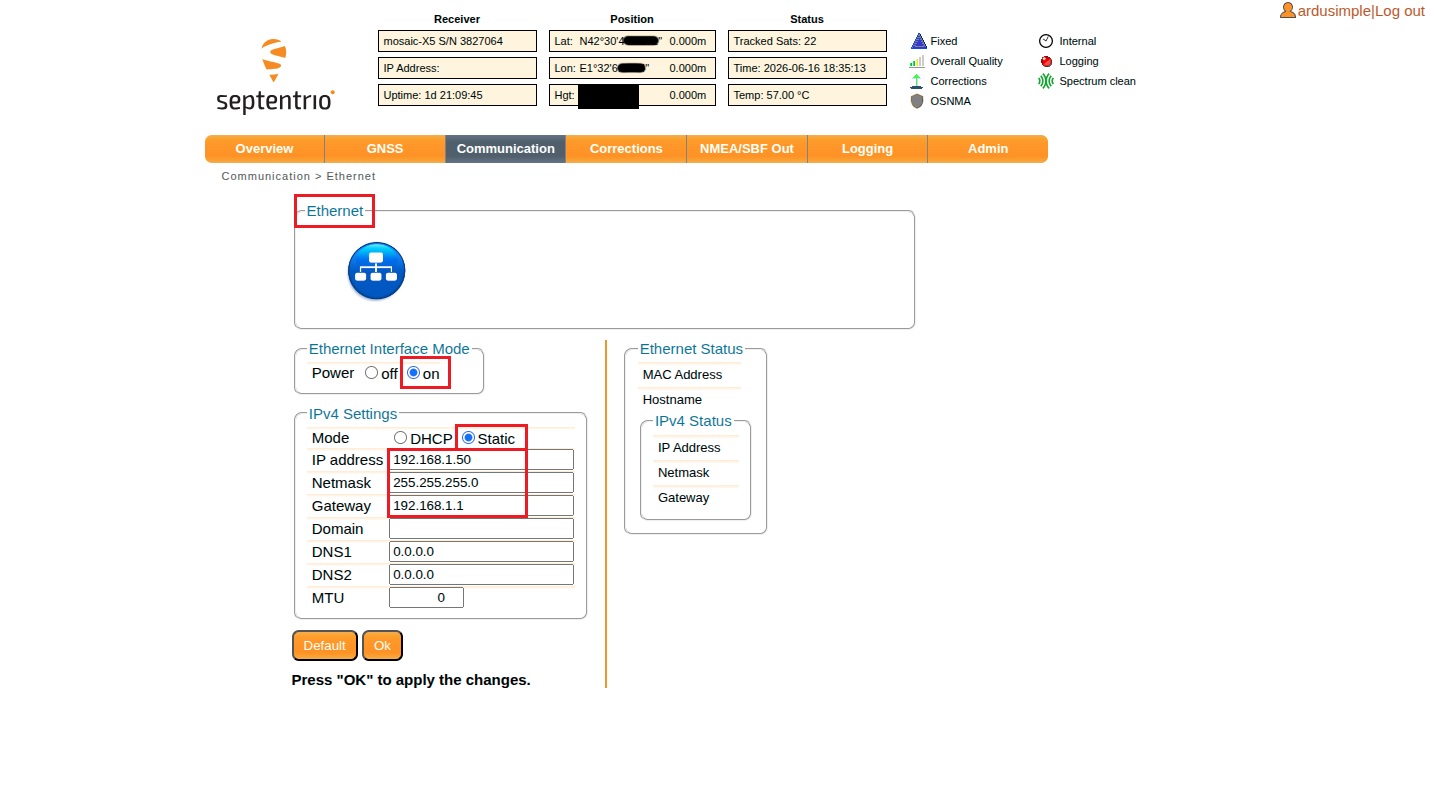
- Now to give the receiver a fixed address on your LAN go to Communication -> Ethernet. Set Interface Mode to Power on, IPv4 Mode to Static, and enter your desired address (we use 192.168.1.50 as an example), netmask, and gateway. A static IP is needed in this case, as the router and NTRIP caster expect the base stream at a fixed address.
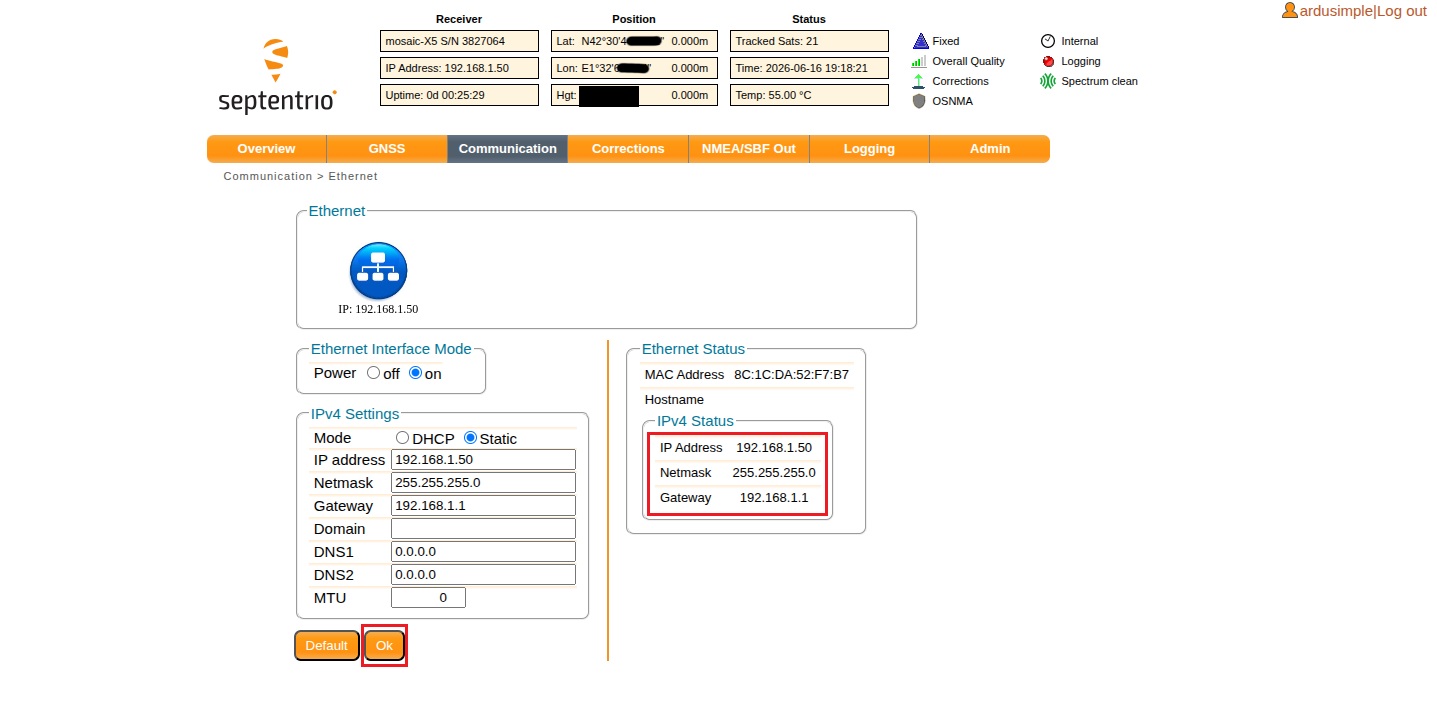
- Press OK. The Ethernet Status panel should populate showing the receiver reported IP, Netmask and Gateway.
Clone and configure the caster files in a PC or laptop
Following steps are done in a PC or laptop, aside of the NAS server. Either a Windows, Linux or MacOS machine can be used (we use ubuntu in this tutorial), as long as it has installed git for cloning the open source caster repository.
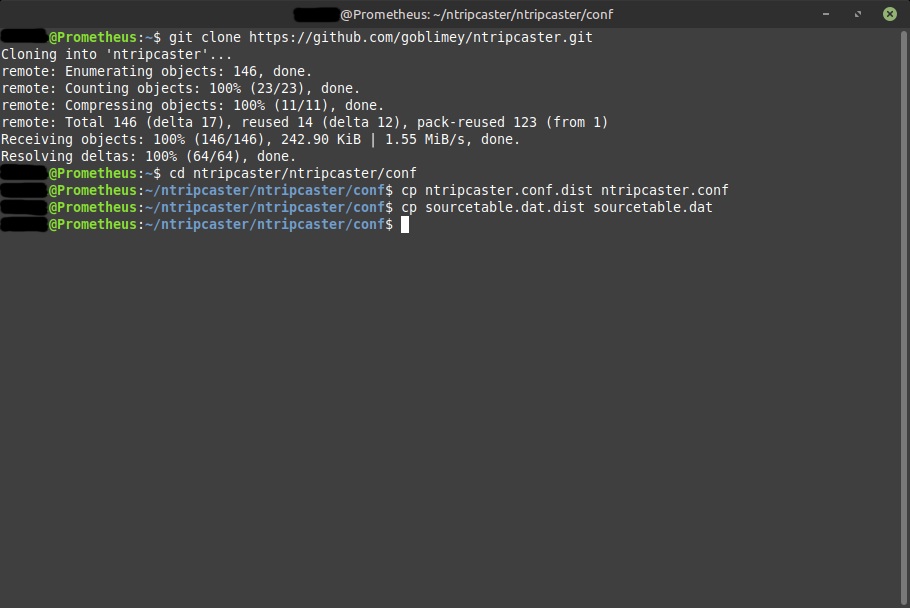
- Clone the BKG NTRIP caster repository and create the config files from its templates.
     # Download the caster source code from GitHub into a new ntripcaster folder.
git clone https://github.com/goblimey/ntripcaster.git

# Switch console to the configuration files folder.
cd ntripcaster/ntripcaster/conf

# Create editable copy of ntripcaster.conf file.
cp ntripcaster.conf.dist ntripcaster.conf

# Create editable copy of sourcetable.dat file.
cp sourcetable.dat.dist sourcetable.dat
- Open sourcetable.dat for editing.
nano sourcetable.dat
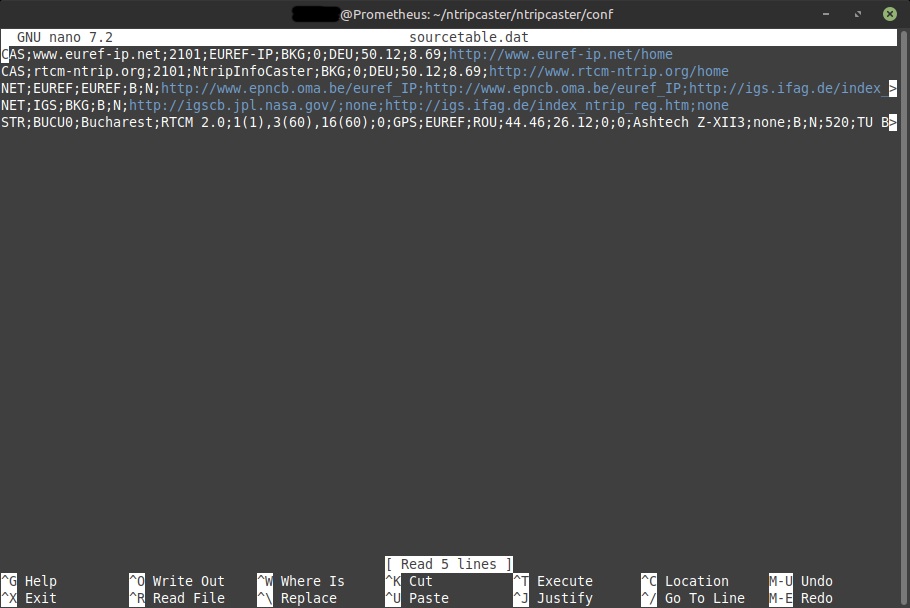
- The shipped template contains example CAS, NET, and STR;BUCU0 lines.
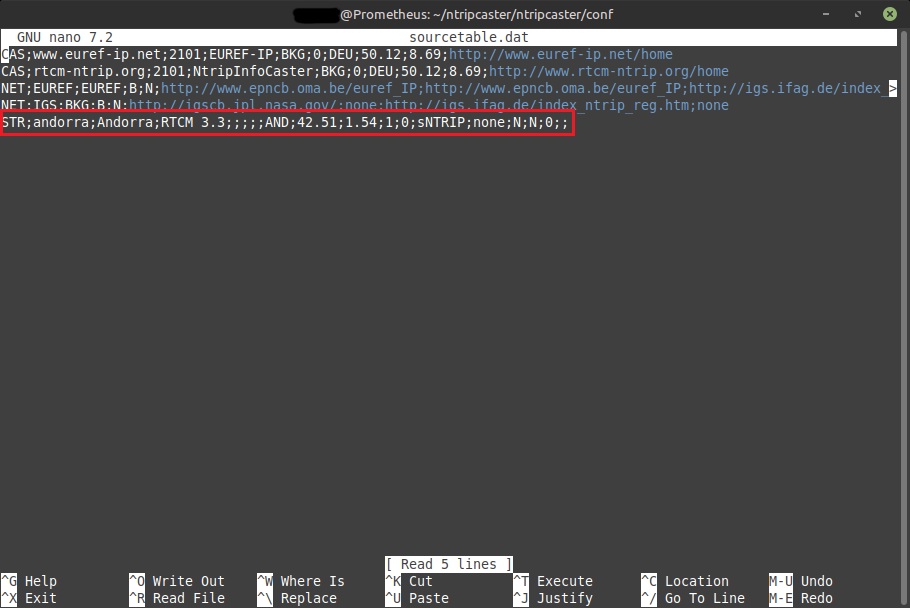
- Add your own mountpoint and remove the example STR;BUCU0 line.
STR;andorra;Andorra;RTCM 3.3;;;;;AND;42.51;1.54;1;0;sNTRIP;none;N;N;0;;
- Now open ntripcaster.conf file.
nano ntripcaster.conf
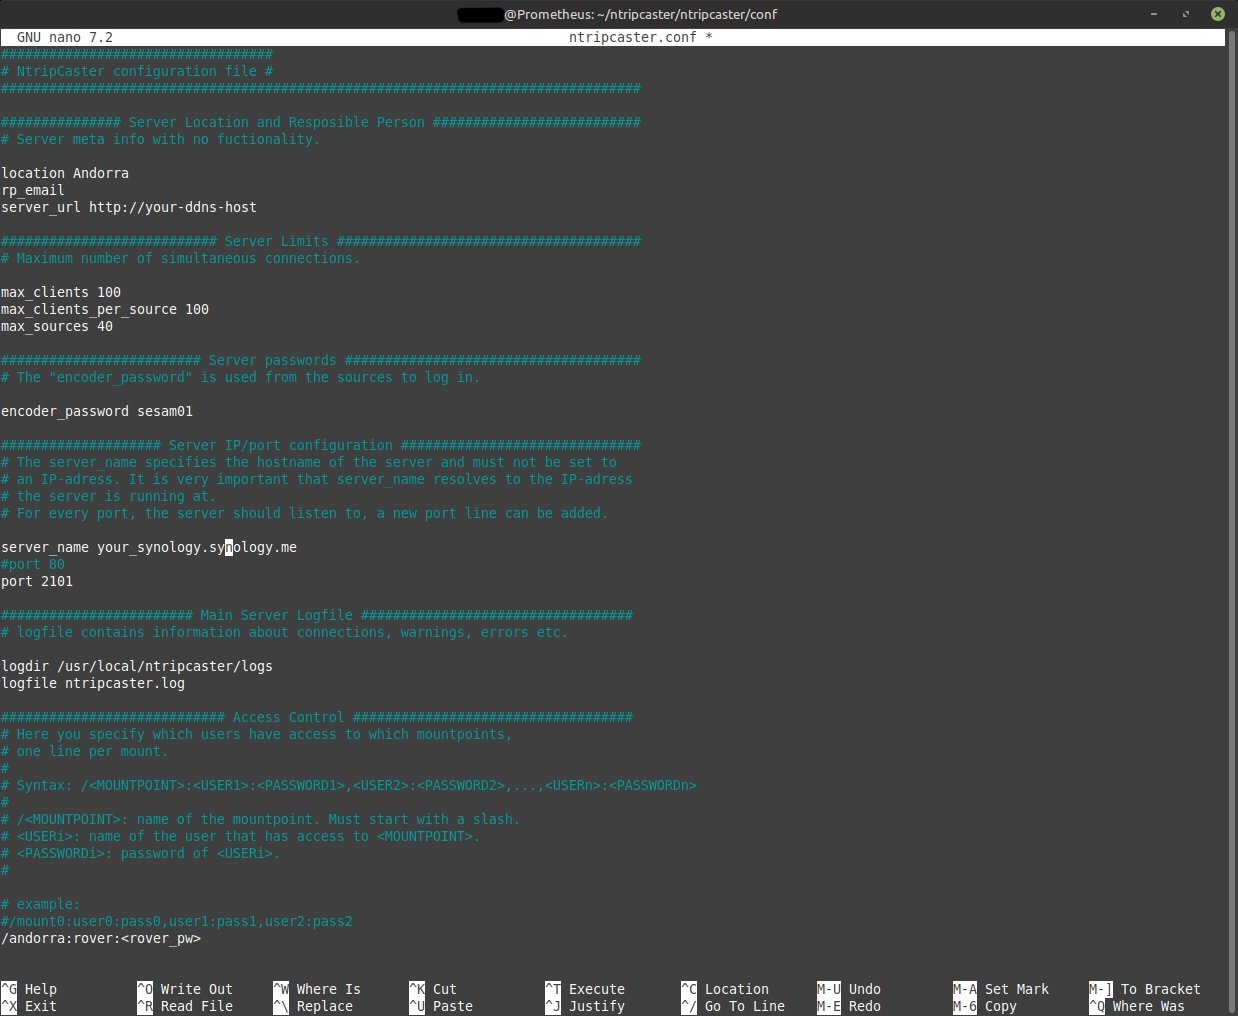
- Set the responsible-person email (rp_email), the password your receiver will push with (encoder_password), the server_name (your DDNS host), the access port number, a single mountpoint access line and remove the example /BUCU0 line.
     location Andorra
rp_email you@example.com
server_url http://<yourname>.synology.me
encoder_password <choose-a-password>
server_name <yourname>.synology.me
port 2101
/andorra:rover:<choose-a-rover-password>
- server_name is the DDNS hostname bound to the NTRIP caster (it must be a name, not an IP address).
- server_url is informational metadata only (the template even mentions that it has no functionality) so it is just an operator link shown for reference.
- The Access Control line.
- The STR;andorra sourcetable entry.
- The receiver NTRIP server config.
NAS Configuration
Package installation and user configuration
- In DSM, install and enable:
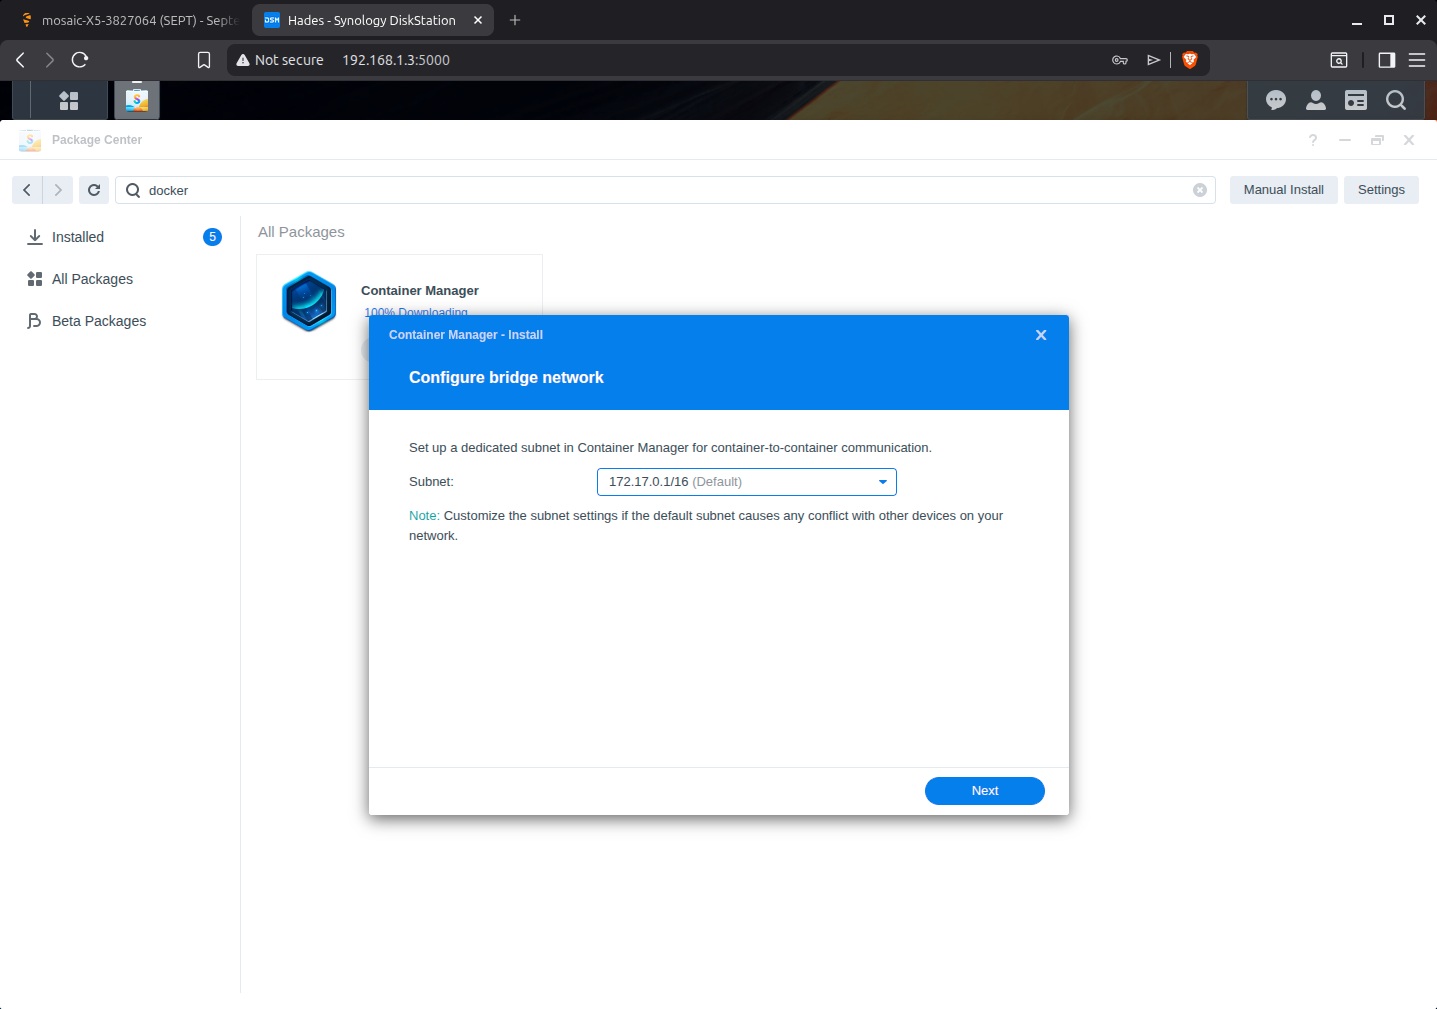
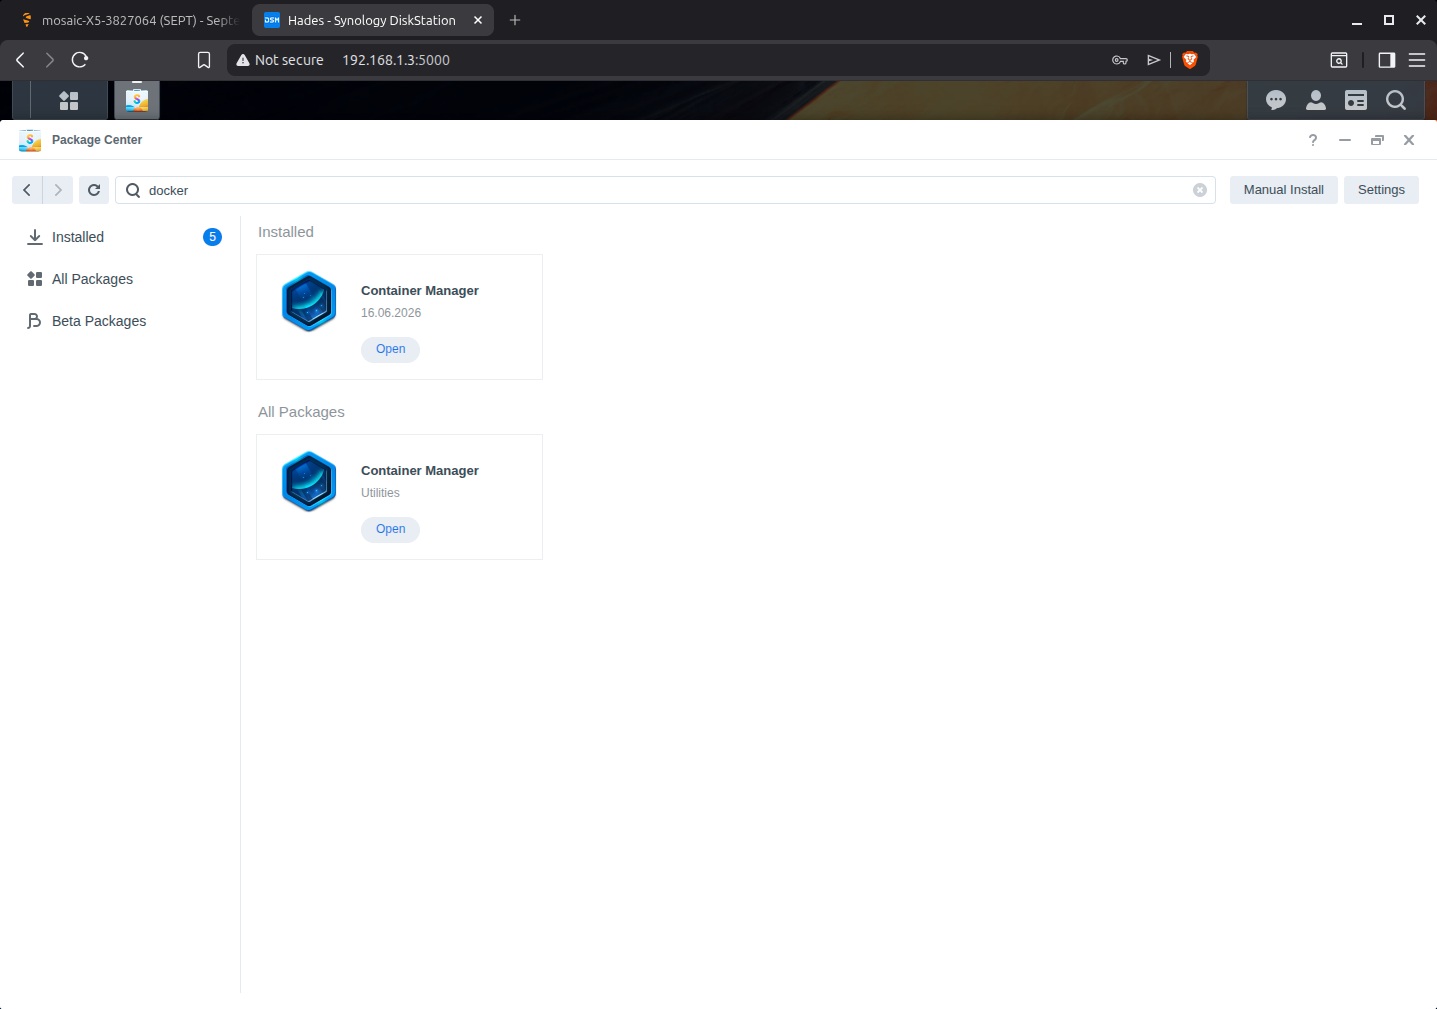
- Container Manager (Package Center) – the Docker engine. Installing it also creates the /volume1/docker shared folder. Accept the default bridge network.
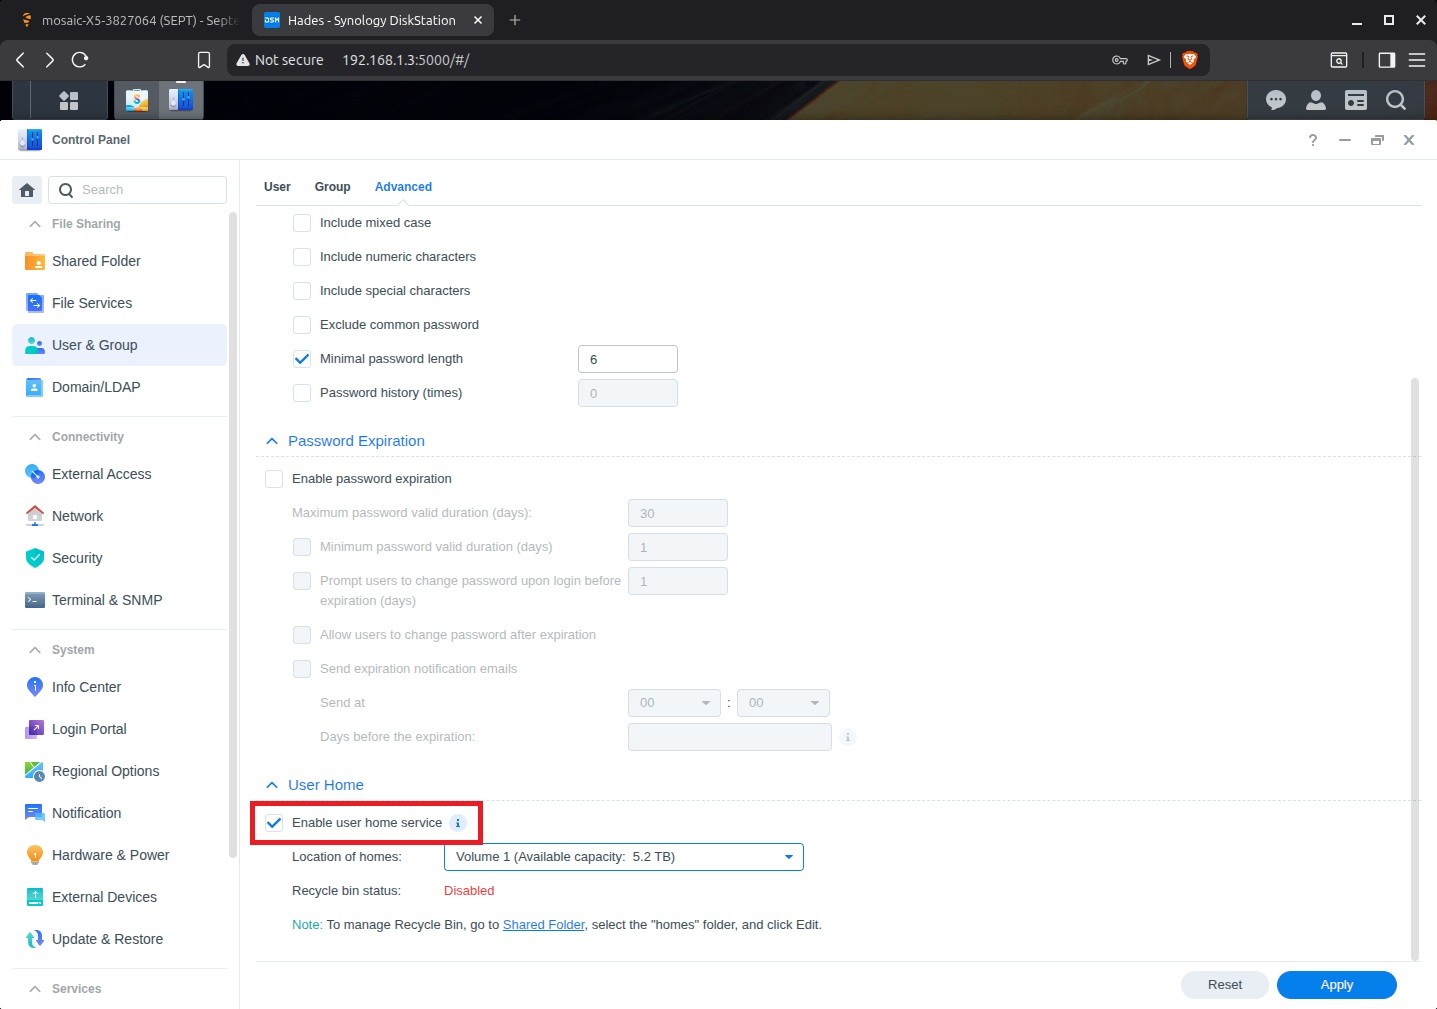
- User Home – Control Panel -> User & Group -> Advanced -> Enable user home service. This creates a DSM admin account and its home directory, which is needed for SSH login.
- SSH – Control Panel -> Terminal & SNMP -> Enable SSH service. Keep it LAN only and do not forward Port 22.
Firewall (optional)
Synology NAS firewall is off by default and not needed to follow this tutorial, but if you want it enabled you will have to allow inbound connections to the forwarded port (2101 by default).
- Go to Control Panel -> Security -> Firewall and edit your active profile:
- Press Create
- Set Ports to Custom -> TCP -> 2101
- Source IP to All
- Action to Allow
Transfer the source caster files
The files created at previous steps in a PC or laptop are now transferred to the Synology NAS.
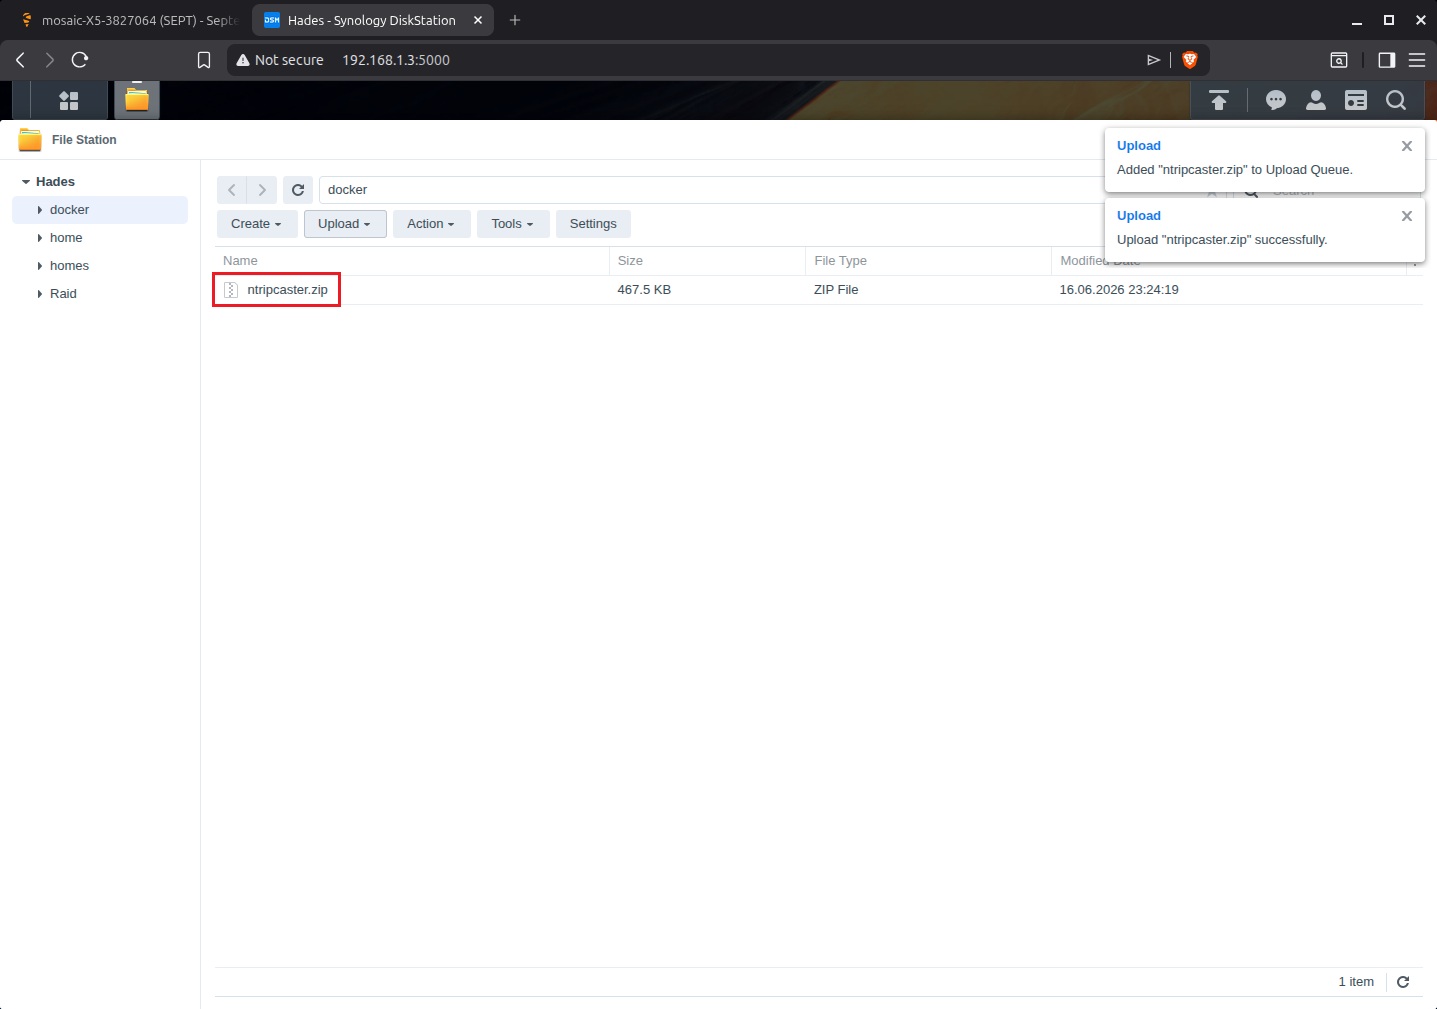
- Zip the cloned ntripcaster folder and upload it using the DSM File Station into the docker shared folder.
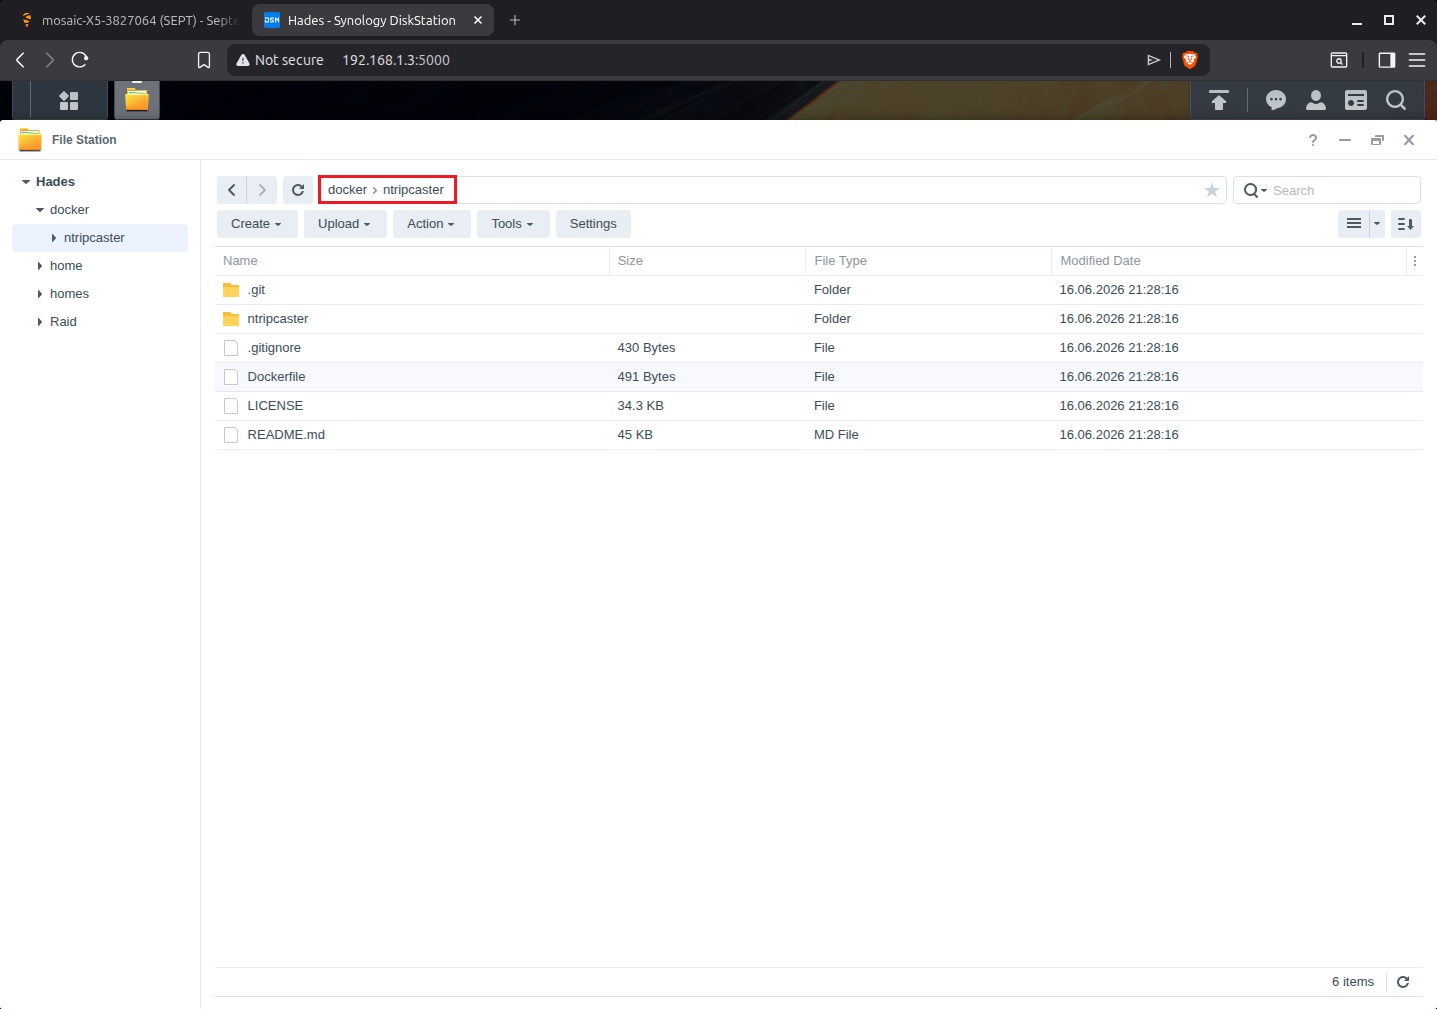
- Extract it to /volume1/docker/ntripcaster and verify that the actual Dockerfile exists directly at this folder, not into a nested one.
Build caster docker container
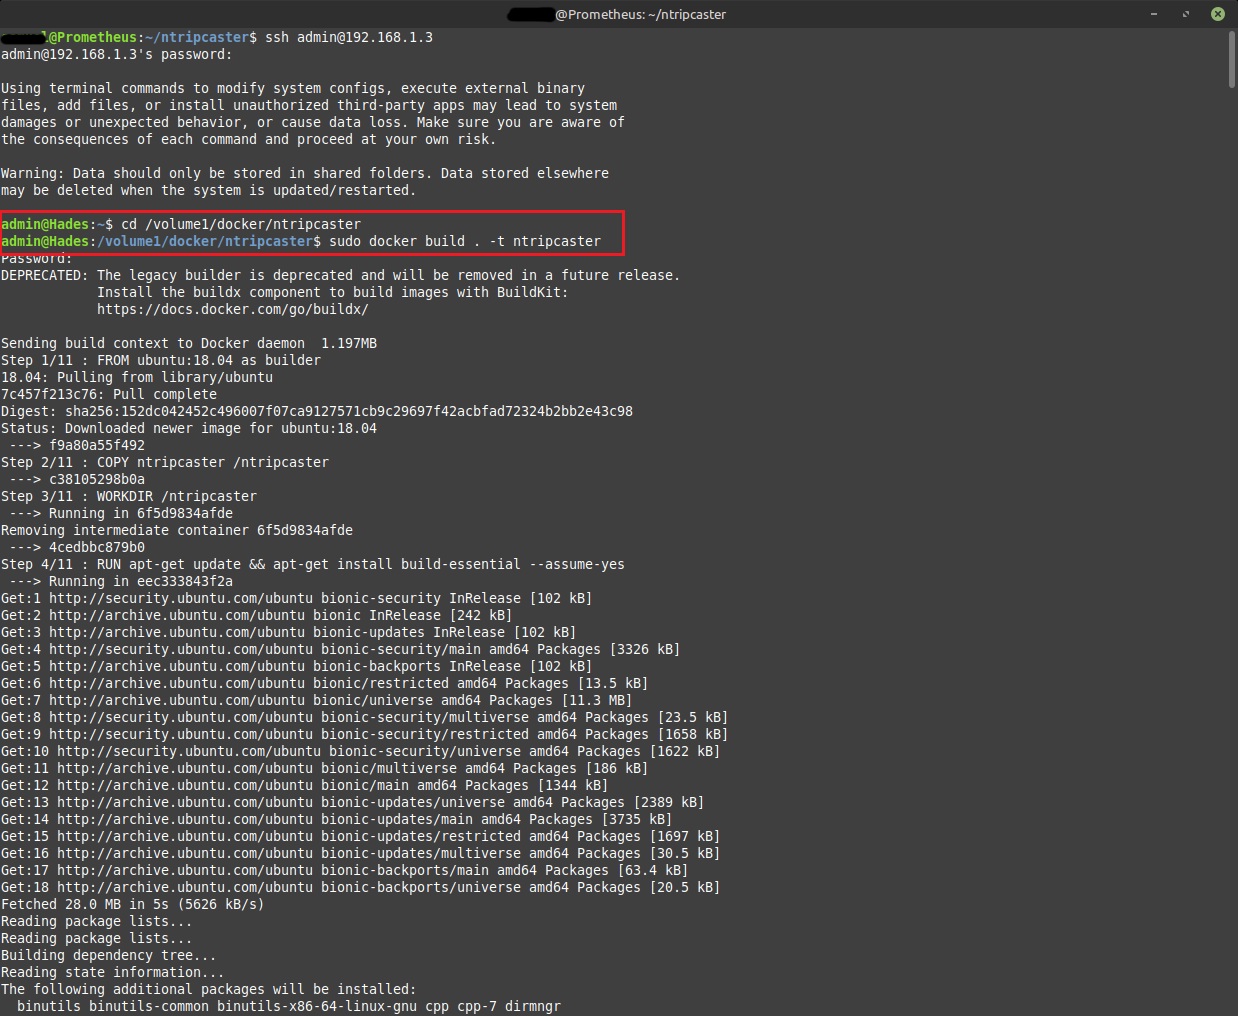
- Open an SSH session to the NAS and build the image.
     # Open a remote command-line session on the NAS over the LAN
ssh <your-dsm-user>@192.168.1.3

# Move console to the source folder you uploaded through File Station
cd /volume1/docker/ntripcaster

# Build a container named ntripcaster from the Dockerfile in the current folder
sudo docker build . -t ntripcaster
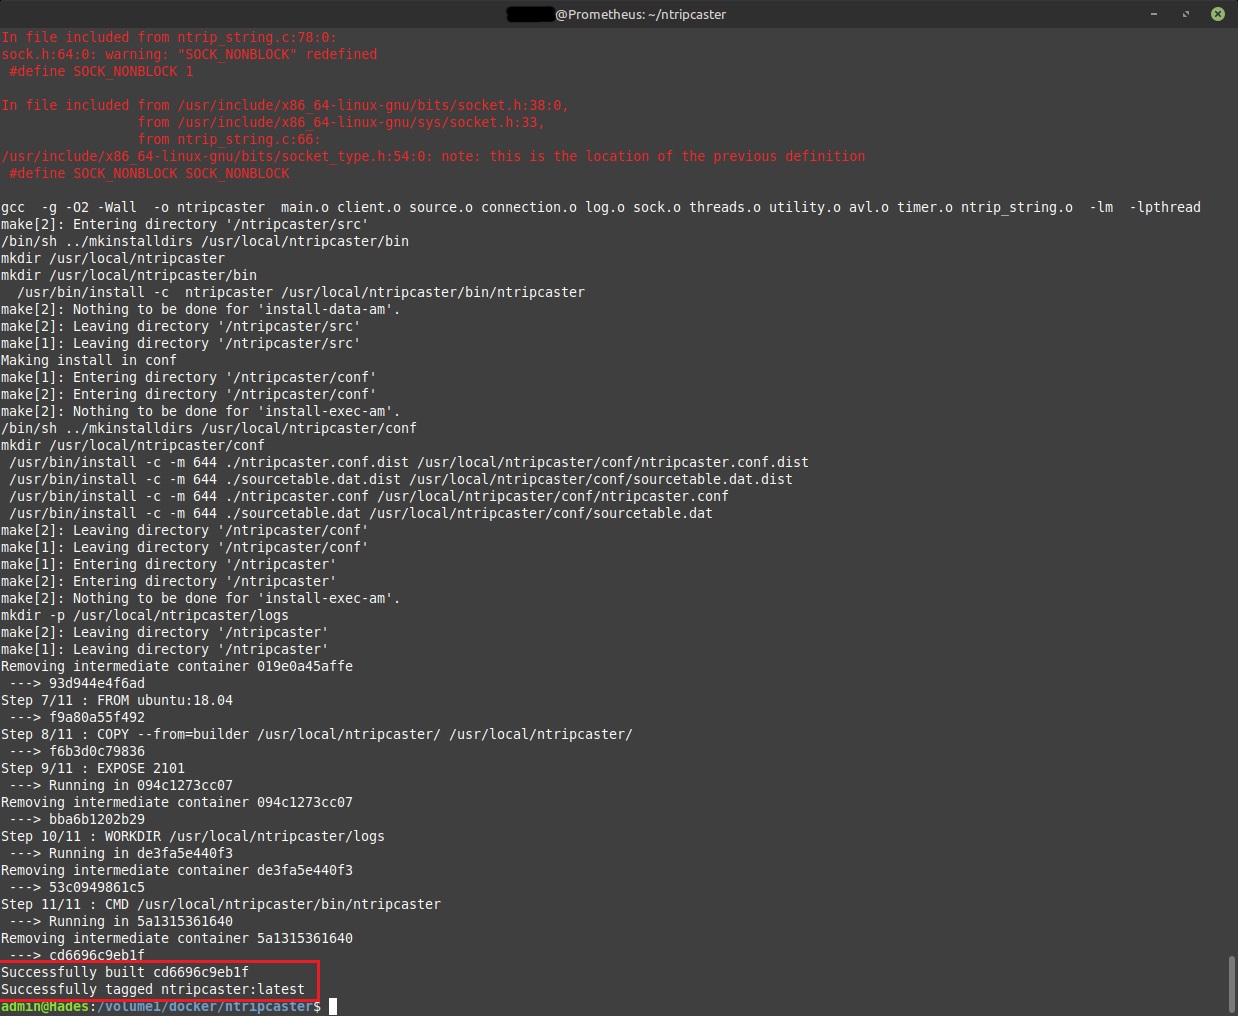
- After the build process is completed you should get a success message.
- Run the container and verify it is serving.
     # Start the caster image
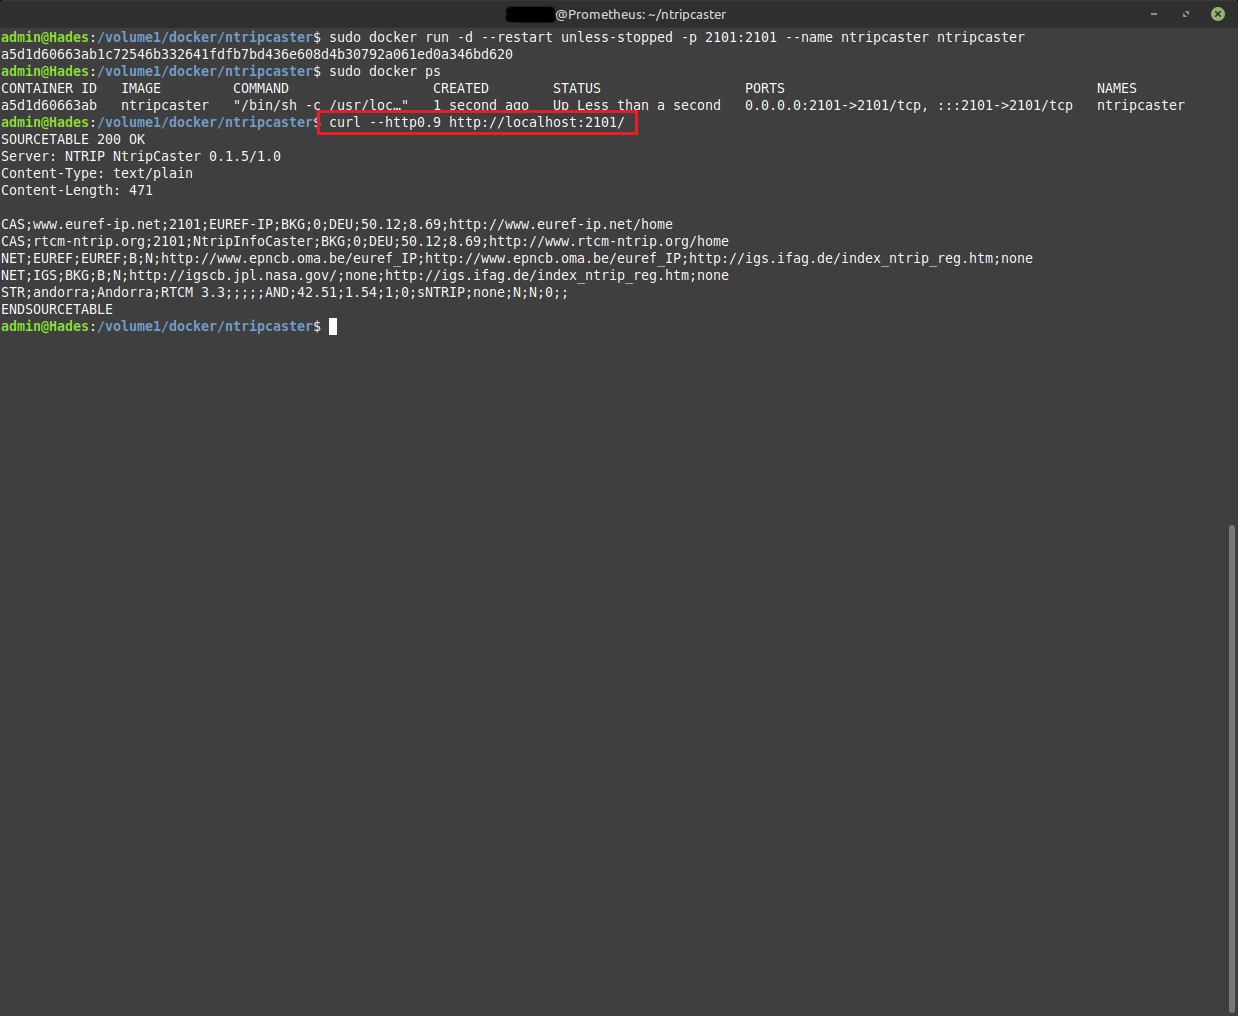
sudo docker run -d --restart unless-stopped -p 2101:2101 --name ntripcaster ntripcaster

# List running containers, so you can confirm the caster is up
sudo docker ps

# Ask the caster for its source table
curl --http0.9 http://localhost:2101/
- The curl command should return a SOURCETABLE OK message and the expected STR line we created on previous steps. This confirms that your edited config has been baked into the image at build time, and that the caster and mountpoint are working.
Set up Synology DDNS
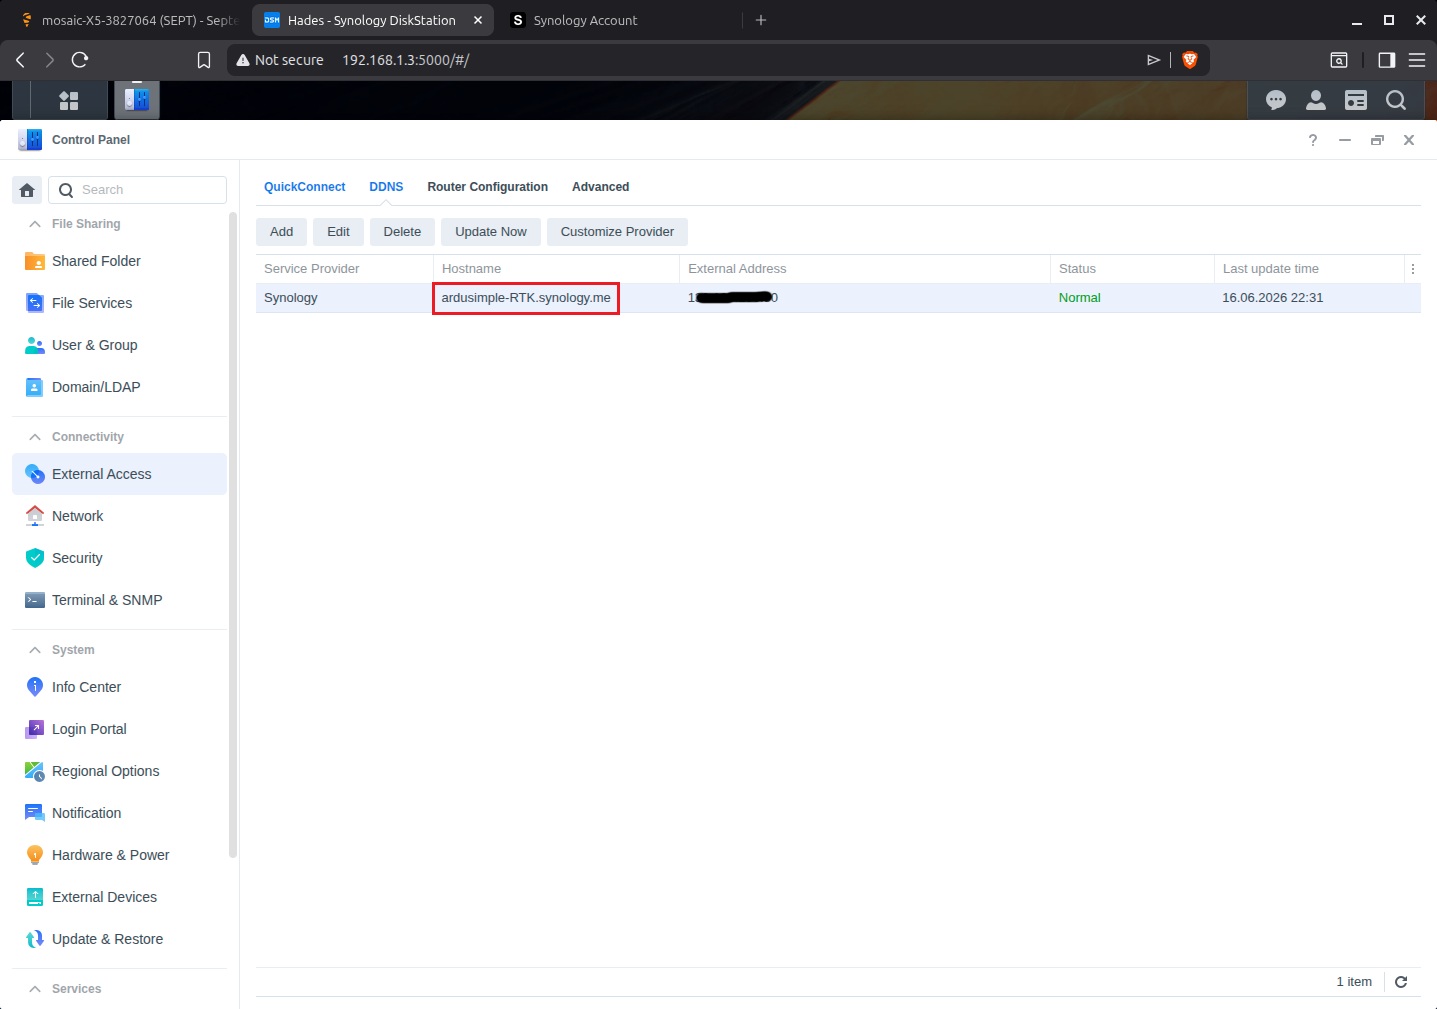
For rovers to reach you on a dynamic public IP, claim a free Synology DDNS hostname. This is the hostname you entered as server_name in previous steps.
- In DSM, first create or sign in to a Synology Account at Control Panel -> Synology Account. Once logged in, go to Control Panel -> External Access -> DDNS.
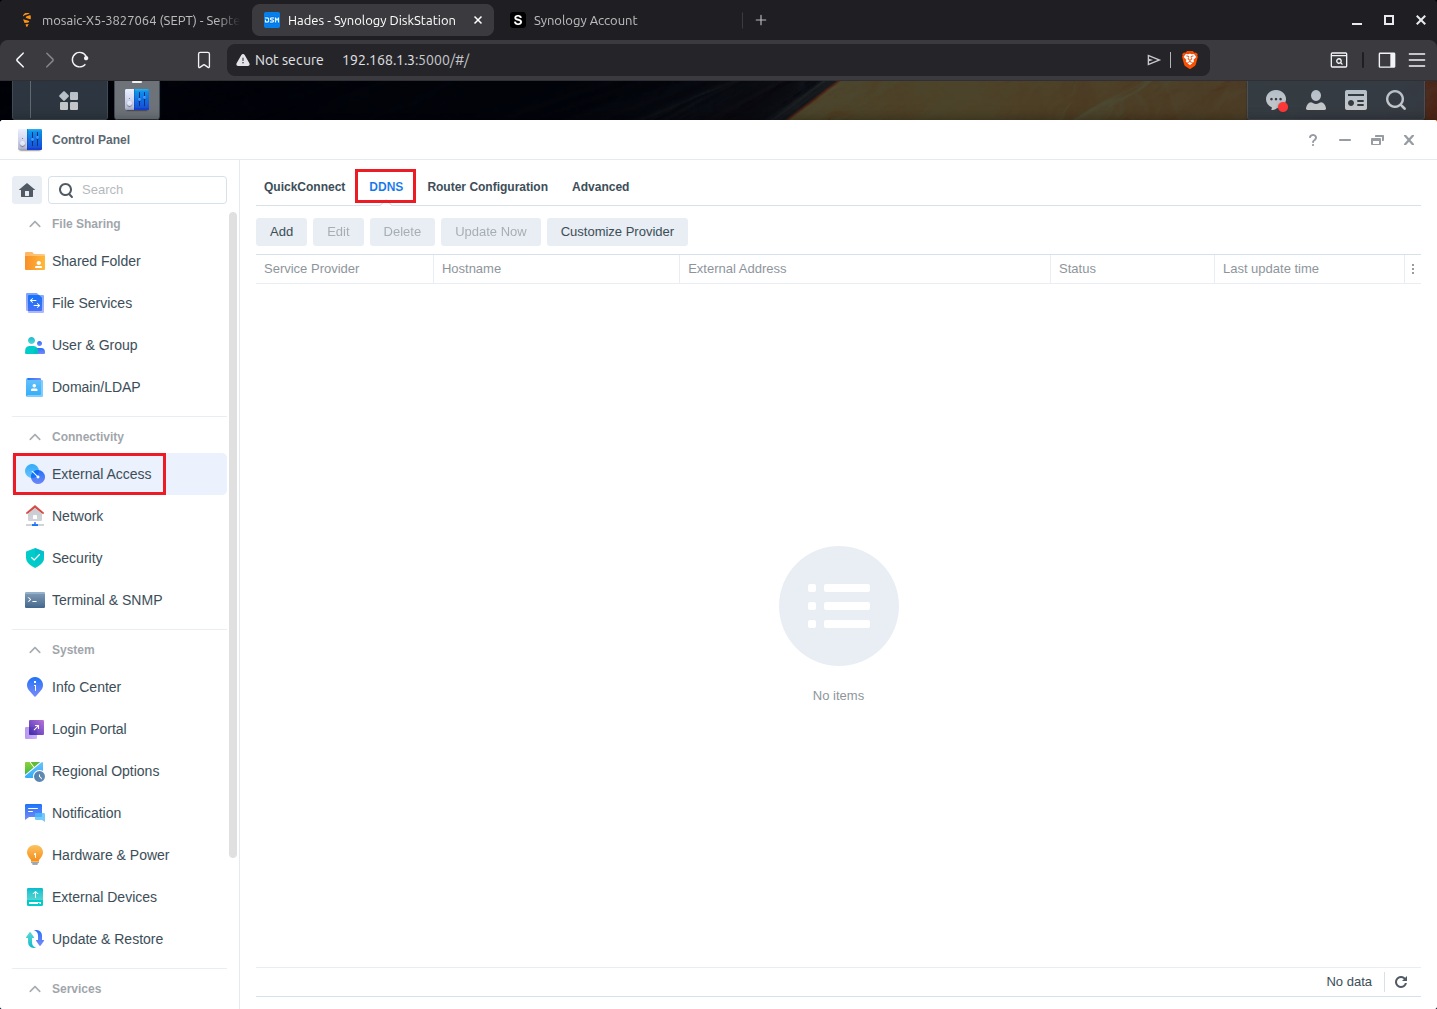
- To add a new DDNS, press Add.
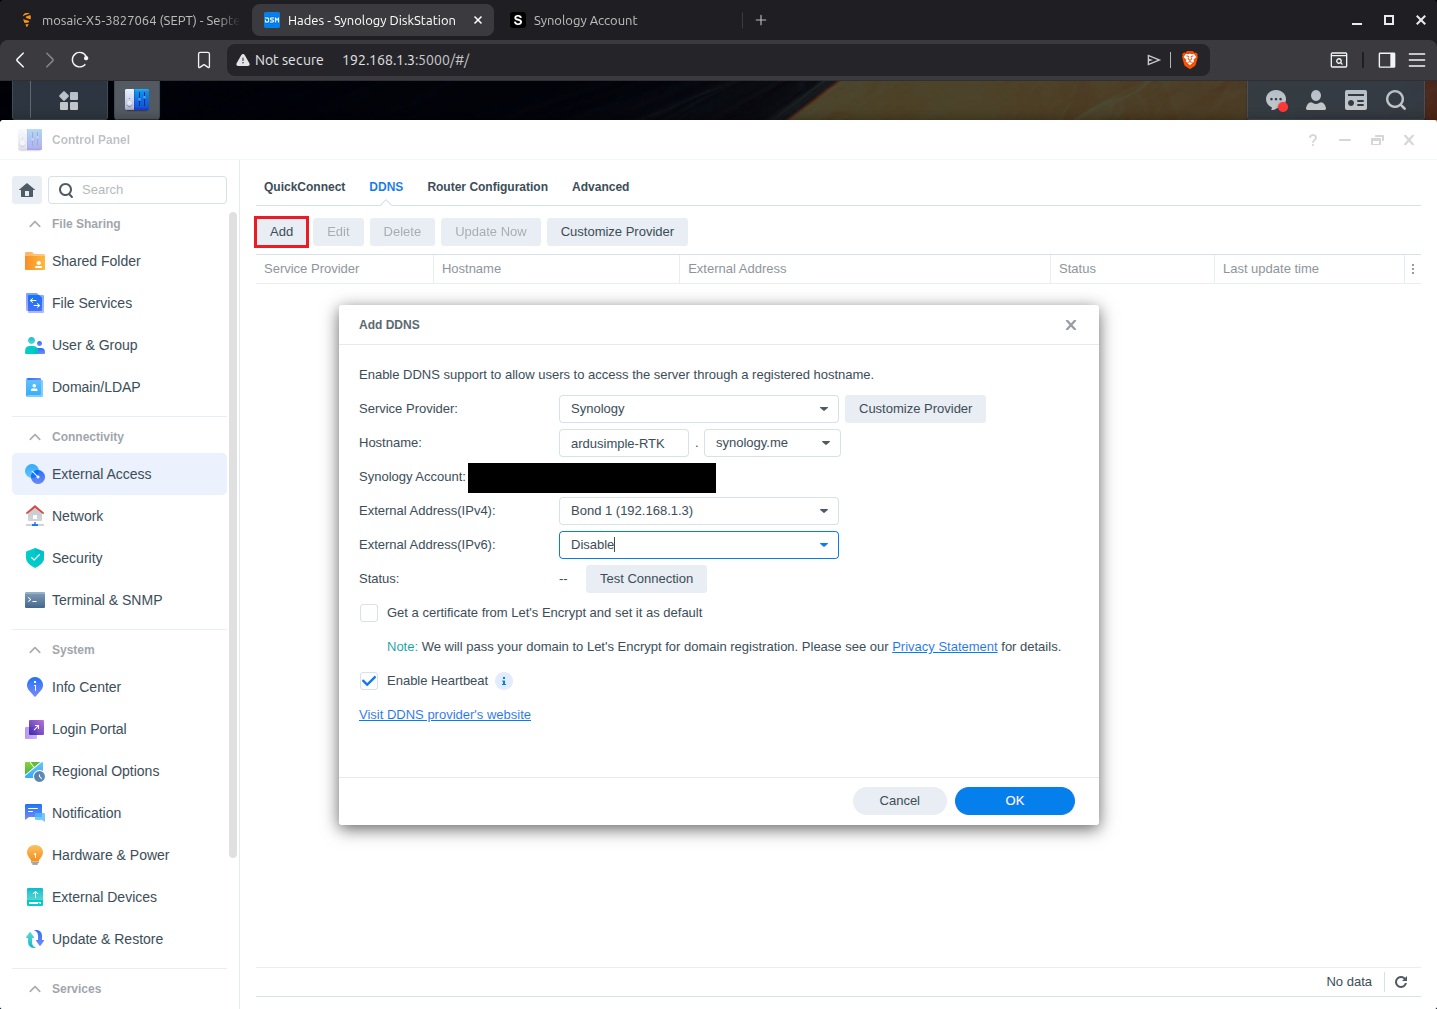
- Fill in:
- Service Provider: Synology
- Hostname: <yourname>.synology.me
- External Address (IPv4): Auto
- External Address (IPv6): Disable
- Get a certificate from Let’s Encrypt: Disabled (NTRIP protocol V1 is plain text, so no certificate needed)
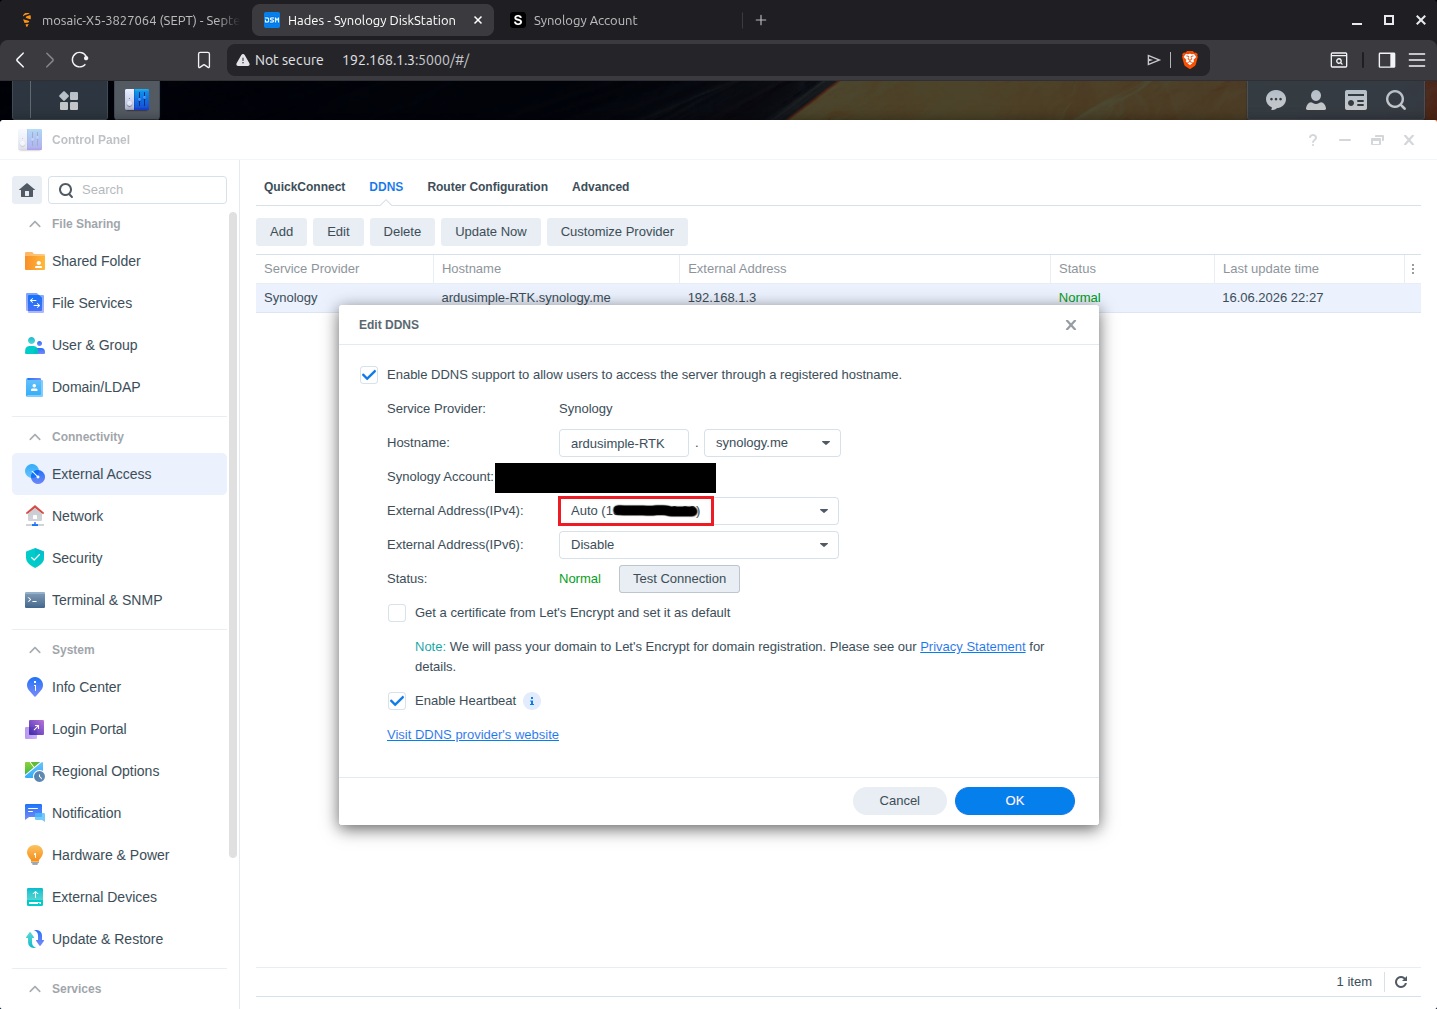
- Press OK and confirm a Normal status, so the DDNS is resolving to your public IP.
Point the base at your caster
Now configure the receiver to push its RTCM stream to the caster.
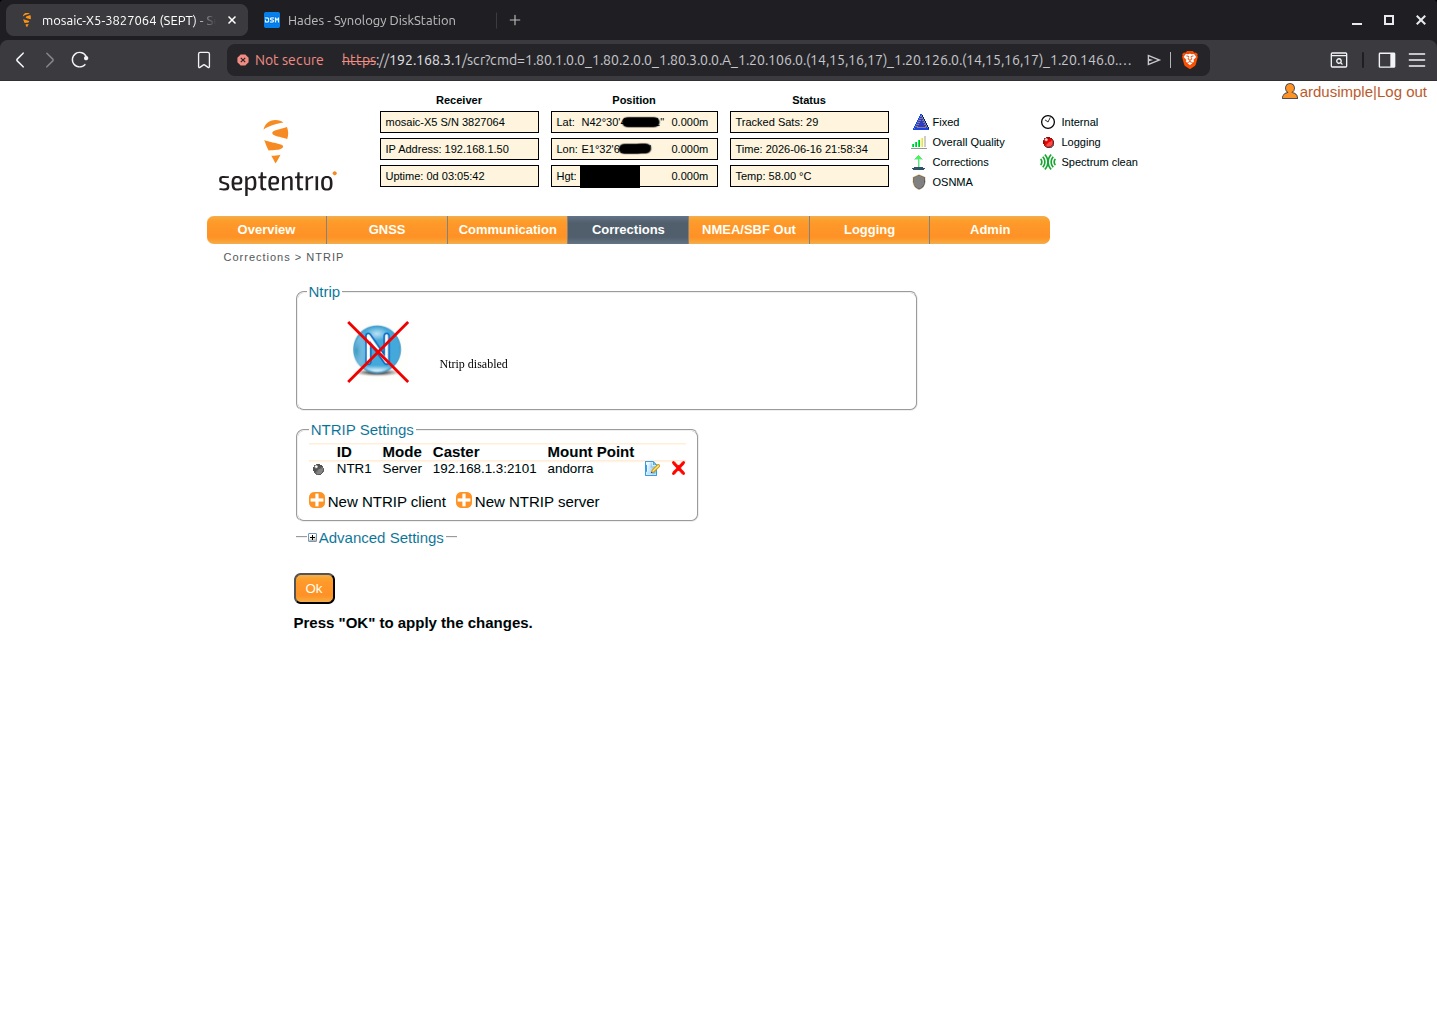
- Open the Septentrio web interface (http://192.168.3.1) in a web browser and go to Corrections -> NTRIP -> New NTRIP server.
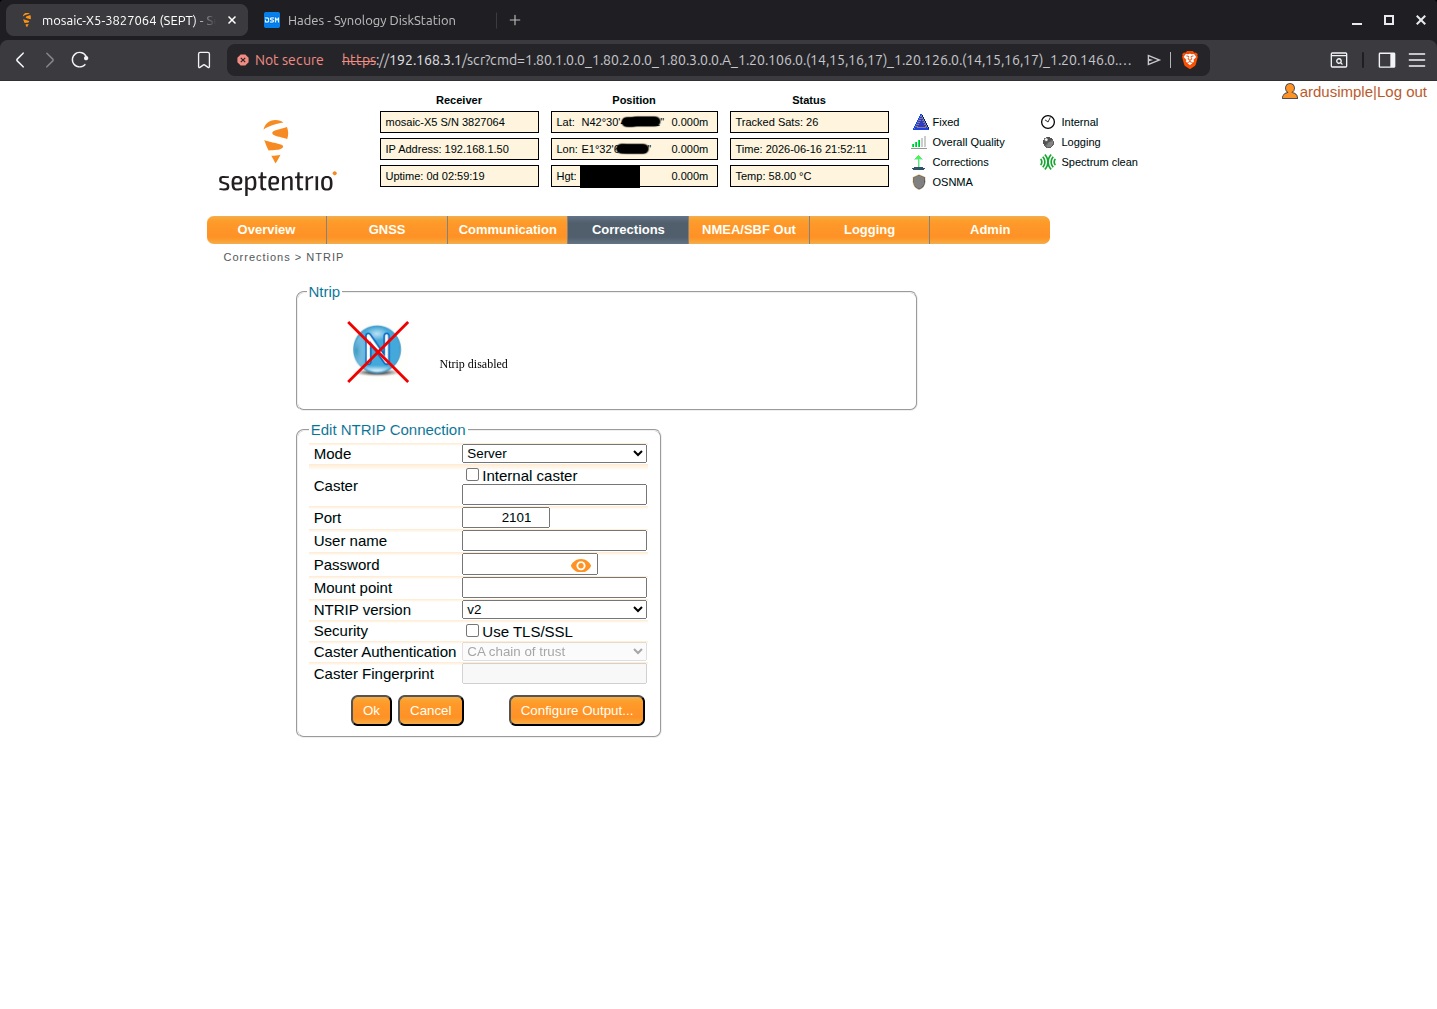
- Fill in:
- Mode: Server
- Internal caster: Disabled
- Caster: 192.168.1.3
- Port: 2101
- User name: Blank
- Password: Use your encoder_password
- Mount point: andorra (use your chosen one)
- NTRIP version: V1
- Use TLS/SSL: Disabled
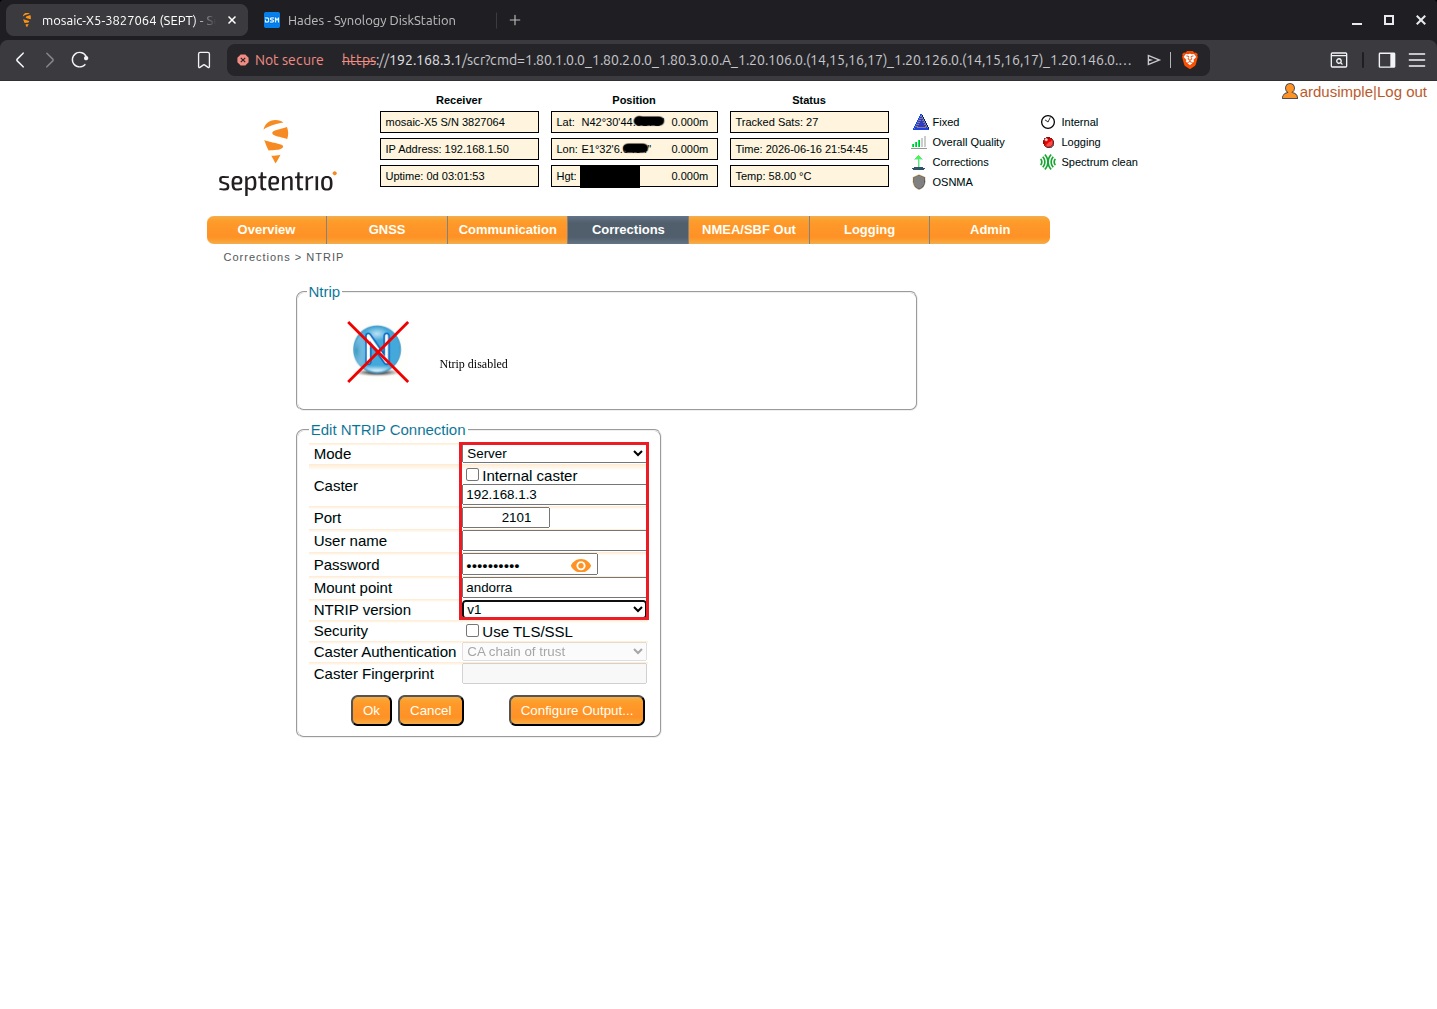
- Press Configure Output and choose RTCMv3. Enable Default messages 1006, 1033, 1230, MSM7 messages 1077, 1087, 1097 and 1127, and disable MSM4 entirely. Press OK.
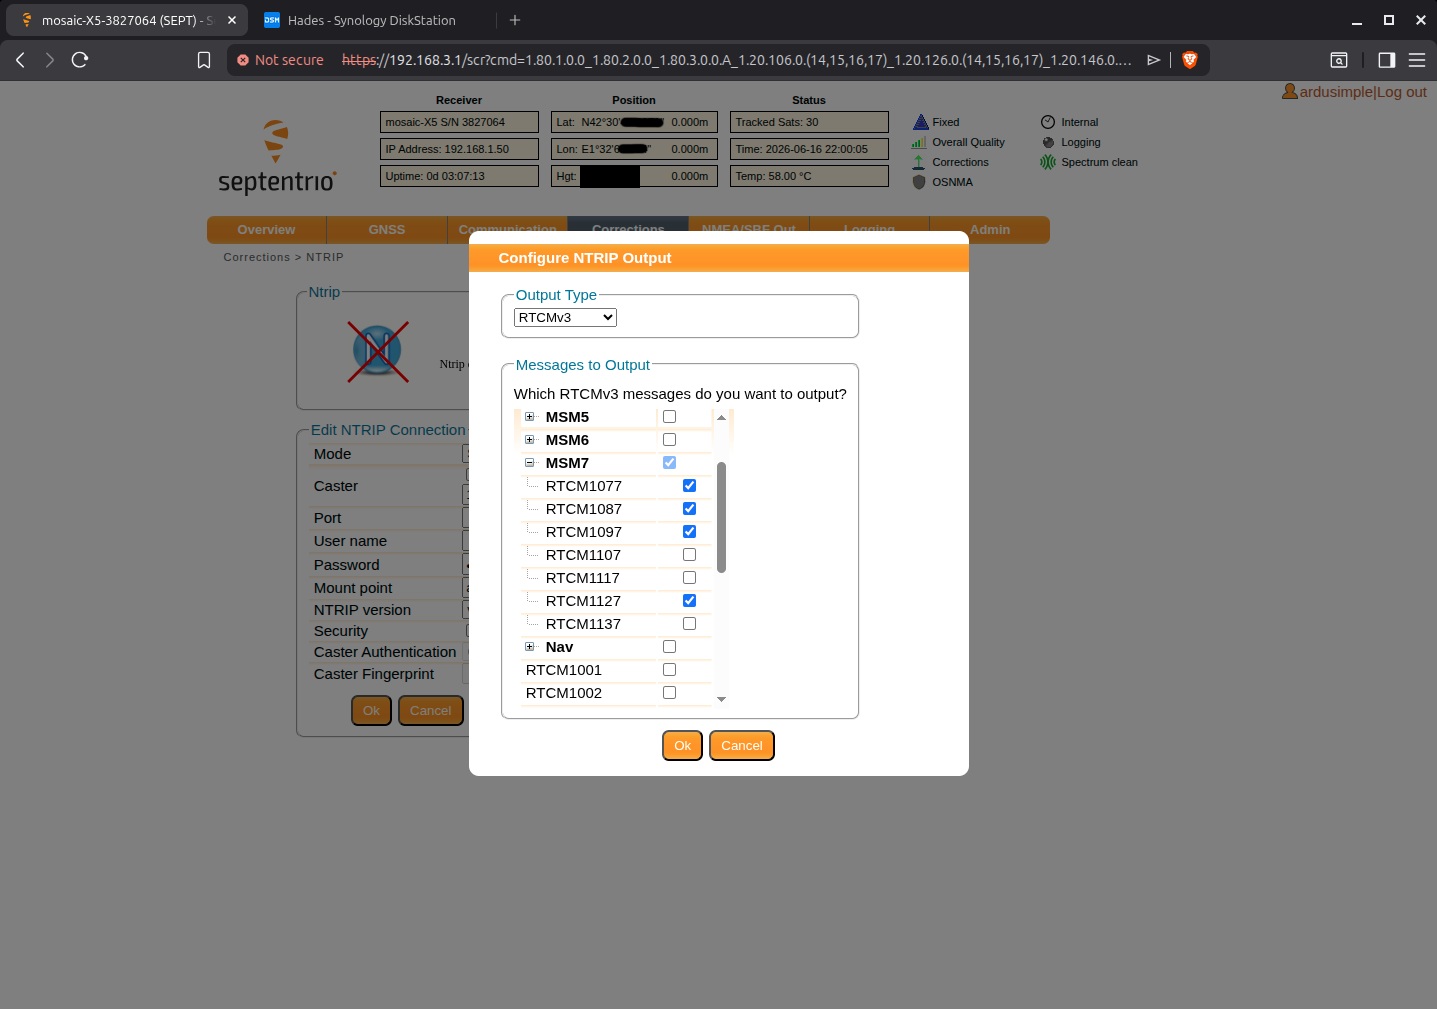
- Back in the Corrections -> NTRIP page confirm that your NTRIP server is now registered. Press OK.
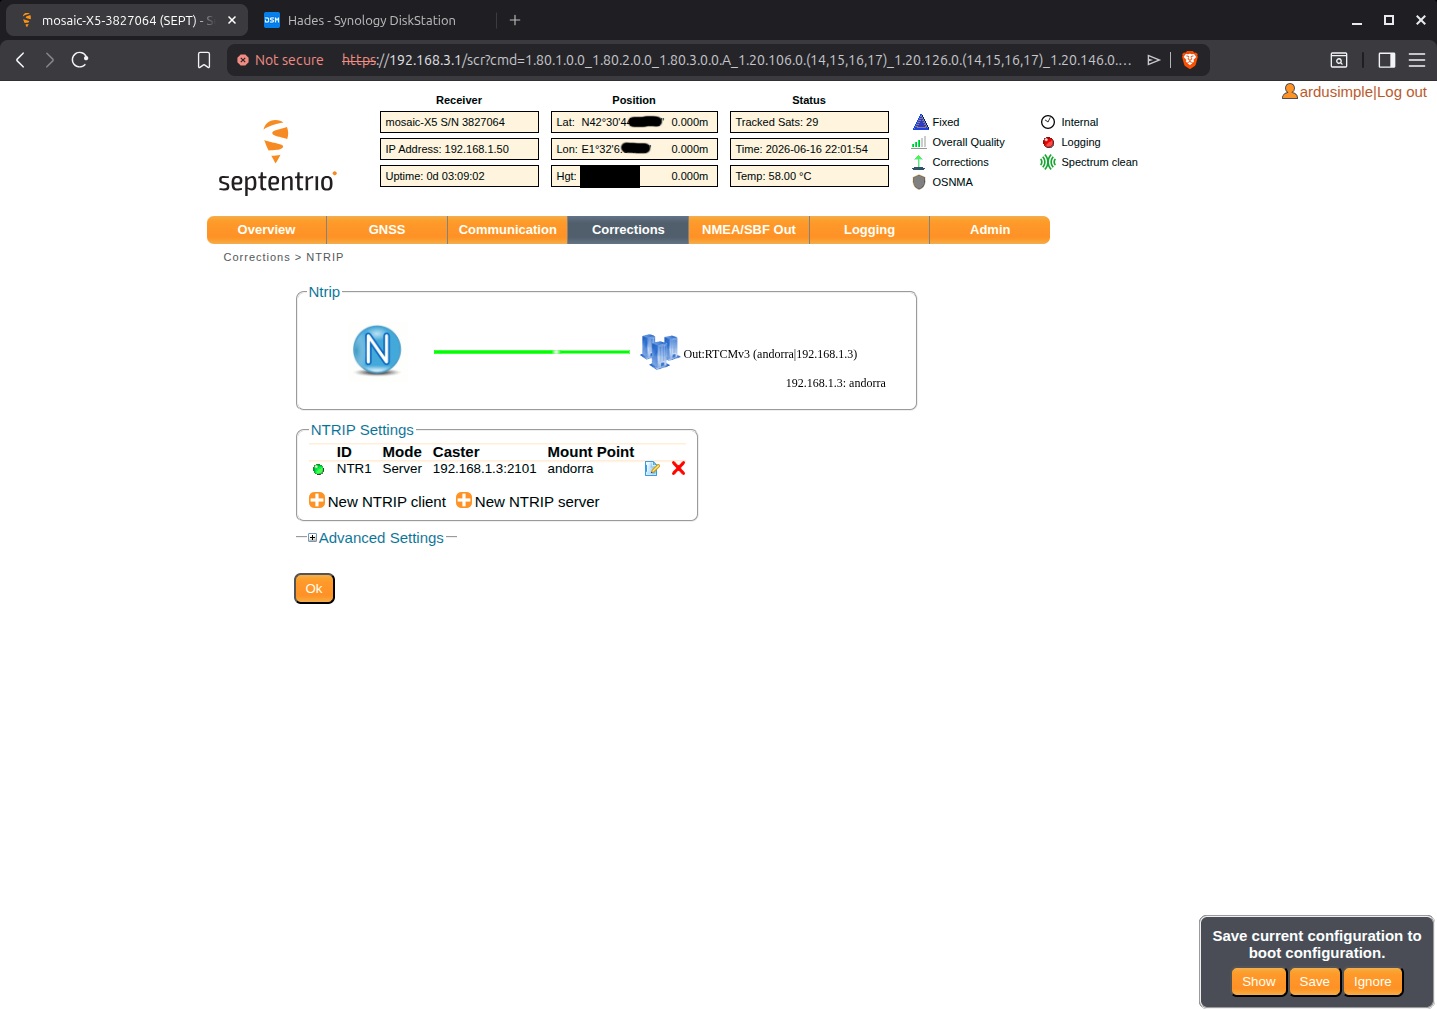
- The link to the RTCM stream should go green. Save current configuration to boot when prompted at the web browser bottom right corner.
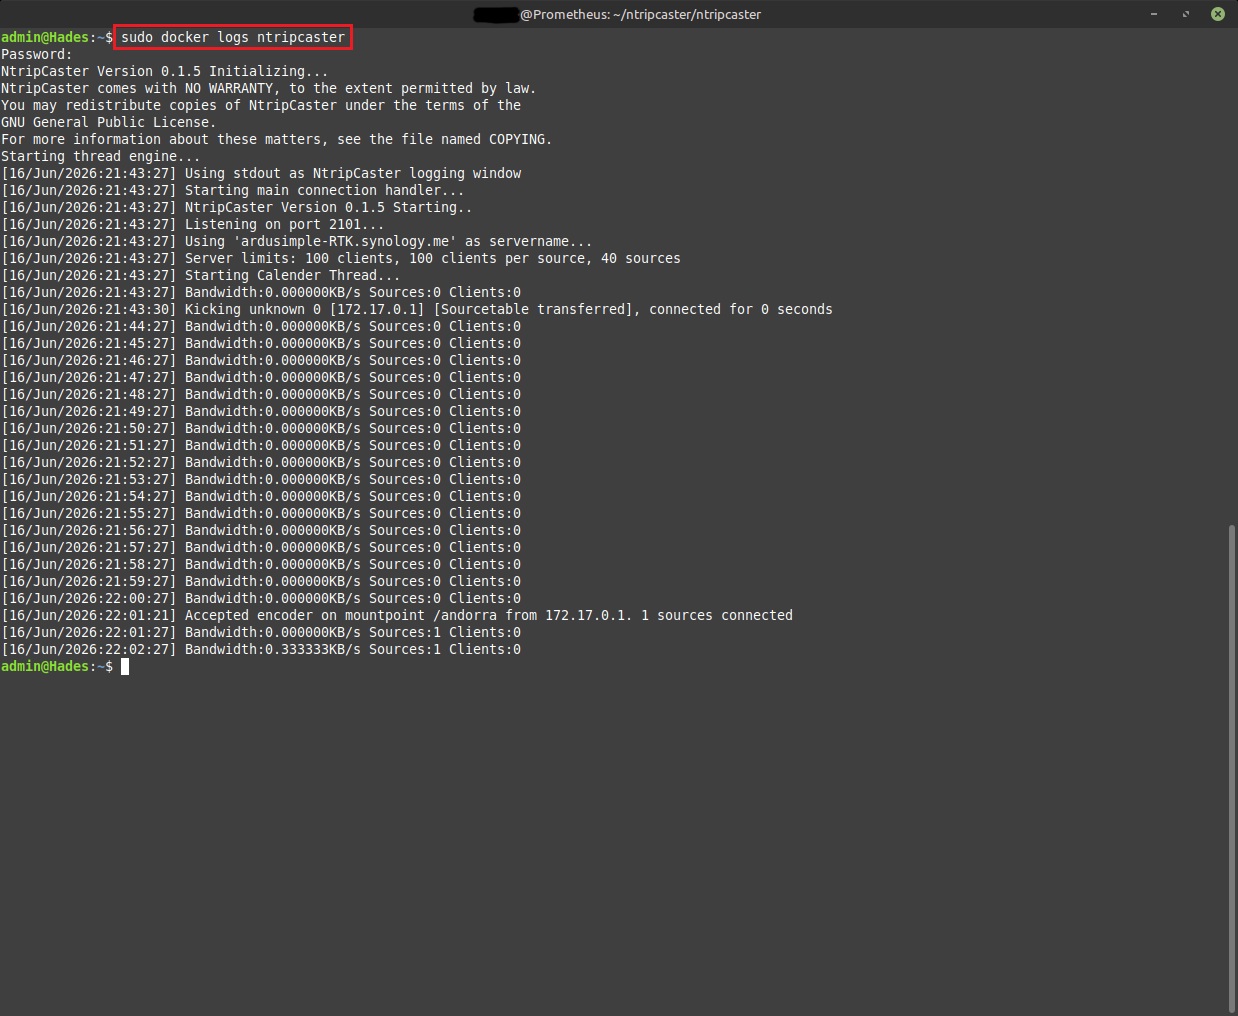
- Verify from the NAS that the source is connected.
     # Print the caster log to confirm the base is connected
sudo docker logs ntripcaster
Make the caster available at the internet
The caster is now serving corrections to the LAN, but it is still not accesible from the internet.
TCP Port configuration
- In the router configuration add a new rule:
- Forward TCP port 2101 to the NAS LAN IP 192.168.1.3:2101 (this step is dependant on your router model, so check the ports configuration section of your router manual).
Validate the caster
Checking that the caster is working do not require any special hardware.
- Fetch the source table from another machine connected to the LAN (not the NAS itself) to prove the caster is up and providing the mountpoint. This should return the SOURCETABLE OK and STR lines.
     # Source table request at the NAS LAN IP, but run from another machine connected to the LAN
curl --http0.9 http://192.168.1.3:2101/
- Connect an NTRIP client software from a machine over the internet to the caster while watching the caster log. The logging of the client should be visible in the caster log. The credentials are:
- Hostname: <yourname>.synology.me
- Port: 2101
- Mountpoint: <your chosen mount point name> (in our case andorra)
- User: rover
- Password: <your chosen password>
     # Show NTRIP caster log
sudo docker logs -f ntripcaster
- The final end-to-end validation step (optional) would be connecting a GNSS receiver (rover) as the simpleRTK2B – Basic Starter Kit to an NTRIP client software and confirm that the corrections provided by the caster are resulting in a RTK Fixed position with centimeter-level accuracy. Please follow the simpleRTK2B user guide using the same credentials from the step above.
Security note
This setup only exposes port 2101 (the correction stream) from the NAS. Before making it live on the internet change the credentials used as an example in this tutorial for your own:
- encoder_password (your chosen base push password)
- mountpoint (we used andorra)
- username (we used rover)
- password (your chosen user password)
Treat the credentials as any other personal data and bear in mind that anyone knowing them could access the corrections from the caster.
Remember that NTRIP V1 protocol is not encrypted and hence your mountpoint, username, password and the RTCM stream itself all travel as plain text over the internet. Do not use personal names or passwords, assuming anyone on the data path could read the stream.
Troubleshooting
This table shows most common errors, along with their probably cause and how to fix them.
| Error | Cause | Fix |
|---|---|---|
| Base receiver unreachable at its IP and Ethernet LED off | Interal RTK Board power switch not set to 5V OUTPUT | Flip the the internal RTK board switch to 5V OUTPUT |
| Source table query works on the NAS (curl command) but not from another LAN machine or over the internet | DSM firewall blocking 2101, or router port-forward missing/wrong | Allow TCP 2101 in DSM Firewall and verify the port forward process |
| Mountpoint shows in the source table but a rover gets no data | DSM Base is not pushing - Sources: 0 | Check the NTRIP server link is green in the web interface and that the encoder password is matched |
| Caster log shows the encoder rejected and Base push do not connect | Wrong encoder_password or NTRIP protocol version not changed to V1 | Change NTRIP protocol to V1 (default is V2) and the password at ntripcaster.conf file |
| Rover receives data but never reaches RTK Fix | Message 1006 is not included in the push or rover antenna not having a clear un-obstructed sky view | Confirm 1006 was included in the RTCM messages or move the antenna location to an outdoors open area |
| DDNS hostname resolves correctly but external clients cannot connect | Internet connection is behind a CGNAT or firewall/forward blocking 2101 port | Verify your IP is not behind CGNAT (before start section), and verify firewall and port forward configurations. |
| DDNS shows Normal status but the hostname is unreachable from the internet | External Address pinned to a LAN interface instead of set to Auto | Set DDNS External Address to Auto |
Credits
This tutorial uses the Docker file and instructions to build and run the BKG NTRIP caster.
NTRIP and the original caster software are developed by the German Federal Agency for Cartography and Geodesy (BKG).
Related tutorials and documentation
- RTK Base Station User Guide
- simpleRTK2B – Basic Starter Kit User Guide
- How to configure Septentrio Mosaic-X5 and Mosaic-H
- How to build a low cost tripleband CORS base station
- How to determine the exact position of your base station with simpleRTK3B Pro
- How to configure simpleRTK3B Pro as static base station
Related products
If you want to follow this tutorial we have all the products in stock and ready to be shipped worldwide within 1-3 days.


RTK Assistant
Find the best products for your application in just a few questions.