 and
and 

How to connect simpleRTK2B series receiver to a NTRIP correction service via PC

We have shown some figures about the performance of the u-blox ZED-F9P in base-rover configuration, where the base sends corrections to improve the accuracy of the rover position.
The base-rover configuration has some advantages:
- No external infrastructure required
- No need for cellular network coverage
But also has some limitations:
- The range of RTK corrections is limited to ~35km from the base
- The range of RTK corrections is limited also by the radio link between the base and the rover which, in some cases, must have direct line of sight
When these limitations are a problem, simpleRTK2B series receiver can be used as a standalone board and RTK corrections can be fed to it via an external NTRIP service.
In this post we will show how easy it is to connect your shield to a NTRIP caster.
Good to know:
Before starting the tutorial, you need to find a NTRIP service provider that covers your geographic location.
If you are not aware of them, check this list. Most of these services are free but require registration.
In this tutorial we will use CatNet GNSS service (CatNet GNSS network from the Institut Cartogràfic i Geològic de Catalunya) which is free and have coverage in the area where the tests took place.
Required hardware:
- simpleRTK2B series receiver
- simpleANT2B antenna
- USB cable compatible with the USB port of your board to connect to computer
- a computer or a laptop with internet connection
Required software:
- u-center (If you don´t have it installed you can download it here. Note: Download the classic u-center, not u-center2)
How to connect simpleRTK2B series receiver to a NTRIP correction service?
- Make sure you have credentials to connect to NTRIP service (username, password and the parameters of the connection).
If you do not, register on a NTRIP server and get the username, password and the parameters of the connection.
Note: The procedure maybe be different for different NTRIP services, but it usually needs:
- To fill in the registration form of your NTRIP service provider
- To receive an automatic email with details if your registration made
- To activate the subscription by clicking the received email link
- Plug the GNSS antenna to your receiver, place your antenna in a location with good view of the sky, or near a window for testing the functionality.
- Connect your simpleRTK2B series board to computer with an USB cable.
Note: Your receiver may have two USB connectors, so that you need to use connector labeled as POWER+GPS. - Open u-center and connect your receiver with COM port.
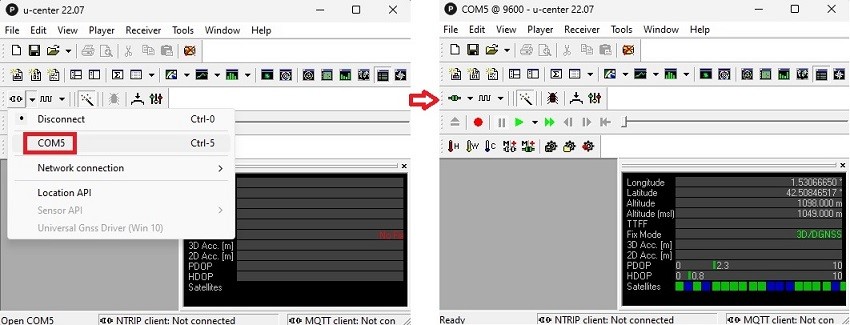
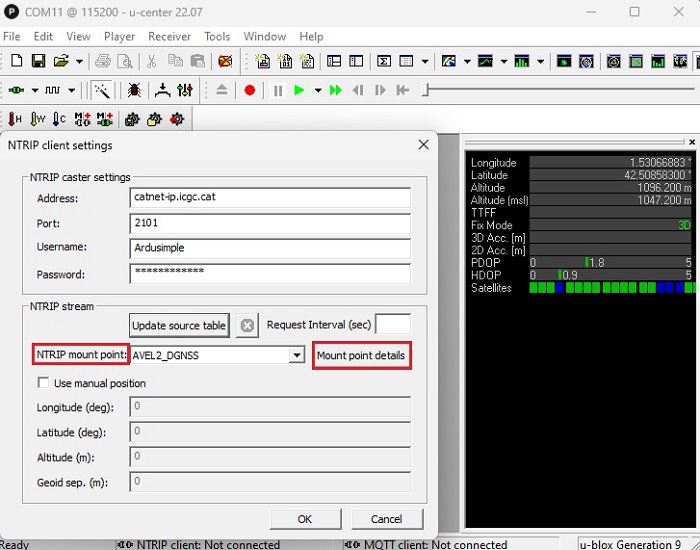
- Go to Receiver –> NTRIP Client… Enter the settings of your NTRIP caster you get from step1. Click Update source table.

- Wait a few seconds for u-center to retrieve the information. After seeing the update information in the NTRIP mount point, click the Mount point details button.
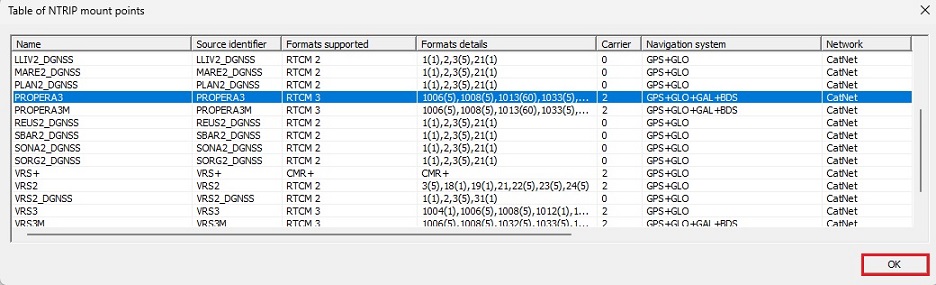
- In the window you will see details of the different stations that belong to your NTRIP service provider. Some of them broadcast generic information while others use your position to send you custom corrections.
- There are a lot of different mountpoint types in the different NTRIP services providers, so it is difficult to make a tutorial that will work for all.
What we can say in general is that:
- if available, use mountpoints with the keywords “nearest” in your own language, or “vrs”
- from these, choose the one with RTCM3 corrections
- from these, choose the one with the greatest number of constellations, e.g if you have GPS+GLONASS mountpoint, and GPS+GLONASS+GALILEO choose the second one
- Click OK.
- At NTRIP mount point choose the mounting point you selected in step 8. In our case will be PROPERA3. Click OK.

- In the toolbar go to View–>Docking Windows–>Data.
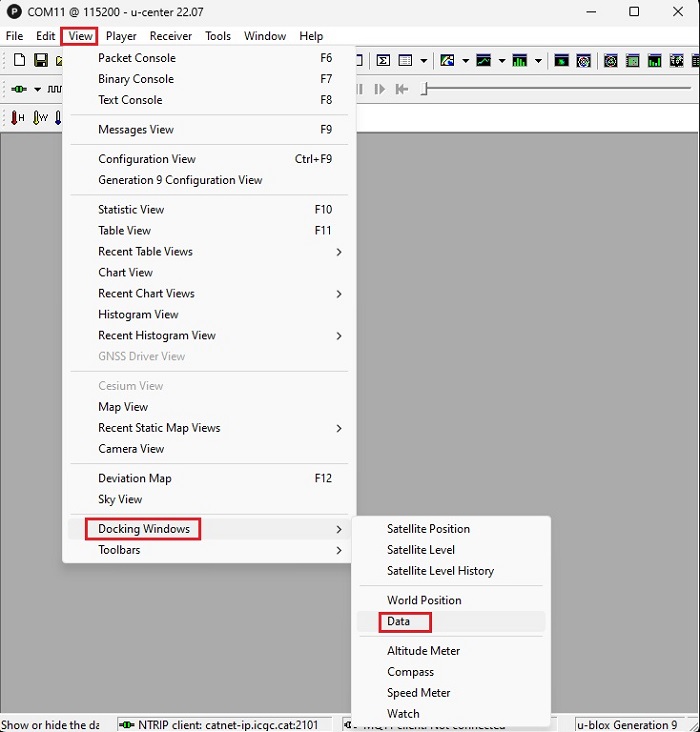
- In a few seconds you should see in the information panel that Fix Mode has changed to FLOAT or FIXED.
At the bottom of u-center screen, if everything is working, you will see the green icon in the NTRIP client section.
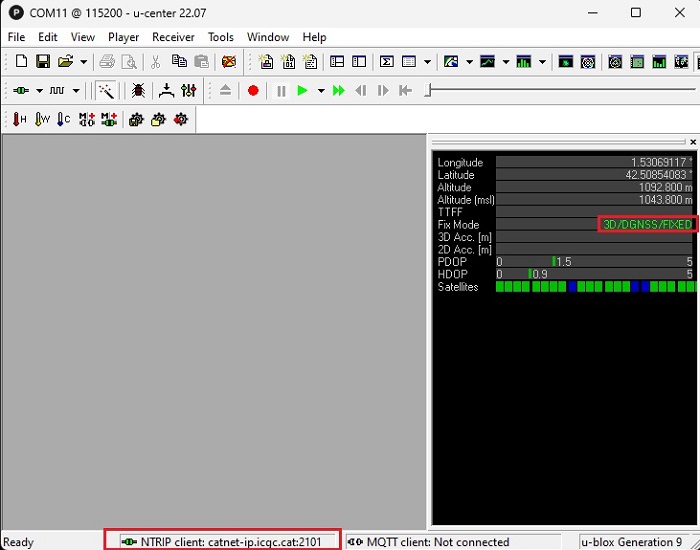
- Now your simpleRTK2B series receiver is connected to a NTRIP correction service.
If you want to do this tutorial, we have all the products in stock and ready to be shipped.

RTK Assistant
Find the best products for your application in just a few questions.

