Update (05/04/2026): We have plenty of stock of all our products, find us also in and    Shop now

User Guide: CANBus GNSS Master

Overview and installation

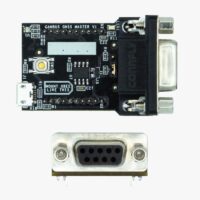
The CANBus GNSS Master is an accessory that allows to connect your simpleRTK2B, simpleRTK3B or simpleRTK4 board to a CAN Bus network and read/write messages.

With the current firmware you can use this plugin to transmit classic messages or you can also use it with NMEA2000 protocol.

The module has the following connections:

  • XBee socket. This module is compatible with all our products with XBee sockets (simpleRTK2B, simpleRTK3B, simpleRTK4, …).
  • microUSB connector. We use it to update its parameters or to load new firmware. Notice that this connection does not power the CANBus GNSS Master, you always need to plug it into a powered XBee socket.
  • DB9 connector. You need to plug a cable to it. Connect the other end to your CANBus network.
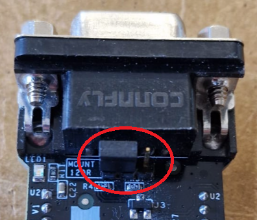
  • Terminal resistor jumper. Make sure to set the terminal resistor jumper like this if your CANbus network has already a terminal resistor (if not leave it in the default position):

  • BOOT button. Use it to load firmware (see instructions below).
  • LEDs. Blue LED shows if the CANBus GNSS Master board is powered on.

To install this device, simply plug it into a GNSS receiver with XBee socket and power the receiver.
In normal operation there is no need to use the microUSB connector on it (we use it only to configure it).

Make sure your GNSS receiver is configured to send data in NMEA format at the proper UART port at 115200bps.

Parameters

To configure your CANBus GNSS Master, you should set its parameters:

  1. Plug the CANBus GNSS Master board into your GNSS receiver XBee socket, power your GNSS receiver.
  2. Connect the microUSB cable to your CANBus GNSS Master and your PC, a flash drive will appear
  3. Fill the form below with your desired output
  4. Press the Generate parameter file
  5. Drag and drop the generated file on your CANBus GNSS Master flash drive.
    Make sure the name is can_settings.toml
  6. Wait 10 seconds and restart your CANBus GNSS Master device by pressing the XBEE RESET button  on your receiver(not the BOOT button on your CANBus GNSS Master). If you have a simpleRTK2B Lite, unplug the USB cable and replug it.

You can also read previous generated files by pressing the Read parameter file button.

General settings
Classic CAN messages settings
NMEA2000 settings


Latest firmware and changelog

Last version: FW v1.0.0 updated on 30/03/2026
*** CANBus GNSS Master Changelog ***

2026-03-26 - FW V1.0.0
* First release

Got any questions or requests?
Contact us! We'll answer <24 hours!

Icon
Contact ArduSimple
Close
ArduSimple GNSS RTK evaluation boards made easy

Want to learn more about GPS and RTK?

If you are busy right now, our engineers can send you 3 short e-mails, explaining all you need to know to start your project.