 and
and 

How to integrate u-blox ZED-F9P GNSS/RTK receiver into ROS 2 (Jazzy)


This tutorial explains how to integrate the u-blox ZED-F9P RTK GNSS receiver with a robot running ROS 2 (Jazzy). You’ll learn how to connect the hardware, configure the receiver, set up a ROS 2 workspace, and launch the necessary nodes to receive and process high-precision GPS data with RTK corrections via an NTRIP service.
By the end of this guide, you’ll have a fully functional ROS 2 setup streaming real-time RTK data from your RTK receiver based on u-blox ZED-F9P—suitable for robotics applications requiring centimeter-level positioning accuracy.
Required hardware:
- simpleRTK2B – Basic Starter Kit
- USB cable compatible with the USB port of your receiver for connecting to a PC or embedded platform
- a PC or embedded platform with internet access (we use a PC in this tutorial)
Required software:
- Ubuntu 24.04 (installed natively, in a virtual machine, or via WSL)
- ROS 2 (Jazzy) (installed on Ubuntu platform)
Useful resources
- Helpful resources to install Ubuntu:
- Using WSL or Virtual Machines: In case you want to use WSL or virtual machines it is necessary to share the RTK receiver with Ubuntu. There are instruction how to share it with the system:
- NTRIP Service Access: Make sure you have access and credentials to NTRIP service. You need help to find a correction service, refer to our List of NTRIP correction services in your country.
- RTK Receiver Configuration: Make sure your RTK receiver is configured as a Rover. If you need help configuring a u-blox ZED-F9P as a Rover, refer to our ZED-F9P Configuration files.
How to set up u-blox ZED-F9P RTK receiver with ROS 2?
Setup ROS 2 environment
- When ROS 2 environment has been installed by following the ROS2 installation guide, by default it is not active when you open a terminal.
To fix this, open Terminal and run the following command to configure Ubuntu to load the ROS 2 environment to your Terminal startup configuration automatically.
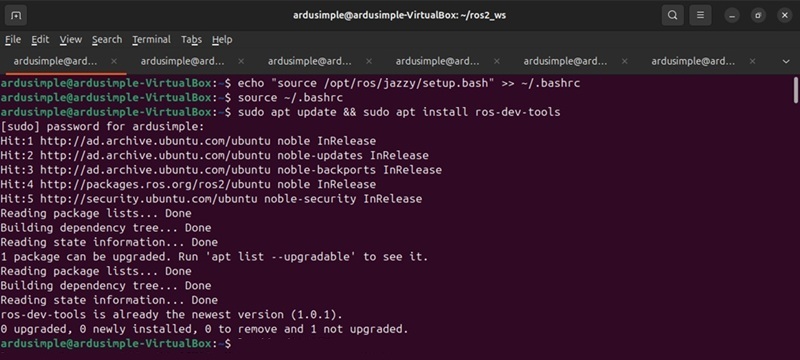
echo "source /opt/ros/jazzy/setup.bash" >> ~/.bashrc
To apply the changes use the command below. After this, ROS 2 will be ready to use every time you open a Terminal.
source ~/.bashrc
- To manage dependencies in ROS 2, update your package list and installs ros-dev-tools, which includes rosdep and other useful development tools for ROS 2.
sudo apt update && sudo apt install ros-dev-tools
Connect RTK receiver
- Plug the RTK antenna to your receiver. Place the antenna in a location with good view of the sky, or near a window for testing the functionality.
- Connect your receiver to the PC via the USB port labeled with “POWER+GPS.”
- The receiver should be automatically configured. To verify this, open Terminal and type the command. You should see /dev/ttyACM0 (or a similar device, e.g., /dev/ttyACM1).
ls /dev/ttyACM*

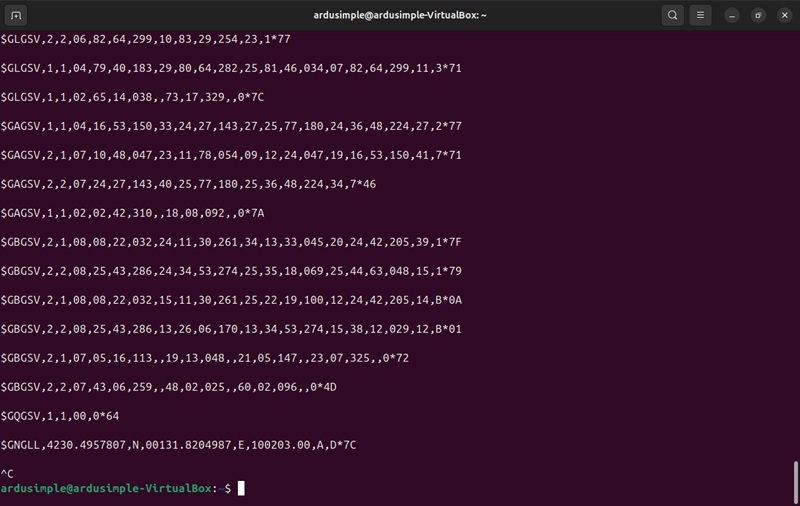
- To check the GPS Stream from RTK receiver, run the command in the Terminal. It shows the raw GPS data streaming from the receiver. Press Ctrl + C to stop.
sudo cat /dev/ttyACM0
- Tip: If you don’t see any output or the device is missing, make sure your user has the appropriate permissions (e.g., being in the dialout group). You can add yourself with the command below. Afterward, log out and log back in for the changes to take effect.
sudo usermod -a -G dialout $USER
- To prevent the RTK receiver from starting in a different “ttyACM*” each time when it is powered, create a udev rule (a dynamic link) that creates an entry with a specific name by adding the following file before connecting the RTK receiver.
sudo nano /etc/udev/rules.d/50-ardusimple.rules

- Enter the following text to the rule:
KERNEL=="ttyACM[0-9]*", ATTRS{idVendor}=="1546", ATTRS{idProduct}=="01a9", SYMLINK="tty_Ardusimple", GROUP="dialout", MODE="0666"
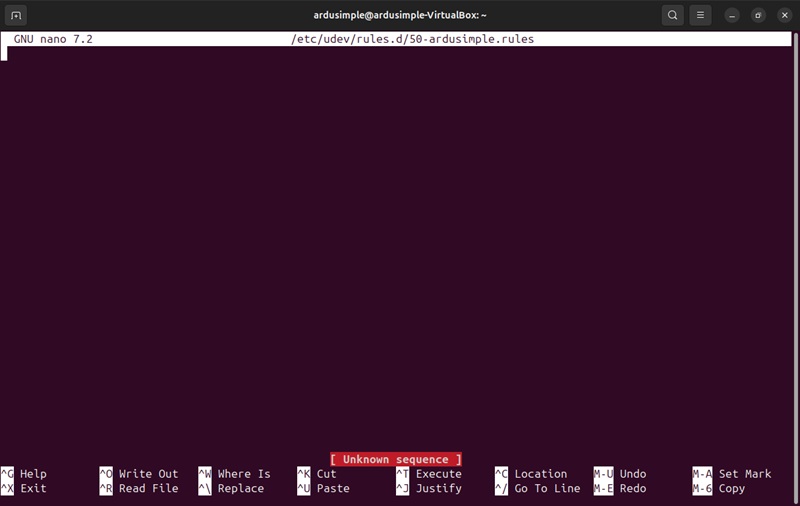
- Press Ctrl+X to exit the file and press Y to save modified buffer.
- Disconnect (unpower) RTK receiver and connect it (power) again.
- Now whenever an RTK receiver is connected, it will be accessible from the “/dev/tty_Ardusimple” link. To check this, enter the commands:
     sudo service udev reload
sudo service udev restart
sudo udevadm trigger
ls /dev/
- Now you can see that “tty_ArduSimple” has been created.

Prepare a new ROS 2 workspace for project
- To create a Workspace Directory, open a Terminal and create a folder (for example, ros2_ws) with a src subfolder:
mkdir -p ~/ros2_ws/src
- Navigate to your workspace.
cd ~/ros2_ws
- To build the Workspace, use colcon to build all packages inside src:
colcon build
- Source the setup file to let your shell recognize the newly built packages:
source install/setup.bash
- Add this command to your ~/.bashrc (or equivalent) to source automatically whenever you open a new terminal.
echo "source ~/ros2_ws/install/setup.bash" >> ~/.bashrc

- Now you have a basic ROS2 workspace set up for further development and integration with ArduSimple RTK.
Start Node on ROS 2 to connect to RTK receiver
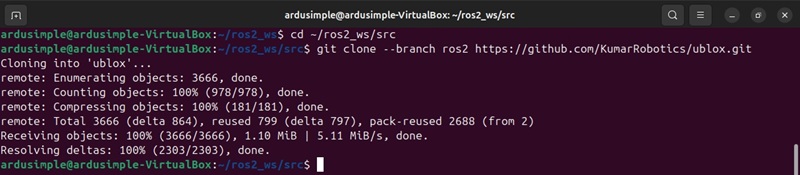
- To clone the u-blox repository to your ROS 2 workspace (~/ros2_ws/src):
     cd ~/ros2_ws/src
git clone --branch ros2 https://github.com/KumarRobotics/ublox.git
- Initiate rosdep and download the latest package dependency definitions.
     sudo rosdep init
rosdep update

- To build u-blox Node, return to the main workspace folder and compile:
     cd ~/ros2_ws
rosdep install --from-paths src --ignore-src -r -y
colcon build
source install/setup.bash
- Now the u-blox Node is available in your ROS2 environment.
- Modify the configuration file to update device paths or parameters as needed (we will use /dev/tty_Ardusimple). The ublox_gps package includes a default configuration file named zed_f9p.yaml. Open the configuration file by command:
nano ~/ros2_ws/src/ublox/ublox_gps/config/zed_f9p.yaml
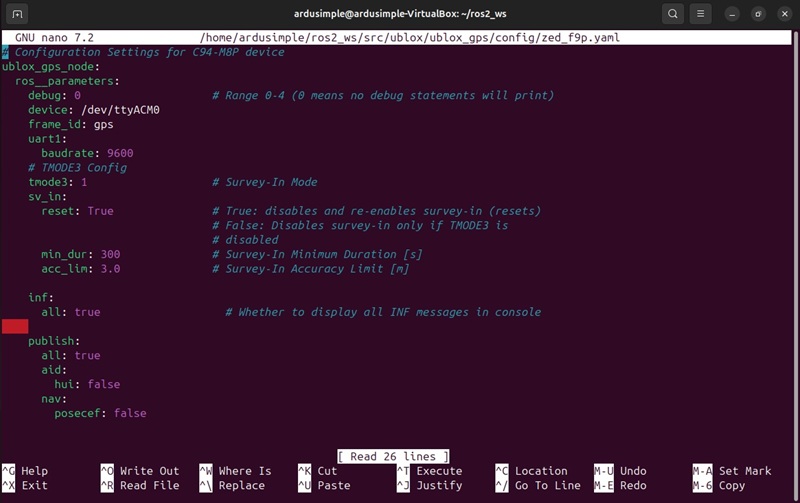
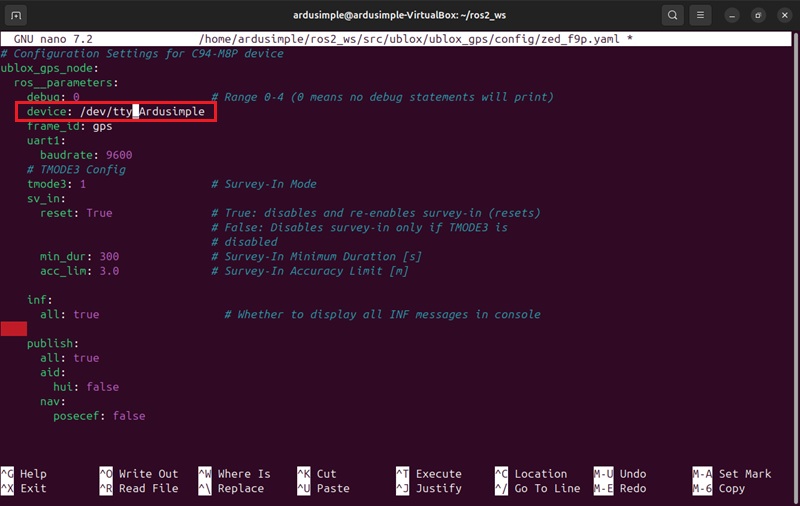
- Modify the configuration file to update device paths or parameters as needed. In our case, set the device path to /dev/tty_Ardusimple.
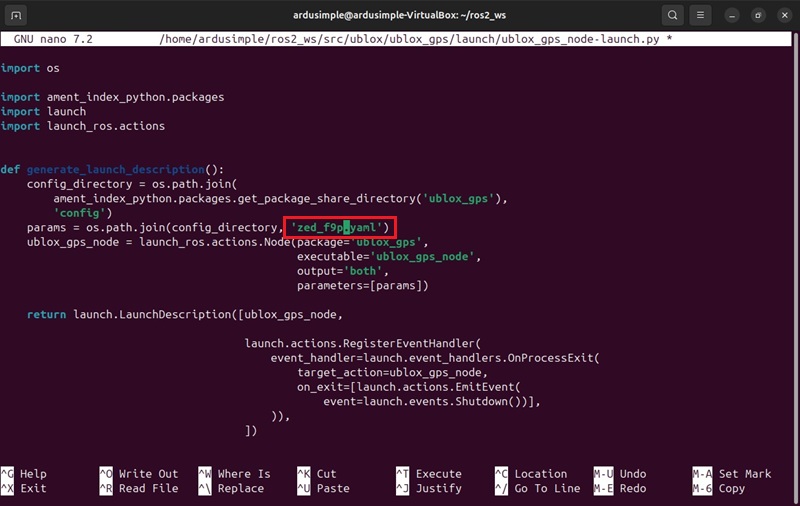
- To configure the node with the zed_f9p.yaml settings, update the launch file. Open the file and add the following line to load the configuration:
nano ~/ros2_ws/src/ublox/ublox_gps/launch/ublox_gps_node-launch.py
- Rebuild the packages. We recommend using a separate package for your custom config and launch files to keep things organized. We’ll discuss that approach later.
     cd ~/ros2_ws
colcon build
source install/setup.bash

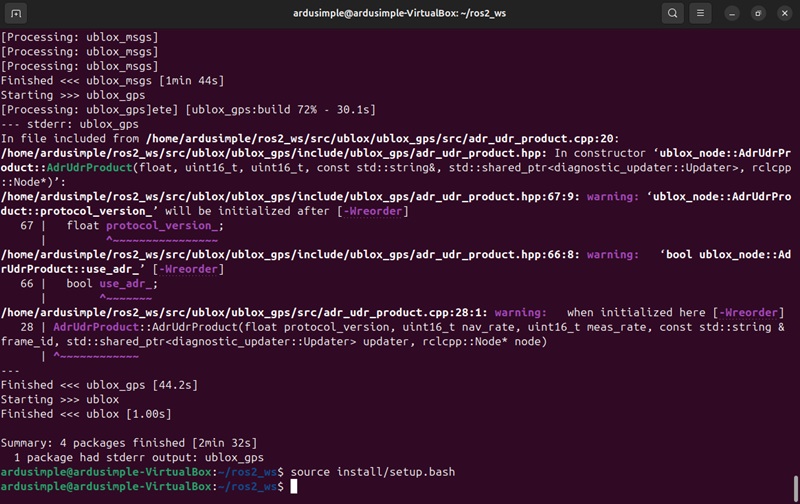
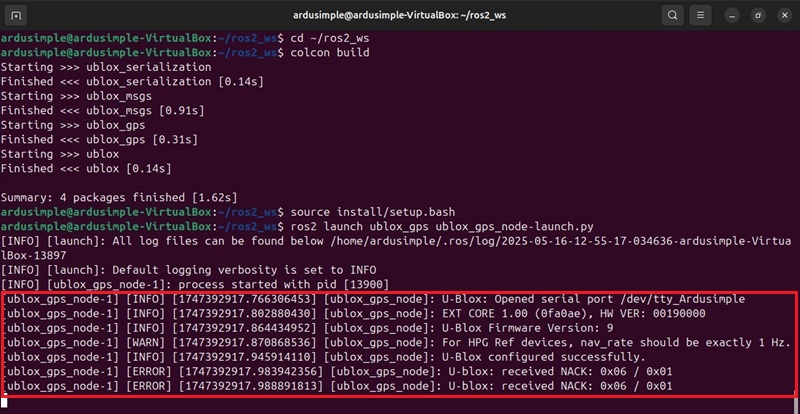
- Launch the GPS node and test the connection:
ros2 launch ublox_gps ublox_gps_node-launch.py
- If everything is configured correctly, the node should begin publishing GPS data from the ArduSimple receiver.
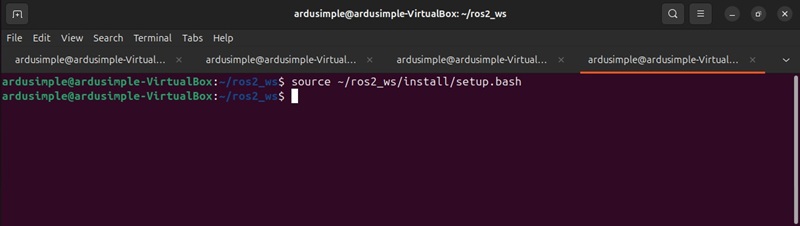
- To avoid stopping the node, open a new Terminal and initialize the workspace using the command below. If this Node is stopped, the u-blox device will no longer publish its topics or provide its services.
source ~/ros2_ws/install/setup.bash
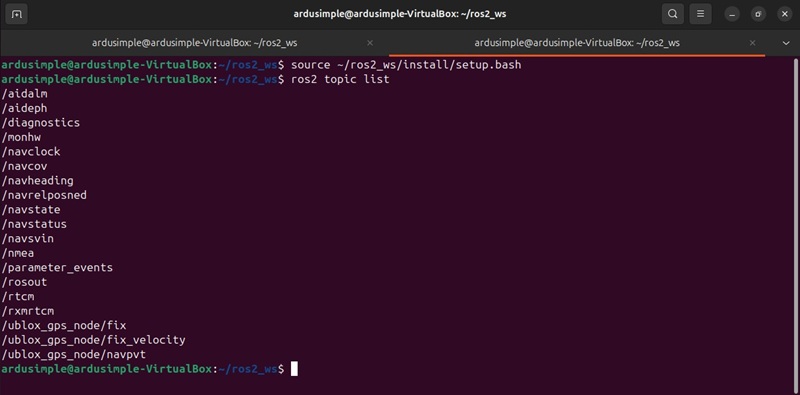
- Run the following command to view available Topics. Look for topics like /ublox_gps_node/fix, which contains GPS data in sensor_msgs/NavSatFix format, etc
ros2 topic list
- Run the command to see GPS data in real time.
ros2 topic echo /ublox_gps_node/fix
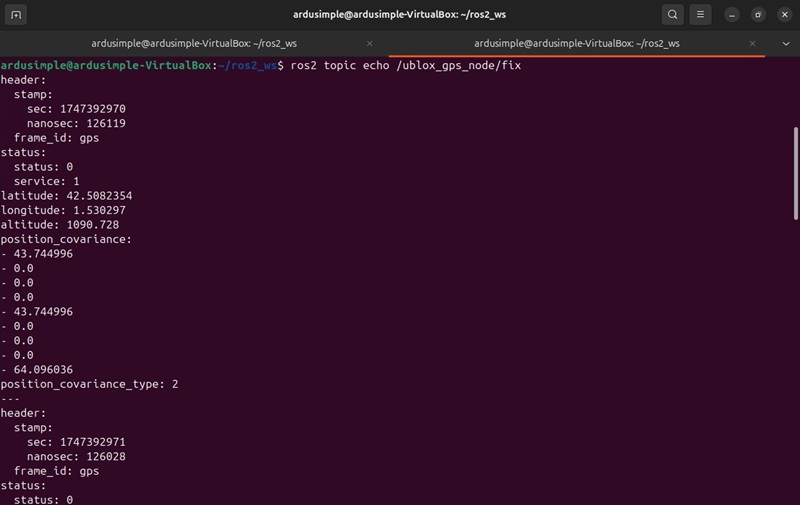
- To stop the stream, press Ctrl + C.
- View the list of available services provided by the Node.
ros2 service list
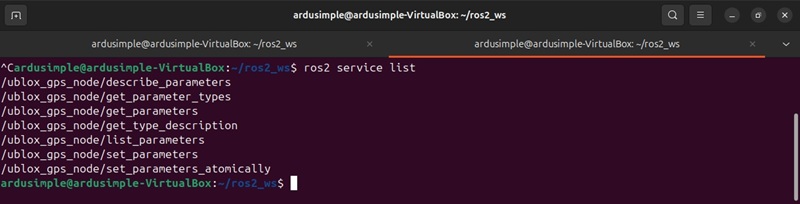
- Now you have have the u-blox ROS 2 Node running and publishing real-time data from your RTK receiver.
Important:- Do not stop the u-blox node. This Node must be running before following steps launching the NTRIP client, since the correction server needs live GPS data to compute and send RTCM corrections.
- The u-blox node must remain active to visualize GPS output using ros2 topic echo, as shown in the previous step.
Start Node on ROS 2 to use NTRIP corrections
Note: Make sure the GPS connection node is already running, as it’s required to transmit correction data.
- Navigate to ROS2 workspace directory and clone the ROS 2 branch.
     cd ~/ros2_ws/src
git clone --branch ros2 https://github.com/LORD-MicroStrain/ntrip_client.git
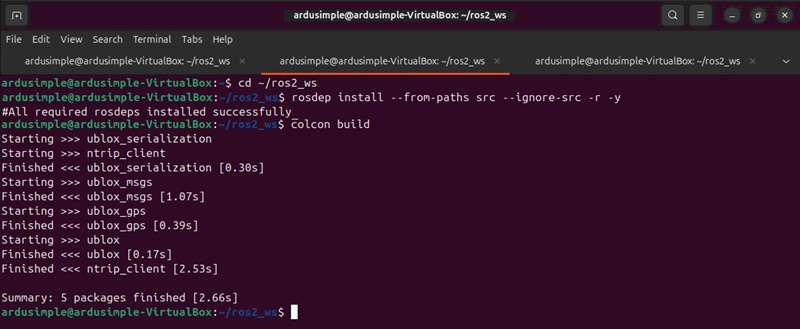
- Return to the workspace root, install any missing dependencies, and build the package
     cd ~/ros2_ws
rosdep install --from-paths src --ignore-src -r -y
colcon build
source install/setup.bash
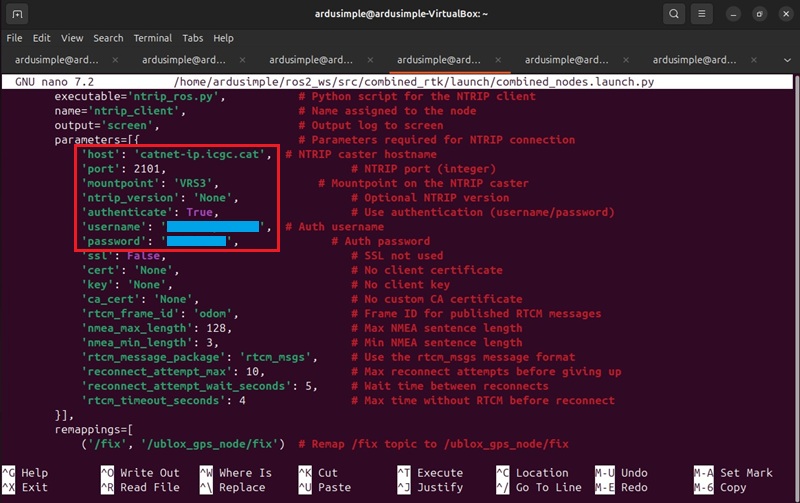
- Open the file ntrip_client_launch.py and scroll down to find the code where NTRIP credentials are set.
nano ~/ros2_ws/src/ntrip_client/launch/ntrip_client_launch.py
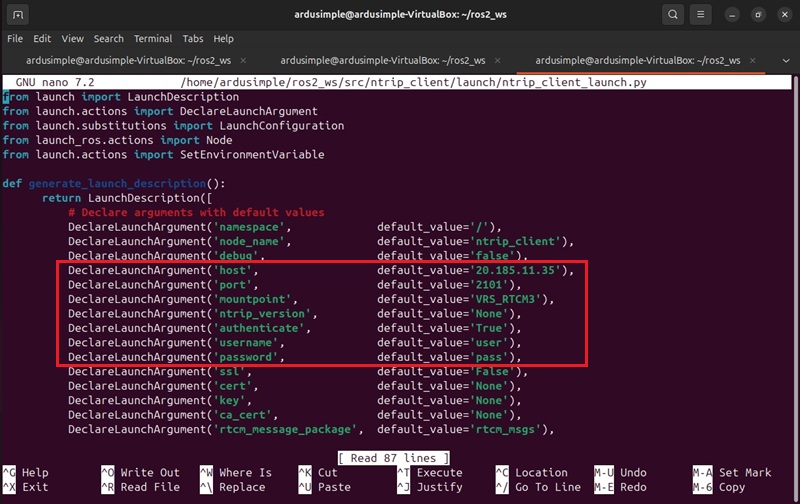
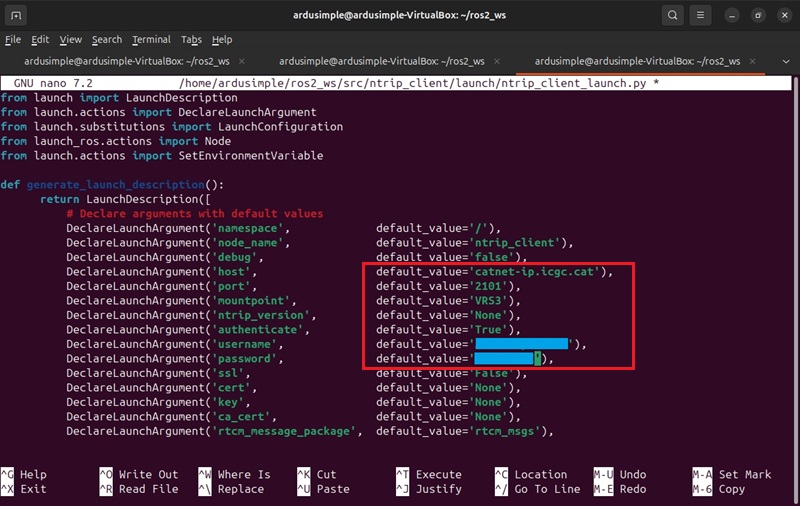
- Update NTRIP parameters such as host, port, username, password, and mountpoint and save the changes in file.
nano ~/ros2_ws/src/ntrip_client/launch/ntrip_client_launch.py
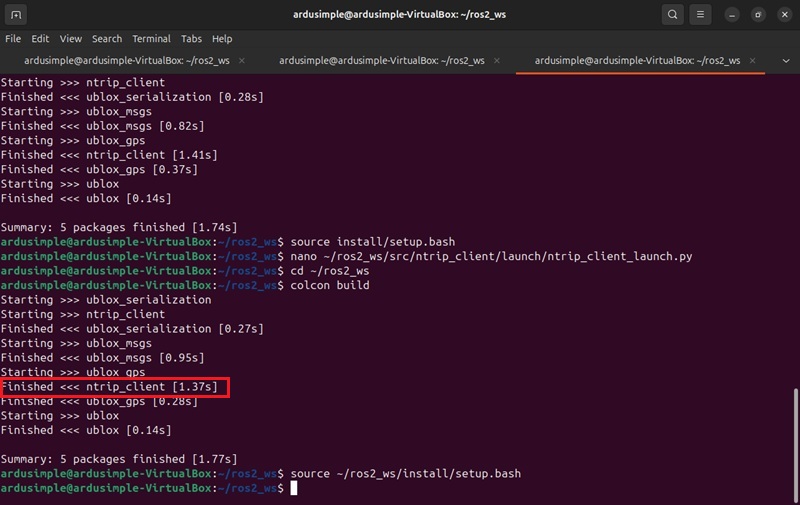
- Rebuild the packages:
     cd ~/ros2_ws
colcon build
source ~/ros2_ws/install/setup.bash
- Launch the Node with your NTRIP parameters to establish a connection to the NTRIP Caster:
ros2 launch ntrip_client ntrip_client_launch.py

- To avoid closing the Node, open a new Terminal and initialize the workspace.
Note: If the Node is stopped, the u-blox device will stop receiving correction data. The u-blox node must be running before launching the NTRIP client, as it provides the necessary GPS data to the correction server. If the u-blox node is stopped, it will no longer publish the required Topics and Services, and rtk receiver will stop receiving correction data.
source ~/ros2_ws/install/setup.bash
- View list of available Topics.
ros2 topic list
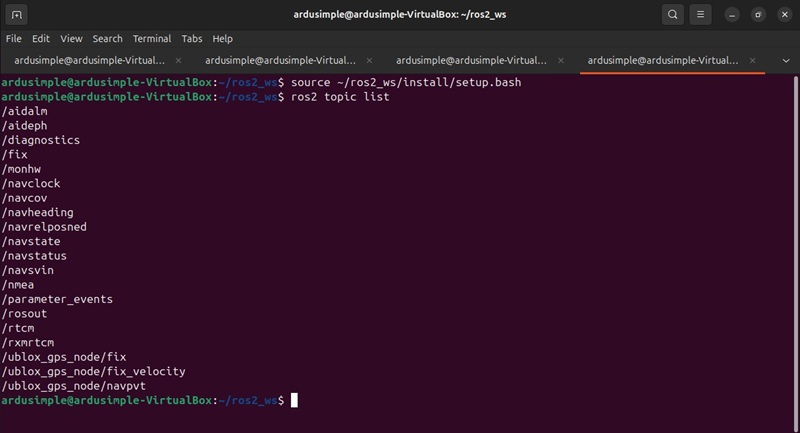
- Key topics you might see:
- /rtcm: Publishes RTCM correction data (either mavros_msgs/RTCM or rtcm_msgs/Message, depending on configuration).
- /nmea: Subscribes to local NMEA sentences, forwarding them to the server.
- /ublox_gps_node/fix: Can also forward global position data if it isn’t already in NMEA format.
- If everything is done correctly, successful, you’ll see the Node publish RTCM corrections on the /rtcm topic. Using ntrip_client Node, you can integrate RTCM correction data into your ROS 2 project to enable precise positioning with RTK receiver.
ros2 topic echo /rtcm
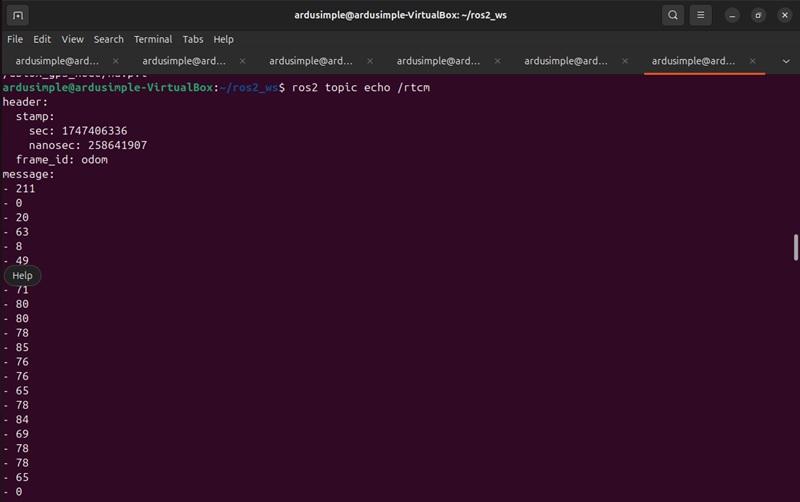
- Using this node, you can integrate RTCM correction data into your ROS 2 project to enable precise positioning with RTK receiver.
Creating a combined launch package
We’ll create a dedicated package that contains a single launch file for running both the ublox_gps node (publishing GPS data) and the ntrip_client node (handling RTK corrections) simultaneously. This approach keeps your workspace organized and makes it easy to start all required nodes with one command.
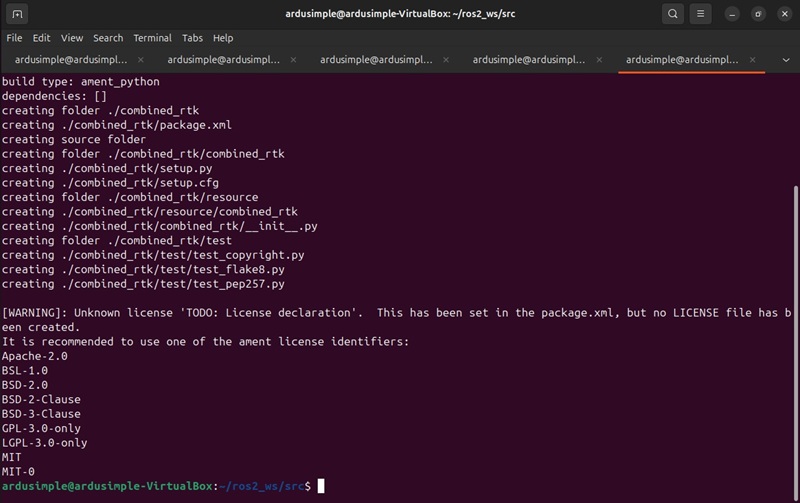
- Open new Terminal, navigate to your ROS2 workspace and create a new package. For a Python-based launch nanofile, run the commands:
     cd ~/ros2_ws/src
ros2 pkg create combined_rtk --build-type ament_python
- Create a launch directory and a Python launch file inside the new package.
     mkdir -p combined_rtk/launch
nano ~/ros2_ws/src/combined_rtk/launch/combined_nodes.launch.py
- Copy the code from the example below and paste it into the file. The code does:
- ublox_gps Node: Publishes raw GPS data from your ArduSimple device.
- ntrip_client Node: Connects to the NTRIP caster/server and publishes RTCM corrections on /rtcm (and can also subscribe to /nmea or /fix if needed).
- Shebang (#!/usr/bin/env python3) – Ensures the file runs as a Python script.
- LaunchDescription – Defines which nodes to start.
- Node parameters – Sets node-specific parameters (e.g., device, host, port, authentication).
     from launch import LaunchDescription
from launch_ros.actions import Node
from launch.actions import SetEnvironmentVariable

def generate_launch_description():
    # ---------------------------------------------
    # Node configuration for ublox_gps
    # ---------------------------------------------
    ublox_node = Node(
        package='ublox_gps',                  # ROS 2 package containing the ublox GPS driver
        executable='ublox_gps_node',          # Executable name for the ublox GPS node
        name='ublox_gps_node',                # Name assigned to the node
        output='screen',                      # Output log to screen
        parameters=[{                         # Node parameters defined inline
            'debug': 0,                       # Debug level (0 = none)
            'device': '/dev/tty_Ardusimple',  # Serial port where GPS is connected
            'frame_id': 'gps',                # Frame ID to tag published GPS messages
            'uart1': {
                'baudrate': 9600              # Baudrate for UART1
            },
            'tmode3': 1,                      # Survey-in mode (TMODE3 = 1)
            'sv_in': {                        # Survey-in configuration
                'reset': True,                # Reset survey-in every startup
                'min_dur': 300,               # Minimum duration for survey-in (seconds)
                'acc_lim': 3.0                # Accuracy limit for survey-in (meters)
            },
            'inf': {
                'all': True                   # Enable all INF messages on console
            },
            'publish': {
                'all': True,                  # Publish all available messages
                'aid': {
                    'hui': False              # Do not publish aiding HUI messages
                },
                'nav': {
                    'posecef': False          # Do not publish NAV-POSECEF messages
                }
            }
        }]
    )

    # ---------------------------------------------
    # Environment variable to control NTRIP client debug
    # ---------------------------------------------
    set_debug_env = SetEnvironmentVariable(
        name='NTRIP_CLIENT_DEBUG',  # Name of the environment variable
        value='false'               # Disable debug output
    )

    # ---------------------------------------------
    # Node configuration for NTRIP client
    # ---------------------------------------------
    ntrip_node = Node(
        package='ntrip_client',              # ROS 2 package containing the NTRIP client
        executable='ntrip_ros.py',           # Python script for the NTRIP client
        name='ntrip_client',                 # Name assigned to the node
        output='screen',                     # Output log to screen
        parameters=[{                        # Parameters required for NTRIP connection
            'host': 'ppntrip.services.u-blox.com',  # NTRIP caster hostname
            'port': 2101,                            # NTRIP port (integer)
            'mountpoint': 'NEAR-RTCM',               # Mountpoint on the NTRIP caster
            'ntrip_version': 'None',                 # Optional NTRIP version
            'authenticate': True,                    # Use authentication (username/password)
            'username': user',  # Auth username
            'password': 'password',              # Auth password
            'ssl': False,                            # SSL not used
            'cert': 'None',                          # No client certificate
            'key': 'None',                           # No client key
            'ca_cert': 'None',                       # No custom CA certificate
            'rtcm_frame_id': 'odom',                 # Frame ID for published RTCM messages
            'nmea_max_length': 128,                  # Max NMEA sentence length
            'nmea_min_length': 3,                    # Min NMEA sentence length
            'rtcm_message_package': 'rtcm_msgs',     # Use the rtcm_msgs message format
            'reconnect_attempt_max': 10,             # Max reconnect attempts before giving up
            'reconnect_attempt_wait_seconds': 5,     # Wait time between reconnects
            'rtcm_timeout_seconds': 4                # Max time without RTCM before reconnect
        }],
        remappings=[
            ('/fix', '/ublox_gps_node/fix')  # Remap /fix topic to /ublox_gps_node/fix
        ]
    )

    # Return the full launch description with all configured actions
    return LaunchDescription([
        set_debug_env,  # Set environment variable for NTRIP debug
        ublox_node,     # Launch ublox GPS node
        ntrip_node      # Launch NTRIP client node
    ])
- Edit the file by inserting your NTRIP credentials (host, post, username, password, mountopoint) and save the file.
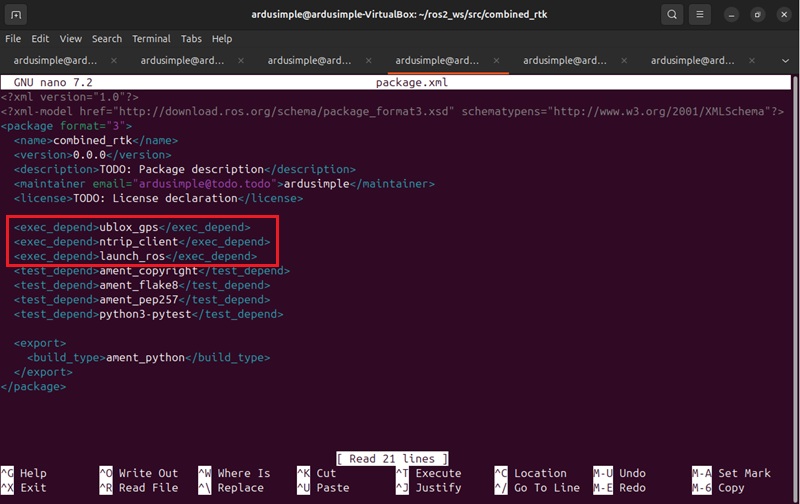
- Open package.xml.
     cd ~/ros2_ws/src/combined_rtk/
nano package.xml

- Insure you have dependencies like ublox_gps, ntrip_client, launch_ros, etc. in your package.xml. If you do not have them, copy them from the code below and past in the file.
     <exec_depend>ublox_gps</exec_depend>
<exec_depend>ntrip_client</exec_depend>
<exec_depend>launch_ros</exec_depend>
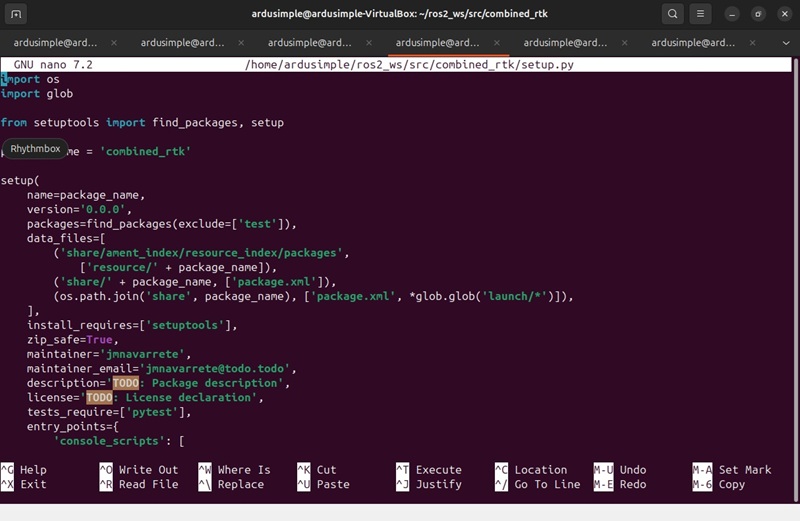
- Open setup.py.
nano ~/ros2_ws/src/combined_rtk/setup.py
- Copy the code below and paste it into the setup.py file to include launch files and dependencies. Close the file and save changes.
     import os
import glob

from setuptools import find_packages, setup

package_name = 'combined_rtk'

setup(
    name=package_name,
    version='0.0.0',
    packages=find_packages(exclude=['test']),
    data_files=[
        ('share/ament_index/resource_index/packages',
            ['resource/' + package_name]),
        ('share/' + package_name, ['package.xml']),
        (os.path.join('share', package_name), ['package.xml', *glob.glob('launch/*')]),
    ],
    install_requires=['setuptools'],
    zip_safe=True,
    maintainer='jmnavarrete',
    maintainer_email='jmnavarrete@todo.todo',
    description='TODO: Package description',
    license='TODO: License declaration',
    tests_require=['pytest'],
    entry_points={
        'console_scripts': [
        ],
    },
)
- Make the Launch File Executable.
     cd ~/ros2_ws/src
chmod +x combined_rtk/launch/combined_nodes.launch.py

- Return to your workspace root, build your new package, and source the setup file:
     cd ~/ros2_ws
colcon build
source install/setup.bash
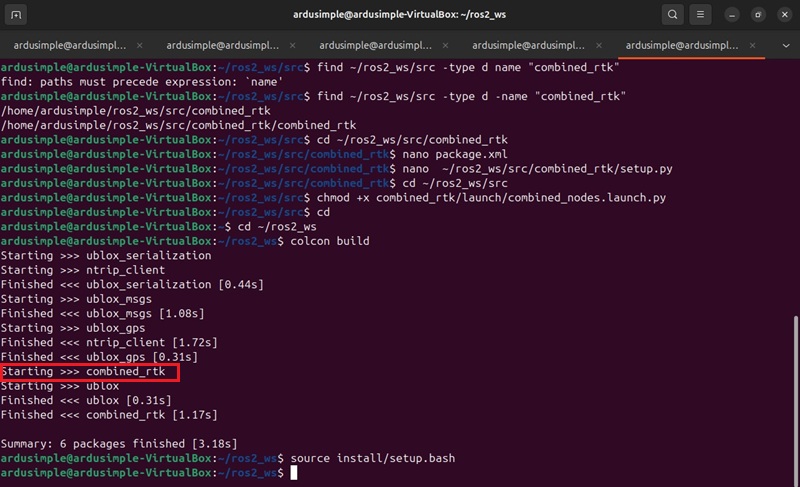
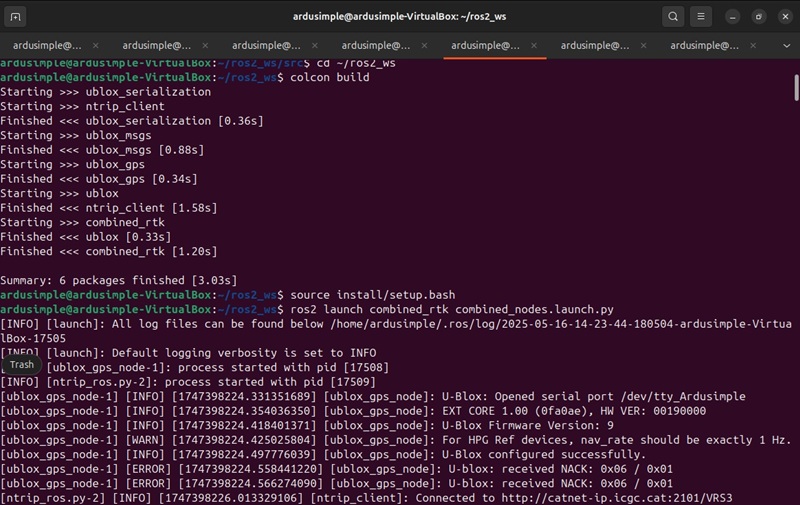
- Launch both the ublox_gps and ntrip_client Nodes with one command:
ros2 launch combined_rtk combined_nodes.launch.py
- You should see logs from both nodes in your terminal, indicating that:
- ublox_gps is reading GPS data from the specified device (e.g., /dev/tty_Ardusimple).
- ntrip_client is connected to your NTRIP server and publishing RTCM corrections on /rtcm (and possibly subscribing to /nmea if configured).
- To interact with the launched Nodes, do not stop the stream. Open a new Terminal and initialize the workspace.
source ~/ros2_ws/install/setup.bash
- To verify Topics, Services, Device Status, open a new Terminal and initialize:
source install/setup.bash
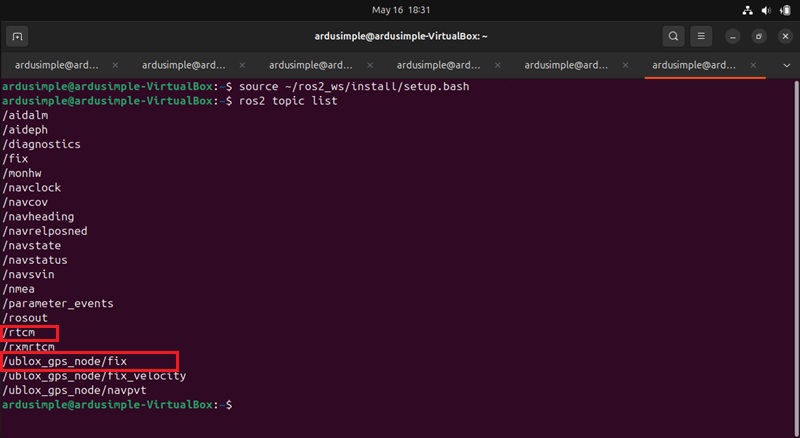
- See the list of Topics.
ros2 topic list
- You will be able to see /ublox_gps_node/fix, /rtcm, or others.
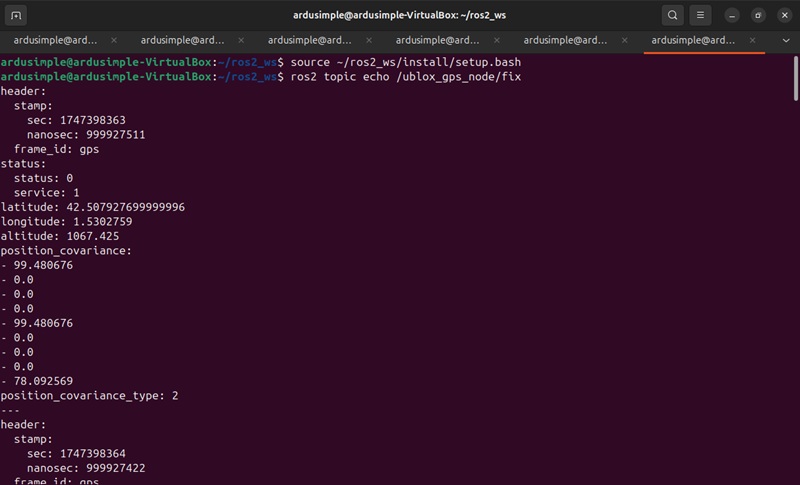
- See Echo of GPS Data.
ros2 topic echo /ublox_gps_node/fix
- This shows real-time GPS data. To stop the stream press Ctrl + C.
- The ublox_gps Node publishes diagnostics on a topic like /diagnostics. To check Diagnostic Information:
ros2 topic echo /diagnostics
It includes status messages such as horizontal accuracy, vertical accuracy and “3D fix” when the receiver has a valid position, or “fix not ok” when the GPS is not properly fixed yet.

- Key tips for checking fix status:
- Monitor /ublox_gps_node/fix in NavSatFix messages (status.status field) or diagnostic messages for more detailed text-based statuses.
- The /diagnostics topic often provides a readable summary like “3D fix”.
- Use /ublox/navpvt to get detailed information:
- The fix_type field should be 3 for 3D fix.
- The flags field should indicate that corrections are being used.
- The flags2 field includes the RTK status: 67 RTK Float, 128 RTK Fix. If the value is significantly lower, it likely means no RTK corrections are being applied.
- Ensure your antenna has a clear view of the sky and your NTRIP caster credentials are correct to achieve a stable RTK Fix.
Finally, you want to integrate both GPS data and RTCM corrections simultaneously. To do that, You need to have both nodes running at the same time. Here’s how it works:
ublox_gps node
Publishes raw GNSS fixes on the
/fixtopic.Exposes an interface (the
rtcm_inputparameter) so that incoming RTCM messages can be sent to the u-blox device over ROS 2.
ntrip_client node
Connects to your NTRIP caster and publishes RTCM correction messages on the
/rtcmtopic.These messages must then be forwarded into the u-blox receiver via
/rtcm➔rtcm_input.
Although the tutorial explains each step separately, to show you how to launch each node and verify that data is being published, it does not automatically link them together. In practice, you should launch both stacks together, for example:
# Terminal 1: run the ublox driver
ros2 launch ublox_gps ublox_gps_node-launch.py# Terminal 2: run the NTRIP client
ros2 launch ntrip_client ntrip_client-launch.pyThis way, the RTCM corrections flowing on
/rtcmare immediately picked up by the ublox driver and sent to the ZED-F9P device, which in turn will publish a true RTK-corrected/fix.
If you made it here, congratulations! This is probably one of our longest tutorials 🙂
If you want to follow this tutorial, we have all the products in stock and ready to be shipped:


